
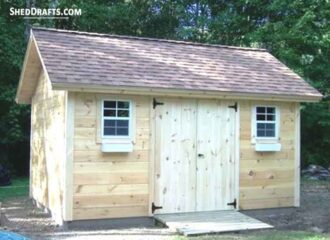
8×12 Gable Garden Shed Plans
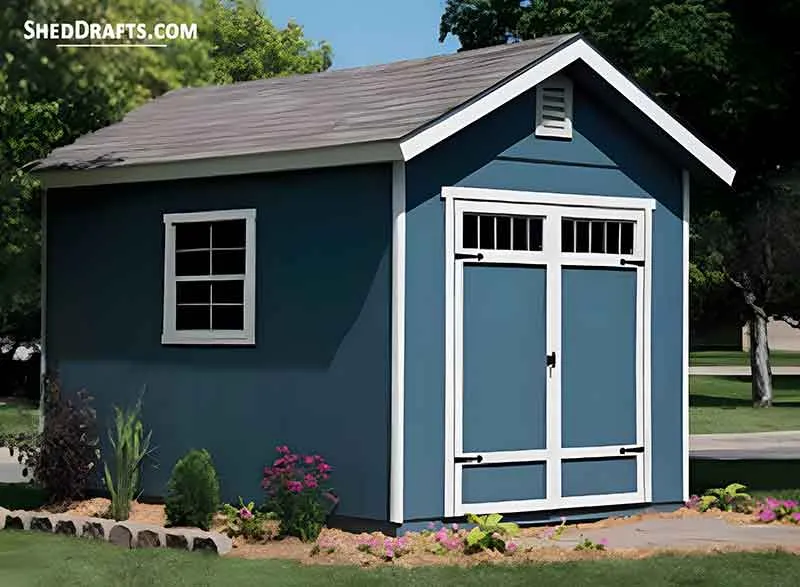
If you want some 8×12 garden shed blueprints for constructing a wooden gable shed in your backyard, then here are some detailed technical drawings that can help you. This specific design can be customized in several ways.
Take the window placement. The blueprints show a nice side-wall slider that provides natural cross-ventilation.
Swap that single window for a pair of insulated double-hungs, toss some Roxul in the walls, and you’ve got the perfect backyard podcast studio or home office.
I’ve seen guys add a small loft joist system to this exact plan, turning the top third into a long-term archives area while the bottom stays a functional woodshop.
One client even scaled the door width down to a single swinging carriage door and transformed the whole thing into a high-end she-shed potting station with a wraparound cedar bench.
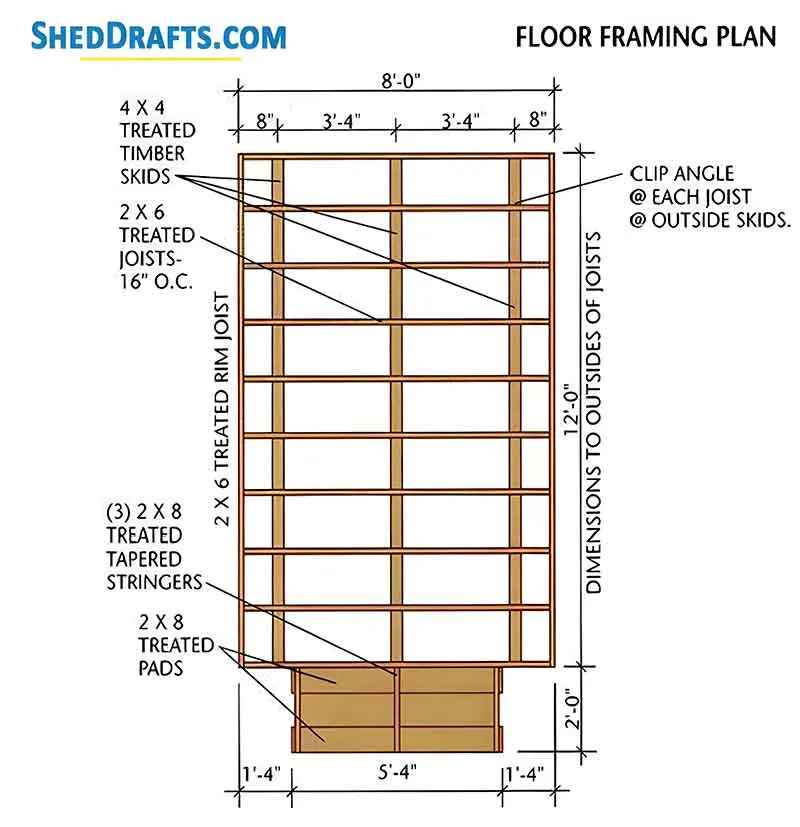
8x12 Wooden Shed Plans For Building Floor Frame & Foundation
Clean out the area for building the shed and excavate site for laying foundation.
Lay down a 4-inch-deep cover of gravel and press it down to make it compact, flat and even.
Craft three 4×4 skids from 12 feet long pieces of lumber.
Place skids on the gravel bed and level them as shown in flooring diagrams.
Create ten 2×6 joists of 93-inch length and two 12 feet long joists.
Refer to the 8×12 shed building blueprints and trace the layout of joists over rim joists.
Use 16d galvanized nails to secure the frame and confirm there is no crowning in any joist.
Setup floor frame over skids and check diagonal length to confirm it is accurately square.
Attach clip angles made of metal to every joist on the outer two skids using galvanized nails.
Each joist must be toe-nailed with the skid in the center.
Attach tongue & groove floor sheathing to every frame corner.
Drive nails at 6 inch distances along the edges of the frame and at 12 inch distances within the frame.
Connect joists to outer skids with angles.
Use hanger nails to fasten joists and 16d galvanized nails to secure skids.
Blueprints For Crafting Wall Frame
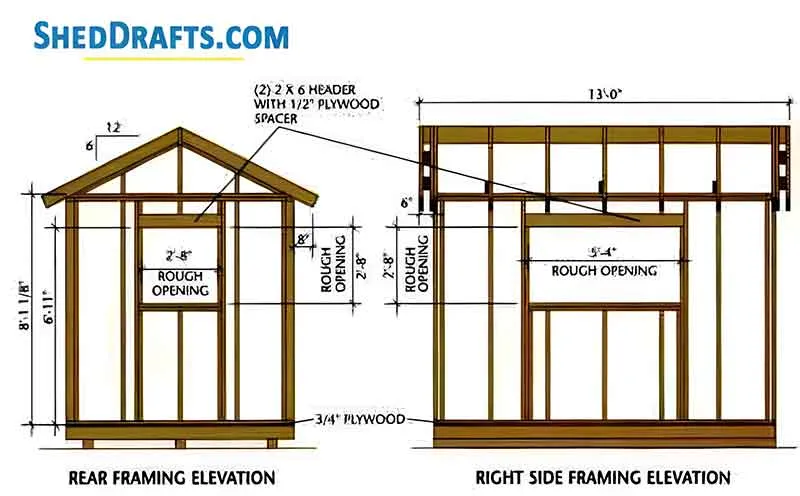
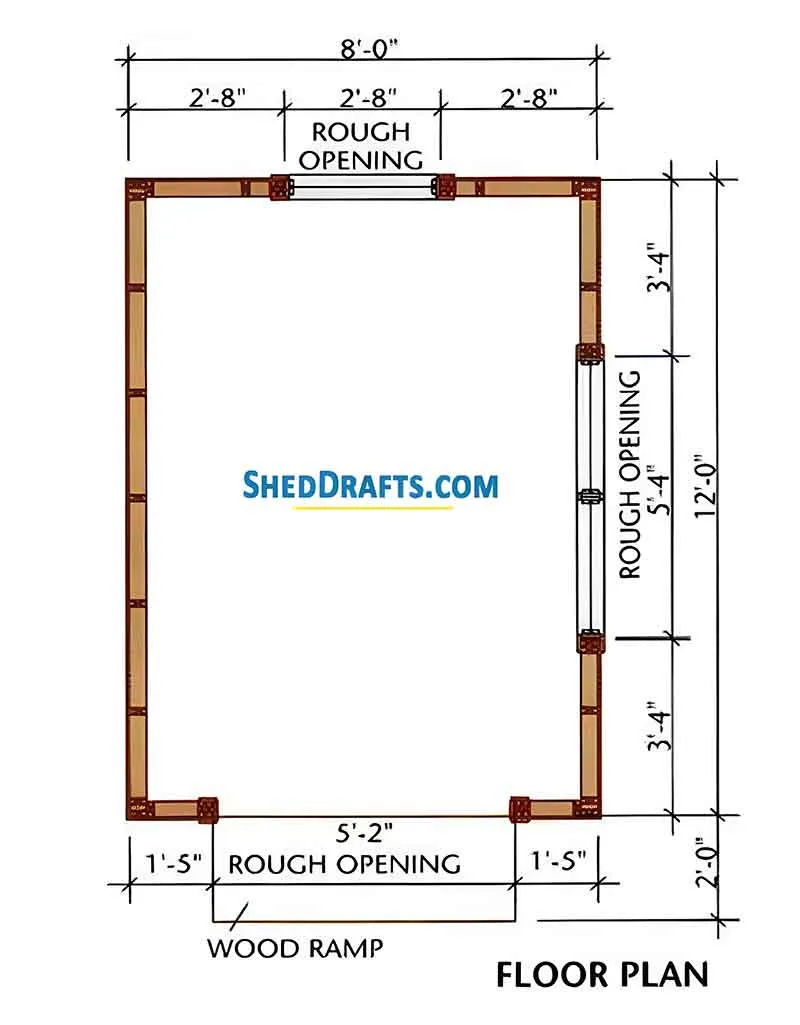
Draw lines using chalk on the floor to mark the positions of wall frame as shown in the 8×12 shed crafting plans above.
Craft four 2×4 timber pieces of 12 feet length for building side wall plates and make four 89-inch-long timber pieces for use as front and back wall plates.
Look at the gable shed blueprints and now trace out stud layout on these wall plates.
Craft six 81-inch long jack studs and twenty-seven studs of 92 inches’ length.
Cut out three 2×6 headers of half-inch thickness from plywood.
First header must be 65-inch-long and will be used for door opening, second is of 35-inch length and used in back window and third one used in right window will be 67-inch long.
Craft the wall frames and raise them one by one into position.
Nail at corner studs to fasten neighboring walls together.
Lastly fasten the top plates.
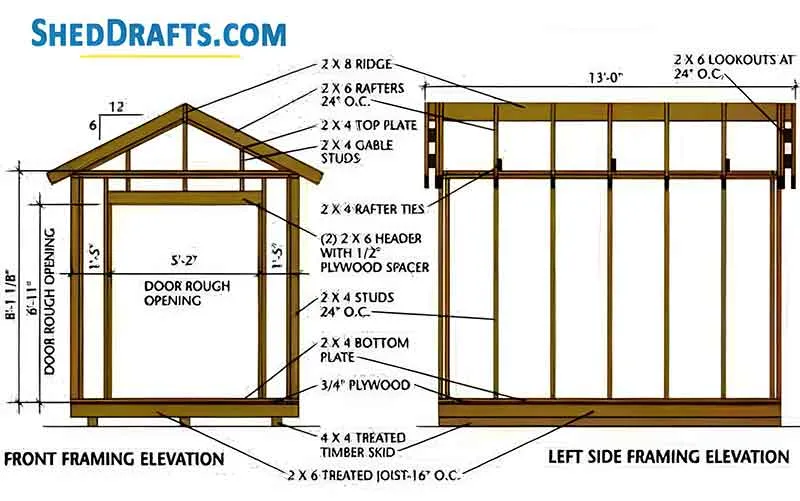
Crafting The Roof Frame & Gable Overhangs
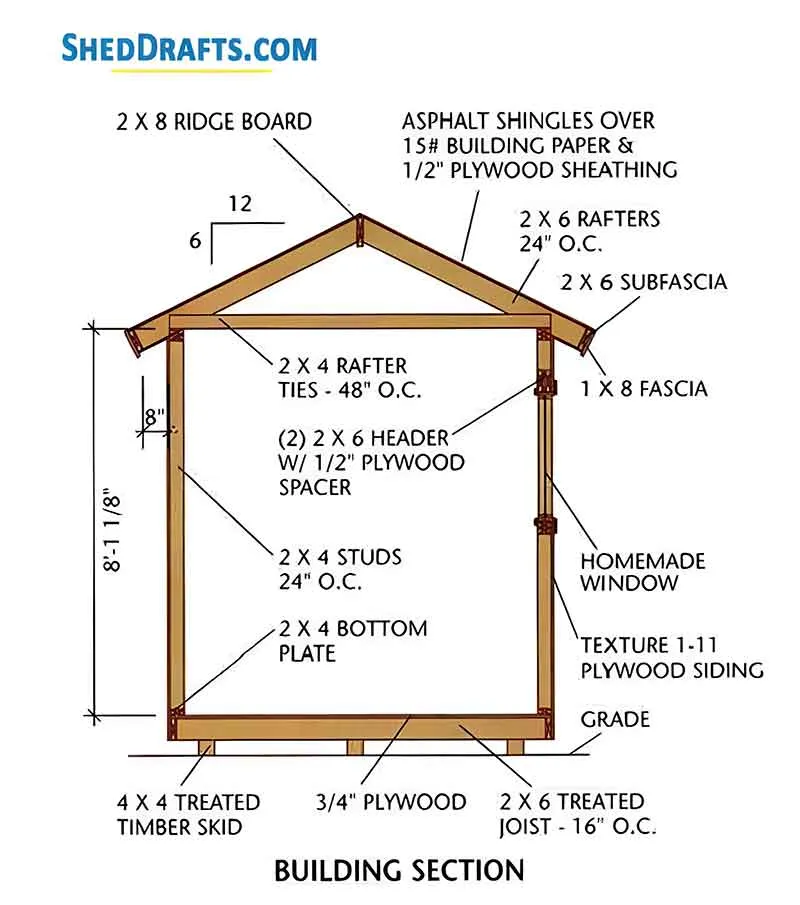
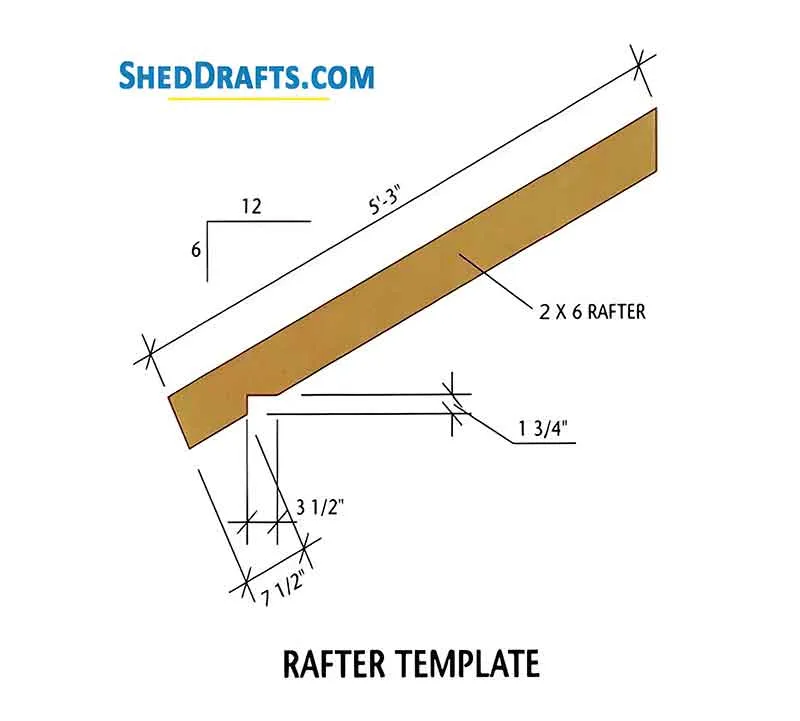
Looking at the rafter template diagrams, create two pattern rafters.
Use a 2×8 spacer block to fasten the pattern rafters and craft 12 more rafters using them as template.
Construct eight gable overhang rafters with no bird’s mouth cuts.
Create a 13 feet long piece of 2×8 lumber for the ridge board.
Draw the layout for rafters over the ridge board and top plates keeping 16 inch OC spacing.
Keep exterior boundaries of outward rafters at a distance of 6 inches from ridge board.
Secure the wall connection and rafters using iron anchors.
Craft three 8 feet long rafter ties using 2×4 lumber.
Cut their upper exterior corners to prevent them from extending beyond the rafters.
Refer to the framing elevations diagram and position one tie besides each rafter pair.
Use three galvanized nails to secure each rafter with its tie and then toenail the upper wall plate with every tie using two nails.
Construct each gable wall plate sufficiently long so that it can reach from ridge to wall plate accurately.
Secure each plate so that its outer boundary is level with the external rafters.
Refer to the elevation diagrams and fasten the gable studs.
Attach lower ends of every common rafter with metal anchors to the wall plates.
Secure outer common rafters to inner overhang rafters and affix lookouts to them.
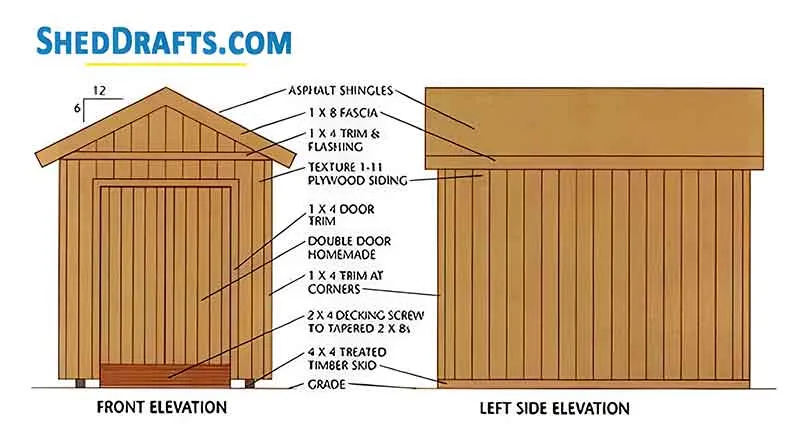
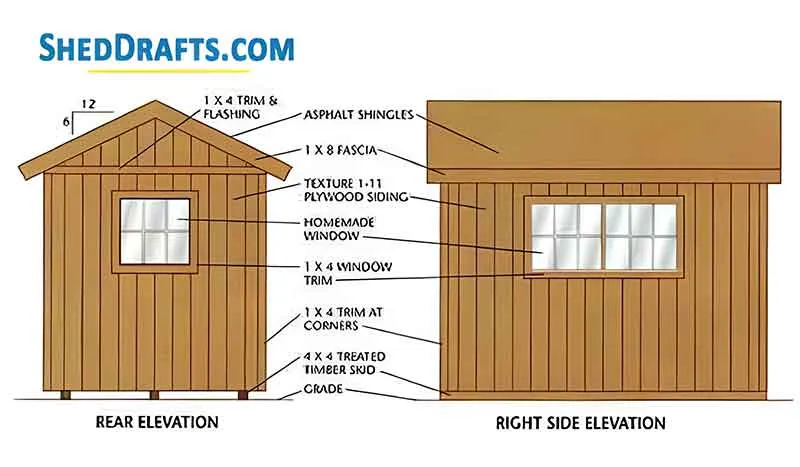
Setting Up Sheathing, Fascia & Roofing
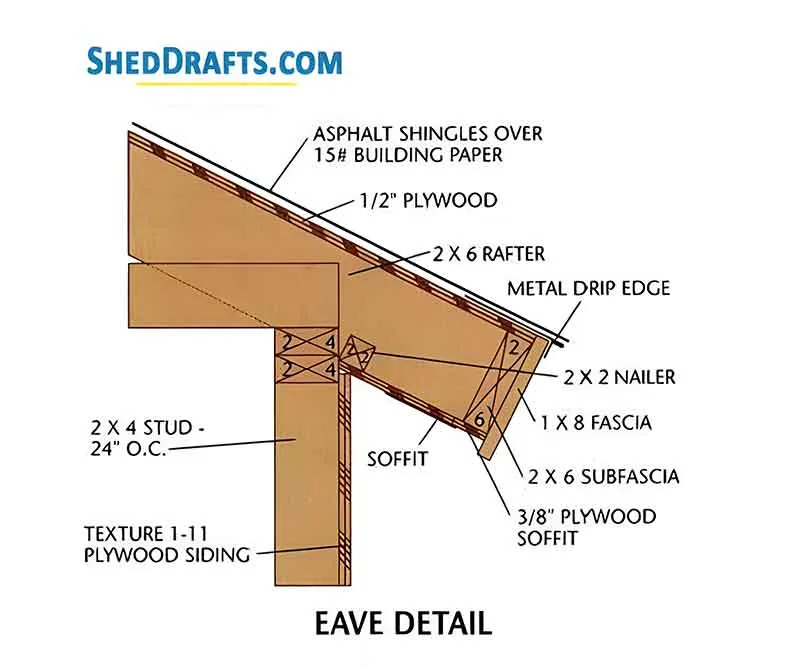
Refer to eave details section of blueprints to craft and install 2×6 sub-fascia over the eaves.
Attach bottom edges of sub-fascia level with lower rafters and upper edges level with overhang rafters using 16d nails.
Install fascia made from 1×8 boards along eaves about 0.5 inch over gable overhang rafters and nail it level to the sheathing.
Fasten 8d nails every 6 inches along edge of plywood sheathing starting at bottom roof corner.
Attach building paper over the plywood sheathing along eaves and then secure drip edges over gable parts over this paper.
Starting from eave edge, install asphalt shingles.
After installing fascia, you can secure the roof sheathing.
Cut soffit panels so that they attach between wall plates and fascia.
Fix the panels to rafters, sub-fascia and nailers.
Instructions For Fitting the Siding & Soffits
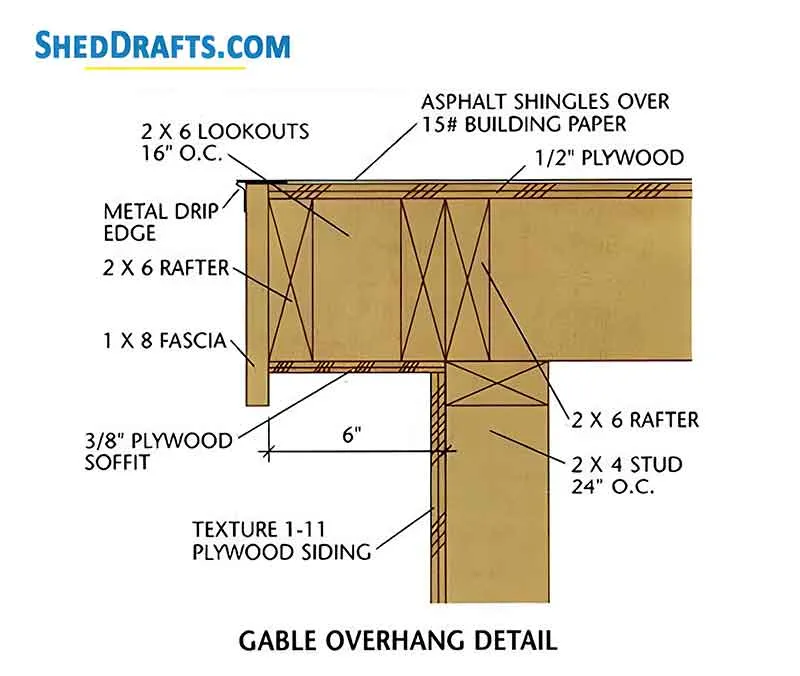
Refer to eave details section of the 8×12 garden shed diagrams and craft 12 nailers using 2×2 lumber for attaching across two rafters.
Attach these between rafters with galvanized nails.
Cut soffit panels from plywood and make sure it attaches accurately from fascia to wall frame.
Use box nails to fasten soffits to rafters.
Create four holes that will serve as vents for soffits.
Place one vent across each shed side, over eaves, and over each rafter bay.
Nail the vents and siding, and secure siding’s upper boundary with the soffits.
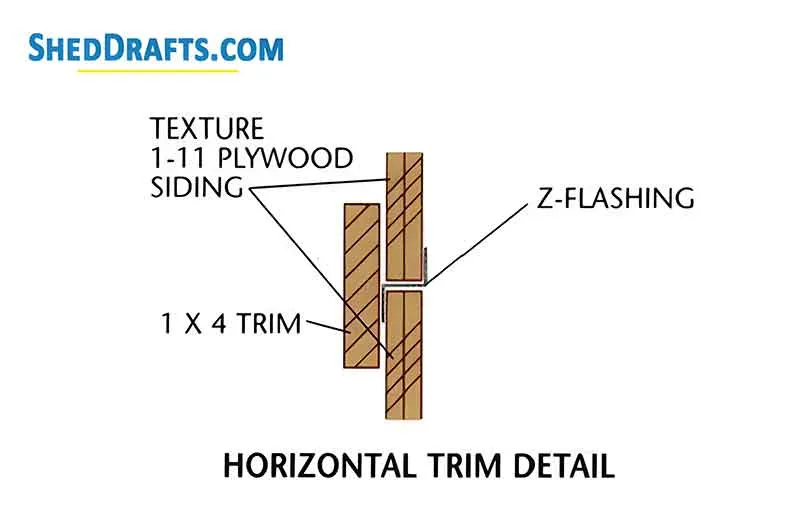
Across the upper gable ends of siding, install Z-flashing.
Use 4×9 siding sheets to overlay the floor framing.
Plans For Making The Doors
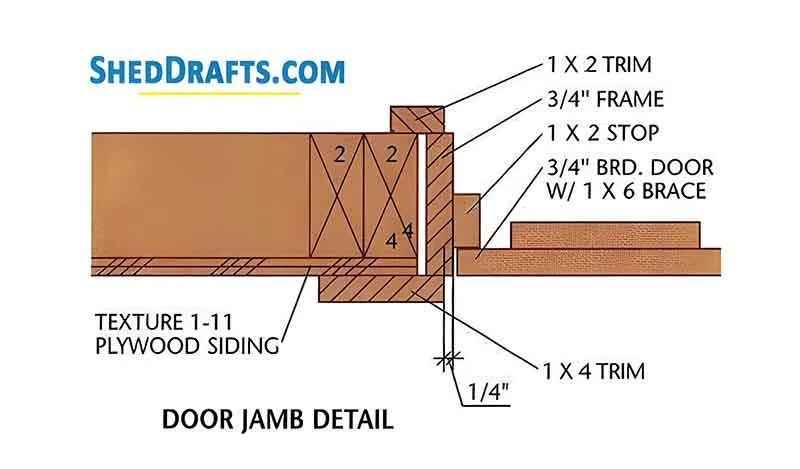
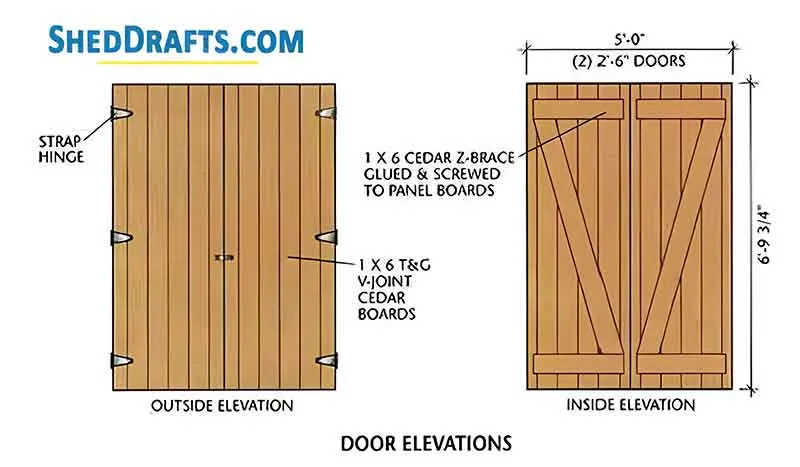
Craft the door’s bottom plate from the space for the door carved into the wall.
Create timber pieces of 0.75 x 4.5 for crafting door frame.
Use 81.875-inch-long timber for constructing side jambs and 61.25-inch-long lumber for crafting the head jamb.
Fasten side jambs to the head jamb using 2.5 inch screws.
Screw 1×2 stops on inner side of jambs.
Install stops 2.25 inch from door frame’s outer boundary or inner boundary depending on if it is going to swing inward or outward.
Install door frame inside wall opening using shims and nails.
Confirm that door frame is square and level.
Create 81.75-inch-long, 12 tongue & groove boards from 1×6 lumber.
Secure six wood boards level to each other and trim the two end boards for crafting each door.
Refer to door elevation details in the 8×12 shed construction plans and craft Z boards for bracing the door.
Place doors on a level floor and attach brace boards to them using adhesive and screws.
Install hinges and hang doors in the frame using shims for keeping space between the door and frame.
Attach flashing and secure siding on the doors using nails.
Nail 1×4 trims to door and shave shims to make them square.
Secure frames for windows into wall openings and install 2×4 mullions inside side windows.
Windows For The Backyard Shed
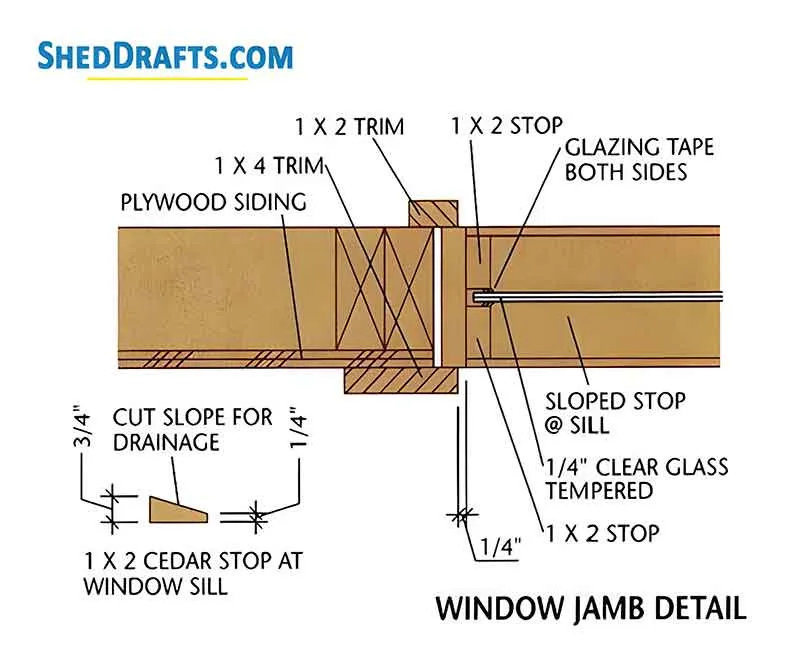
Create a rectangular window frame using 1 x 4 lumber with length and breadth half an inch lesser than the opening in the wall frame.
Secure the window frame to wall frame using metal deck screws.
Craft and install a mullion made from 2×4 timber inside the side window frames.
Install all windows frames level and square along with shims.
Check that jambs are accurately level and nail down the frame.
Refer to window jamb details section of our garden shed diagrams and craft a bevel on exterior sill stops.
Install outer stops and glass along with glazing tape.
Nail window trim and corner trims as shown in the window elevations diagram.
Seal off joints near door and window trim and where it touches the siding using caulk.
Creating A Ramp For Easy Access
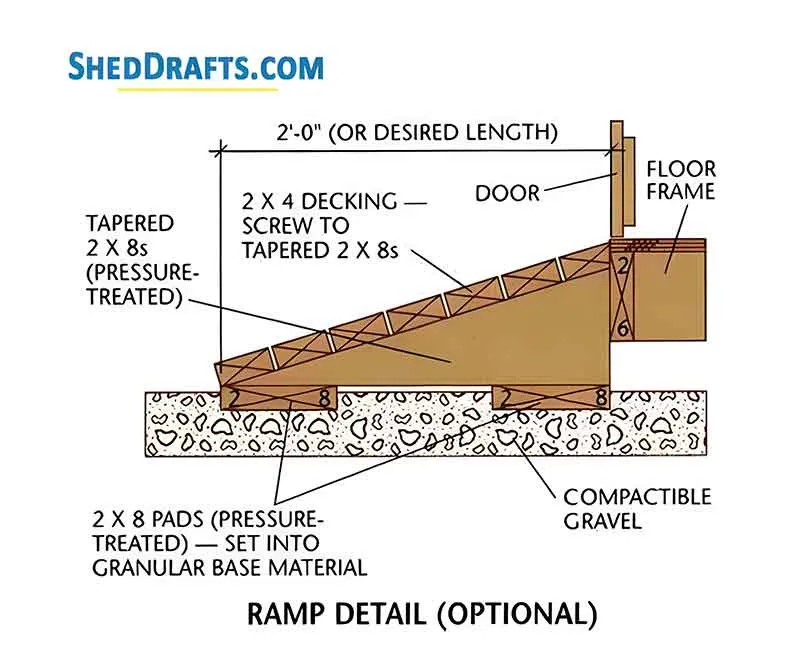
Chalk out the boundaries of the ramp on ground.
Craft two 2×8 pad boards to frame the entire ramp width.
Height of the tapered stringers will be two inches lesser than the maximum ramp height.
Calculate stringer length using the chalk marks you made on the ground.
Include an additional 1.5-inch deck thickness in the calculation.
Use 2×8 lumber for crafting the tapers stringers.
You will need 2 stringers for ends and one stringer every 16 inches.
Nail the lower face of each pad to stringers.
Deck the ramp with 2×4 boards made from pressure-treated lumber.
Position the ramp near the shed and use screws to fasten it to the upper board and end stringers.
Materials List
Foundation
1.4 cubic yard of compactible gravel for drainage material
3 pieces of 12′ long 4 × 4 treated timbers for skids
Floor Framing
2 pieces of 12′ long 2 × 6 pressure-treated lumber for rim joists
10 pieces of 8′ long 2 × 6 pressure-treated lumber for joists
3 sheets of 4 × 8′ 3/4″ tongue-and-groove exterior-grade plywood for floor sheathing
20 pieces of 3″ × 3″ × 3″ × 16-gauge galvanized joist clip angles
Wall Framing
2 pieces of 12′ long, 1 piece of 8′ long, and 4 additional pieces of 12′ long 2 × 4 lumber for bottom plates
8 pieces of 8′ long 2 × 4 lumber for top plates
40 pieces of 92 5/8″ long 2 × 4 lumber for studs
2 pieces of 10′ long 2 × 6 lumber for headers
6 pieces of 9′ long and 1 piece of 6′ long 1/2″ plywood cut to 5 1/2″ wide for header spacers
Gable Wall Framing
2 pieces of 8′ long 2 × 4 lumber for top plates
5 pieces of 8′ long 2 × 4 lumber for studs
Roof Framing
22 pieces of 6′ long 2 × 6 lumber for rafters
10 Simpson H1 metal anchors with nails for securing rafters
3 pieces of 6′ long 2 × 4 lumber for rafter ties
1 piece of 14′ long 2 × 8 lumber for the ridge board
1 piece of 8′ long and 1 piece of 10′ long 2 × 6 lumber for lookouts
10′ long 2 × 6 lumber for subfascia
3 pieces of 8′ long 2 × 2 lumber for soffit nailers
Exterior Finishes
10 sheets of 4 × 9′ 5/8″ texture 1-11 plywood for siding
Space grooves at 8″ on center
2 pieces of 8′ long galvanized 18-gauge Z-flashing
Wall
10 pieces of 10′ long 1 × 4 S4S cedar for corner trim
8 pieces of 8′ long 1 × 8 S4S cedar for fascia
2 sheets of 4 × 8′ 3/8″ cedar or fir plywood for soffits
4 soffit vents measuring 4 × 12″ with a louver and bug screen
6 linear feet of galvanized 18-gauge flashing for door and window trim
Roofing
6 sheets of 4 × 8′ 1/2″ exterior-grade plywood for roof sheathing
150 square feet of asphalt shingles with a minimum of 250 per square
250 square feet of 15 lb building paper
2 pieces of 14′ long and 4 pieces of 6′ long galvanized metal for drip edge
2 roof vents if desired
Door
3/4 × 4 1/4″ (actual) S4S cedar
2 pieces of 8′ long and 3 pieces of 6′ long 2 × 4 lumber for the frame
6 pieces of 6′ long 1 × 2 S4S cedar for stops
1 piece of 8′ long 1 × 6 T&G V-joint 5/4 S4S cedar for panel material
4 pieces of 6′ long 1 × 6 S4S cedar for Z-brace construction
1 tube of adhesive
3 pieces of 6′ long 1 × 4 S4S cedar for exterior trim
6 pieces of 6′ long 1 × 2 S4S cedar for optional interior trim
6 exterior strap hinges with screws
Windows
3/4 × 4 1/4″ (actual) S4S cedar
5 pieces of 6′ long 1 × 4 S4S cedar for frames
1 piece of 3′ long 2 × 4 S4S cedar for the mullion
10 pieces of 6′ long 1 × 2 S4S cedar for stops
30 linear feet of glazing tape
3 pieces of 1/4″ clear tempered glass, field measured
3 pieces of 8′ long 1 × 4 S4S cedar for optional window muntins
5 pieces of 8′ long 1 × 4 S4S cedar for exterior trim
5 pieces of 8′ long 1 × 2 S4S cedar for optional interior trim
Ramp (optional)
2 pieces of 6′ long 2 × 8 pressure-treated lumber for pads
1 piece of 6′ long 2 × 8 pressure-treated lumber for stringers
7 pieces of 6′ long 2 × 4 pressure-treated lumber for decking
Fasteners
16 lbs. of 16d common nails
1 lb. of 10d common nails
1 lb. of 10d galvanized casing nails
1/2 lb. of 8d common nails
3 lbs. of 8d box nails
1 1/2 lbs. of 9d galvanized box nails
7 lbs. of 6d galvanized finish nails
1/4 lb. of 3d galvanized box nails
2 lbs. of 2 1/2″ roofing nails
80 pieces of 1 1/2″ joist hanger nails
70 pieces of 1 1/4″ wood screws
12 pieces of 3 1/2″ deck screws
50 pieces of 3″ deck screws
40 pieces of 2 1/2″ deck screws
30 pieces of 1 1/4″ deck screws
1 tube of silicone latex caulk


Framing-to-Finish Roadmap: DIY Guides For Every Step of The Build


