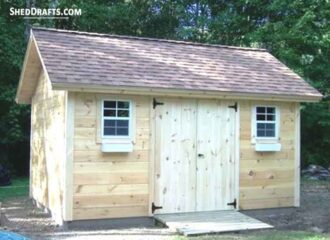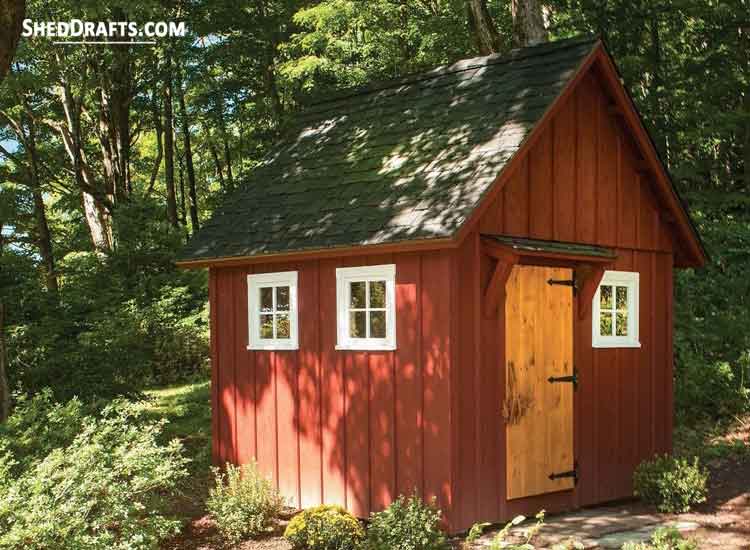
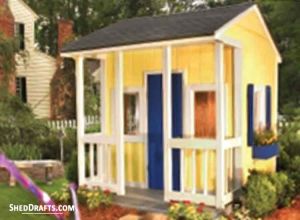
A fantastic garden utility shed can be built on your yard using these 10×10 board-and-batten shed plans and oak planks.
It is vital to contemplate the land where you’ll be setting up the structure and its measurements when you purchase materials for development.
Check with your local construction department in case you must obtain permission so that you can start construction.
You could include accessories like hangers, electricity and even a workbench in your outbuilding depending on your unique requirements.
Check size of diagonals just after creating the wall framework to be sure it is properly square.
This beautiful, perfect-sized storage shed has a rustic look and is designed with simple and modern construction techniques.
10×10 Board-And-Batten Storage Shed Designing Plans Explaining 3D Building Layout
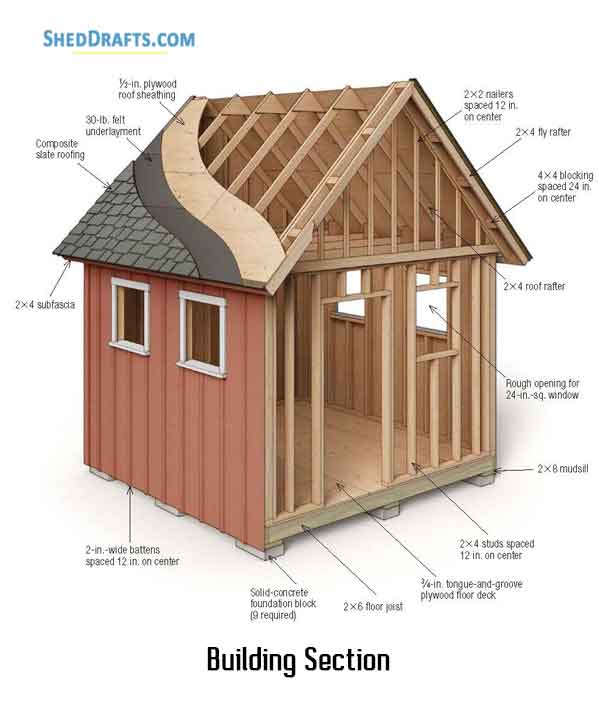
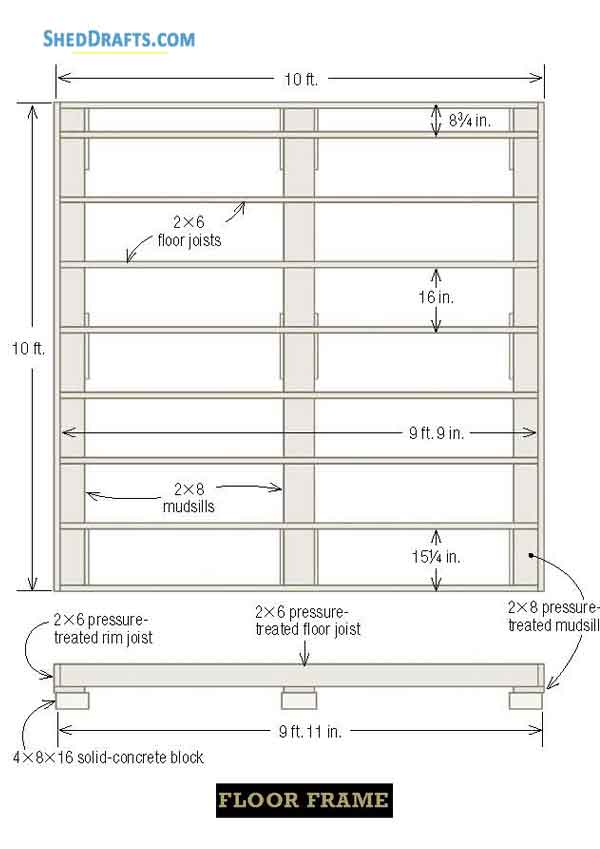
Blueprints For Foundation Design And Floor Framing
Foundation
Since the footprint of this shed is only 100 sq. feet, we used an on-grade foundation.
That saved us the trouble of digging down to the frost line.
However, building codes vary widely across the country, so be sure to check with your local building department before starting construction.
This particular foundation consists of nine solid-concrete blocks laid out in three parallel rows with three blocks per row.
Each block measures 4 inches thick by 8 inches wide by 16 inches long.
The floor frame is built on top of the blocks and is then covered with 3⁄4 inch plywood.
To prevent rot and insect damage, be sure to build the floor frame with pressure-treated lumber.
Frame The Floor
Arrange the nine solid-concrete foundation blocks in three parallel rows.
Make each row 9 feet 11 inches long, and space the first and third row 9 feet 11 inches apart, as measured from outer edge to outer edge.
Center the middle row over blocks between the two outer rows.
Lay a long, straight 2×4 on edge across one row of blocks.
Then, set a 4-feet level on top of the 2×4 and check the blocks for level.
If the ground is sloping, shim up the low blocks with pieces of solid, weather-resistant material, such as additional 2 inch or 4 inch thick solid-concrete blocks, pressure-treated wood, composite lumber, or asphalt roof shingles.
Use a long, straight 2×4 and 4-feet level to make sure that each row of three solid-concrete foundation blocks is perfectly level.
Cut 2×6 floor joists to fit in between the rim joists.
Put the floor joists down on top of the mudsills, spaced 16 inches on center.
Push down on the floor joist to hold it flush with the rim joist.
Drive two 3 inch long screws through the rim joist and into the floor joist.
Fasten each floor joist to the cen-ter mudsill with a single 3 inch screw.
Check to be sure the joists are 16 inches on center before fastening
Install The Floor Deck
Cover the floor frame with 3⁄4 inch tongue-and-groove plywood .
Keep the plywood flush with the outer edges of the floor frame, and align all end-butt joints over the center of a floor joist.
Secure the plywood to the joists below with 2 inch galvanized decking screws.
Space the screws 8 inches to 10 inches apart and be sure to drive them slightly below the surface of the plywood.
If any screw heads are left sticking up even just a little, they’ll create a tripping hazard.
Rafter Design And Roof Frame Schematics For DIY Storage Shed Assembly
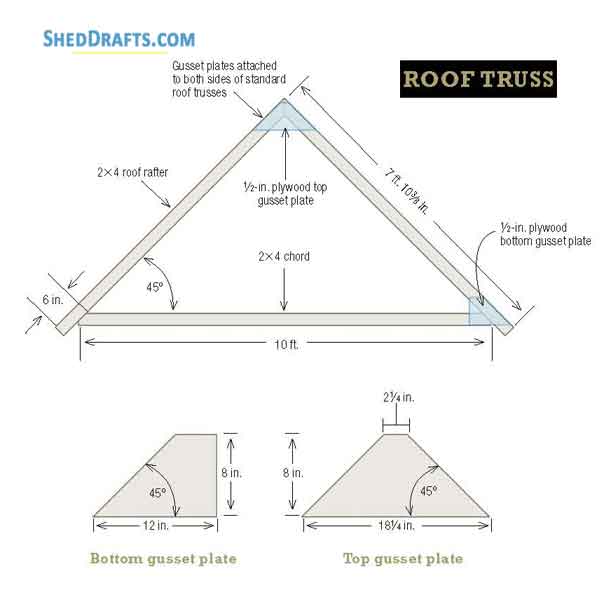
Build Roof Trusses
Lay 3⁄4 inch tongue-and-groove plywood over the floor frame.
Tap the sheets together and be sure that all end joints are centered on a joist.
Temporarily screw short 2×4 blocks down to the floor deck to act as stop blocks for positioning and assembling the roof trusses.
Cut the 1⁄2 inch plywood gusset plates to size on the miter saw.
Put the saw’s miter angle to 45° to match the shed’s 12-in-12 roof slope.
Put the gusset plate flush with the outer edge of the rafter and bottom edge of the chord; secure it with 1.5 inch long roofing nails.
Cut a triangular gusset plate to fit at the peak of the truss.
Hold it flush with the outer edges of the two rafters, then nail the gusset in place.
Frame the gable-end trusses with 2×2 studs.
Cut a long center stud to fit from behind the plywood gusset plate to the 2×4 chord.
Use a layout square to square up the center stud with the chord.
Then, fasten the lower end of the stud with a 3 inch decking screw.
Cut 2×2 studs to fit along each gable-end truss.
Space the studs 12 inches apart and fasten each end with a single 3 inch decking screw.
Screw together 2x4s to form a rough opening for the 20 inch sq. diamond-shaped window that’s installed in the rear gable-end wall.
Fasten a 2×4 mounting plate to the chord on each gable-end truss.
Hold the plate flush with the chord and attach it with 3 inch screws.
Make Windows & Doors For Your 10×10 Timber Shed

Windows
Screw 3⁄8 inch thick rough-sawn plywood siding to the gable-end trusses.
Space the 15⁄8 inch decking screws about 10 inches apart.
Locate the window’s rough opening and drill a 3⁄4 inch dia. access hole through the plywood siding to the inside of the opening.
Rout the plywood from the rough opening with a ball-bearing piloted flush-cutting bit.
Move the router clockwise around the opening.
Screw down the plywood around the perimeter of the rough opening, then carefully set the diamond-shaped window into place.
Gable Overhang
The first step to building the gable overhang is to screw a 2×4 rafter to short 4×4 blocks.
Fasten each block with three 3 inch screws.
Flip over the gable-overhang rafter and use a layout square to make sure that its end is aligned perfectly flush with the rafter on the truss.
Nail 2 inch wide battens strips to the plywood siding.
Space the battens 12 inches on center and fasten them with 2.5 inch long galvanized nails.
Place a 2×4 rafter on top of the 4×4 blocks.
Check to be sure its mitered end is centered on the 4×4 fastened at the peak of the truss.
Fasten the upper rafter to the row of 4×4 blocks.
Drive three 3 inch long decking screws through the rafter and into each 4×4 block.
Put the 41⁄4 inch wide rake board into place on top of the 2×4 gable-overhang rafter.
Hold the top edge of the rake flush with the 2×4 rafter.
Use 2 inch nails to attach the rake board to the rafter.
Note that the rake is cut long to extend several inches past the end of the 2×4 rafter.
Wall Framing
Space the 2×4 studs 12 inches on center.
Fasten each stud with two 3 inch long decking screws driven through the top and bottom wall plates.
To determine if the wall frame is square, measure the opposite diagonals.
If the two dimensions are identical, the frame is square.
Cover the exterior of the wall frame with 3⁄8 inch thick rough-sawn plywood.
Cut the plywood 81⁄2 inches longer than the wall height.
Nail a 2 inch wide pine starter strip to the top of the sidewall.
The chamfered edge of the strip allows the roof-rafter tails to slide past.
Nail batten strips to the wall, spacing them 12 inches on center and aligning each one with a 2×4 stud.
Fasten the battens with 2.5 inch nails.
Carefully tip the completed wall up into place, making sure it doesn’t slide off the floor deck.
If it’s very windy, get two more helpers.
Screw a 2×4 brace to each wall end.
Hold the wall plumb with a 4-feet level, then screw the lower end of the brace to the floor frame.
Fasten the bottom of the wall with 3 inch long screws spaced 24 inches apart.
Drive the screws through the battens and into the floor frame.
Secure the bottom wall plate with 4 inch long structural screws.
Place the screws near the edge of the 2×4 so they’ll go into the rim joist.
Left Sidewall
Use 15⁄8 inch decking screws to attach rough-sawn plywood siding to the wall frame.
Drive the screws slightly below the surface.
Drill a 3⁄4 inch dia. access hole through the plywood siding.
Then cut out the window openings with a router and flush-cutting bit.
Put the cellular-PVC windowsill into the window’s rough opening and then fasten it with three 2.5 inch long trim-head screws.
Install the head casing so that it extends past each side casing by an equal amount.
Then attach the head casing with 2.5 inch screws.
Put the 2 inch wide batten strips into place on the sidewall.
Space the strips 12 inches on center and align each one with a 2×4 wall stud.
Frame The Front Gable-end Wall
Frame the rough opening for the doorway by screwing a horizontal 2×4 header to the jack studs (trimmers) on each side of the opening.
Cut the rough-sawn plywood siding to extend 81⁄2 inches past the bottom wall plate.
Attach the siding with 15⁄8 inch screws.
Screw the PVC trim to the window opening, starting with the windowsill, followed by the two side casings, and then the head casing.
Tip up the front gable-end wall, being careful it doesn’t slide off the floor.
Then, push it tight against the right-hand sidewall.
Fasten the front wall to the sidewall by driving 3 inch screws through the corner studs.
Space the screws about 16 inches apart.
Secure the bottom of the wall to the floor by driving 4 inch long structural screws through the bottom plate and into the rim joist below.
Install The Rear Gable-end Wall
After routing the opening in the plywood siding, install the transom window.
Fasten the sash to the rough opening with 2.5 inch screws.
Nail the 2 inch wide pine batten strips to the wall, spacing them 12 inches on center.
Be sure to center each batten over a 2×4 wall stud.
Raise the left sidewall and slide it up against the front wall.
Then, from outside, push the bottom of the wall tight to the floor frame.
Use 15⁄8 inch screws to fasten the plywood siding at the ends of the walls.
Corner boards will eventually conceal these screw heads.
Put the rear gable-end wall into position between the two sidewalls.
Be sure it’s securely screwed in place before letting it go.
Roof Framing
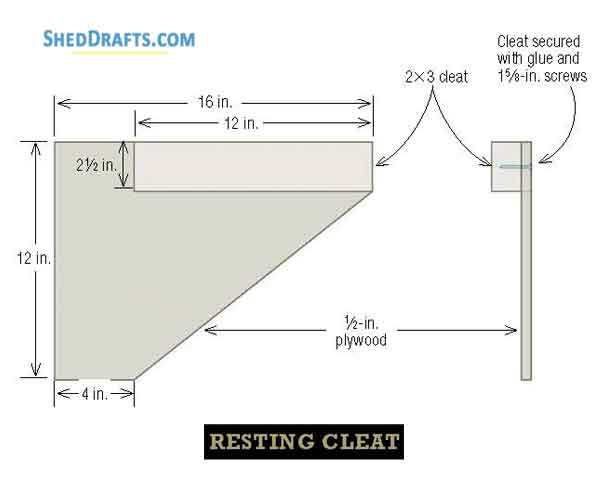
Securely fasten one resting cleat to each corner of the shed.
Use three 3 inch long screws and drive each one solidly into a wall stud.
Lift up the gable-end truss and set it down onto the resting cleats, which should be screwed in place about 3 feet above the ground
Raise one end of the truss about 2 feet, then move up the cleat.
Repeat for the other end of the truss, slowly “walking” the truss up the wall.
When the truss gets to within 12 inches or 16 inches of the top of the wall, lift it off the resting cleats and set it down on top of the 2×4 wall plate.
Secure the truss to the top of the gable-end wall by driving 3 inch screws down into the top wall plate; space the screws 12 inches apart.
Set a standard roof truss into place atop the sidewalls.
Position one truss every 2 feet and set each one directly over a 2×4 wall stud.
Fasten the trusses by driving a 3 inch decking screw up through the top wall plate and into the bottom edge of the 2×4 chord.
After installing all the trusses, cut a subfascia from a perfectly straight 2×4 to span across the rafter tails at each sidewall.
Securely screw the subfascia to the rafters by driving two 3 inch long galvanized decking screws into the end of each rafter tail
Nail 1⁄2 inch plywood sheathing to both sides of the roof frame.
Fasten the sheathing to the rafters with 2.5 inch nails spaced 10 inches apart.
Cut a 41⁄4 inch wide pine fascia board to span across the roof.
Nail the fascia to the 2×4 subfascia with 2.5 inch nails spaced 12 inches apart.
Trim the rake boards flush with the fascias.
At the end of each cut, reduce the downward pressure on the saw to avoid splitting the rake.
Use a paint roller to apply paint or stain to the board-and-batten siding.
Use a 2 inch sash brush to spread finish onto the batten edges.
Roofing
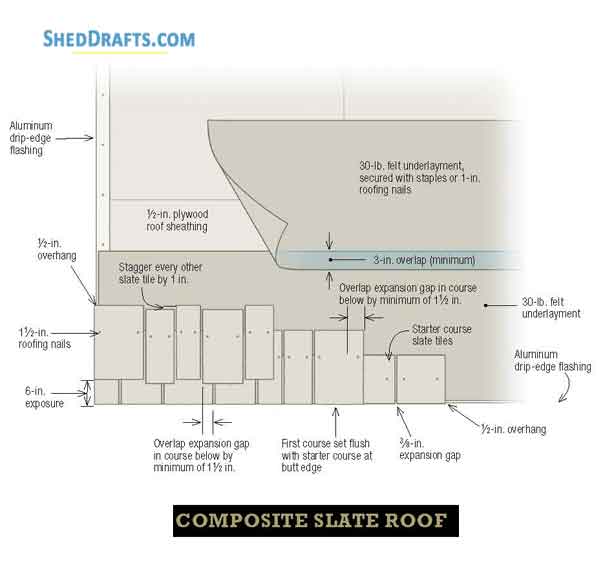
Cover the plywood roof deck with 30-lb. felt.
Position the first felt piece at the bottom of the roof, flush with the drip-edge flashing.
Install a second piece of felt underlayment to the center portion of the roof, making sure it overlaps the first piece by at least 3 in.
Before nailing down the starter course, measure up 11.5 inches
from the drip-edge flashing and snap a chalkline across the roof.
Put the first starter tile into place with its upper edge on the chalkline and its left edge protruding exactly 1⁄2 inches past the rake board.
Continue to nail starter tiles across the roof, setting each one on the chalkline and leaving a 3⁄8 inch expansion space between the slate tiles.
Install first-course tiles across the roof, making sure each one overlaps the expansion gaps in the course below by at least 1.5 in.
Cut the slate tiles with a sliding compound miter saw.
Install with the cut edge facing the adjacent tile, not the end of the roof.
Use a block plane to round over and soften the sharp, freshly cut edge.
A sanding block with 80-grit sandpaper could be used instead.
When installing the second-course tiles, nail one tile with a 6 inch exposure, then set the next tile 1 inches lower to create a staggered pattern.
To ensure the roofing courses remain straight and level, measure up from the drip edge and snap chalklines at 6 inch intervals.
To make it easier to reach the upper half of the roof, install a pair of metal roof brackets.
Then nail a staging plank to the brackets.
As you work your way up the roof, keep 3⁄8 inch gaps between the slate tiles and maintain the 1 inch stagger along the butt edges.
At the roof peak, nail down fulllength slate tiles and allow them to run long past the peak.
Secure each tile with two 1.5 inch long nails.
Use a cordless circular saw to trim the slate tiles flush with the edge of the plywood roof deck, which is 1.5 inches down from the peak.
Adhere a wide strip of granulated self-sealing ice-and-water barrier to the top surface of the rigid-polypropylene ridge vent.
Press the ridge vent down onto the roof peak, and then secure it with 2.5 inch long roofing nails spaced about 12 inches apart.
Cover the ridge vent with 6 inch wide ridge tiles, which are available from the roofing manufacturer.
Fasten each tile with two nails.
Install Soffit Vents And Attach Corner Boards
Install a perforated vinyl soffit vent underneath the overhanging eave of the roof that runs along the top of each sidewall.
Hold the soffit vent against the underside of the overhanging eave and then fasten it to each rafter tail with 1 1⁄4 inch decking screws.
To form a corner board, attach a 4 inch wide pine board to the edge of a 3 inch wide pine board using 2.5 inch long galvanized nails.
Angle the corner board into place, tucking its upper end tightly against the overhanging face of the plywood siding on the gable-end wall.
Nail the preassembled corner board to the shed corner with 2.5 inch nails.
Later, stain or paint the corner board to match the siding.
Cross-Buck Batten Door
When making the door-assembly jig, use a framing square to ensure that the 2×4 cleat is perfectly square with the long 2×2 fence.
Make the door panel out of five 1×6 tongue-and-groove pine boards.
Put the boards into the jig one at a time and tap them together.
Apply a bead of construction adhesive across the door panel, then press the 6 inch wide horizontal rail down into the adhesive.
Hold the 2 inch wide stile flush with the outer edge of the door panel.
Fasten the stile to the door with four 1 1⁄4 inch long decking screws.
Lay a long straightedge rule diagonally across the door and mark the position of each inside corner onto the stile-and-rail frame.
Put the cross-buck batten into place on the door panel.
Align the centerline mark on the batten with the lines drawn onto the frame.
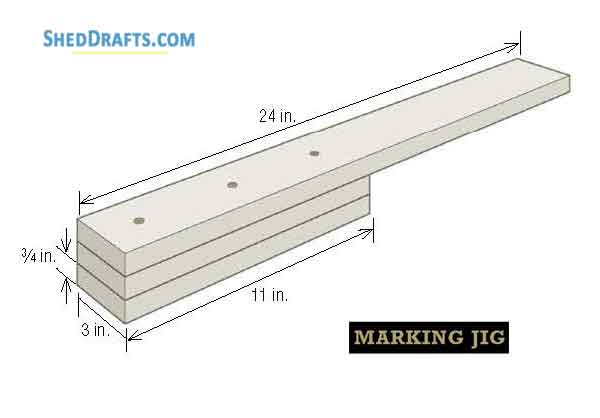
Use a homemade marking jig to quickly and accurately locate and draw the angled cutlines onto the 6 inch wide cross-buck batten.
Adjust the miter saw’s blade to match the angle of the cutlines.
Then cut an angled point onto each end of the crossbuck batten.
Apply a zigzag bead of construction adhesive diagonally across the door panel and push the cross-buck batten into the adhesive.
Fasten it with 1 1⁄4 inch long decking screws.
Screw the side casing to the right hand side of the doorway.
Locate the pine casing 3⁄4 inches away from the edge of the doorway opening.
To create a clearance gap between the door and side casing, tap nails partway into the siding immediately adjacent to the casing.
Hold the door in place over the doorway opening.
Slide it up against the spacer nails, and then screw the hinges to the side casing.