
How To Build Shed Door & Window Headers That Never Sag
I’ll never forget a call I got about six years ago. My friend Mike had built a beautiful 12×16 garden shed. He’d spent a fortune on cedar siding and custom French doors. Three months later, he couldn’t open those doors. He thought the wood had swollen from the humidity.
When I showed up, I didn’t even look at the doors first; I looked at the roofline. The ridge was sagging because Mike had nailed a couple of 2x4s together flat-ways over a six-foot span. He hadn’t built a header, he’d built a springboard. The weight of a light snow load had crushed the door frame by 3/4 of an inch. We had to jack up the roof and tear out the siding, and then we retrofitted a proper LVL header. It turned a weekend project into a $2,000 nightmare.
Headers are the unsung heroes of any outbuilding. They are the horizontal structural beams that bridge the gap created by a door or window, transferring the weight from above (the live and dead loads) down to the foundation through the jack studs. If you get this wrong, your windows will crack and your doors will bind. Eventually, your roof will develop a localized swale that invites rot.
- Never undersize. A double 2×6 is the bare minimum for any opening over 36 inches, but double 2x8s are the safe bet for most 4-to-6-foot shed spans.
- Every header must sit on jack studs (or trimmers). Do not toenail a header into a single stud and expect it to hold.
- For massive spans (garage-style shed doors), skip the dimensional lumber and go with LVL (Laminated Veneer Lumber) to prevent long-term creep or sagging.
Why Cheap Framing is the Fastest Way to Kill a Custom Shed
When you cut a hole in a wall for a window or a door, you’re interrupting the flow of gravity. In a standard wall, studs are 16 inches on center, each doing its fair share of the heavy lifting. The moment you remove two or three studs to make room for a 60-inch double door, the weight that was resting on those studs has nowhere to go.
That’s where the header comes in. It acts as a bridge, collecting the load from the cripple studs above it and diverting that force sideways to the jack studs that flank the opening.
I’ve seen guys try to save twenty bucks by using a single 2×6 laid flat because they wanted more headroom. It’s a classic amateur move. Wood is incredibly strong under compression when the load is applied parallel to the grain, but dimensional lumber has very little structural integrity when loaded across its weak axis.
By turning the lumber on edge, you’re utilizing the depth of the board to resist bending. The deeper the board depth (the h in the I=(bh^3)/12 equation for those who like physics), the exponentially stronger the header becomes.
In the real world, you also have to account for point loads. If your shed design has a roof truss landing directly over the center of a window opening, that single point is exerting hundreds of pounds of pressure. Without a beefy header, that window frame becomes the structural support, which it was never designed to be. I always tell my crew: if you’re debating between a 2×6 and a 2×8 header, you’ve already answered your question. Buy the 2×8.
Flat Header Fiasco
Early in my career, I assisted on a lean-to shed where we used a flat 2×4 header for a small 24-inch window. We figured the span was so short it wouldn’t matter. Within two years, the homeowner called because the glass had spontaneously shattered.
The header hadn’t failed in the sense of breaking, but it had deflected just 1/8th of an inch. That was enough to put pinch pressure on the window flange, and the first cold snap did the rest. Now, I don’t care if the window is 12 inches wide, it gets a minimum double 2×4 header on edge.
Sizing Your Headers Without Needing a Structural Engineering Degree
One of the biggest hurdles for DIYers is looking at a span table. These charts are designed for residential housing codes (like the IRC), which are often overkill for a 10×10 tool shed. However, the physics don’t change just because the building is smaller.
For a standard shed with a gable roof, the header on the eave side (the side where the rafters rest) is doing all the work. The header on the gable side (the ends) is mostly just holding up the siding.
Actual Measurement
Remember that a 2×6 isn’t 2 inches by 6 inches, it’s 1.5 by 5.5. Beginners often calculate their rough opening height based on nominal numbers and end up with a door that won’t fit. When planning your header height, always start from the finished floor height and add the manufacturer’s recommended rough opening. Then add 1.5 inches for your bottom plate (if you haven’t cut it out yet).
For eave-side openings, here is my Rule of Thumb for headers:
Up to 36-inch Span
- Double 2×4 (installed on edge)
- Jack Studs: 1 per side
- Best For: Small windows or standard single walk-doors.
36-inch to 60-inch Span
- Double 2×6
- Jack Studs: 1 per side
- Best For: Double windows or standard French doors.
60-inch to 96-inch Span
- Double 2×10
- Jack Studs: 2 per side (Double Jack studs)
- Best For: Large double barn doors or sliding glass doors.
96-inch to 120-inch Span
- Double 2×12 or 7.25-inch LVL (Laminated Veneer Lumber)
- Jack Studs: 2 per side (Double Jack studs)
- Best For: Garage-style roll-up doors or extra-wide equipment access.
Is the shed wall taller than 8 feet? Use a Triple Ply or 2×12 to prevent wall flutter over the opening.
If you live in an area with heavy snow loads (looking at you, Minnesota and Maine), you need to bump each of those up by one size. A 6-foot door in a high-snow zone should absolutely have a double 2×10. The cost difference between a 2×8 and a 2×10 is usually less than $15 per header, it’s the cheapest insurance policy you’ll ever buy for your backyard structure.
Through-Bolting for Heavy Loads
On extra-wide shed doors, like those 8-footers used for riding mowers, I don’t just rely on 16d nails to hold the header sandwich together. I like to use HeadLOK or TimberLOK structural screws every 12 inches in a staggered pattern. These pull the members together much tighter than nails ever could and significantly increase the shear strength of the beam. It turns two boards into a single, monolithic structural unit.
Header Integrity Pre-Flight Checklist
- Are both boards installed with the crown facing up?
- Is there a 1/2 inch plywood spacer between the dimensional lumber?
- Does the header sit on at least 1.5 inches of solid wood (the jack stud)?
- Are there 16d nails every 12 inches in a staggered pattern?
- Is the underside of the header level within 1/16th of an inch across the span?
- Is there a 1/2 inch to 3/4 inch gap between the header and the planned door/window unit?
- Did you measure the opening diagonally (corner-to-corner) to ensure it’s not racked?
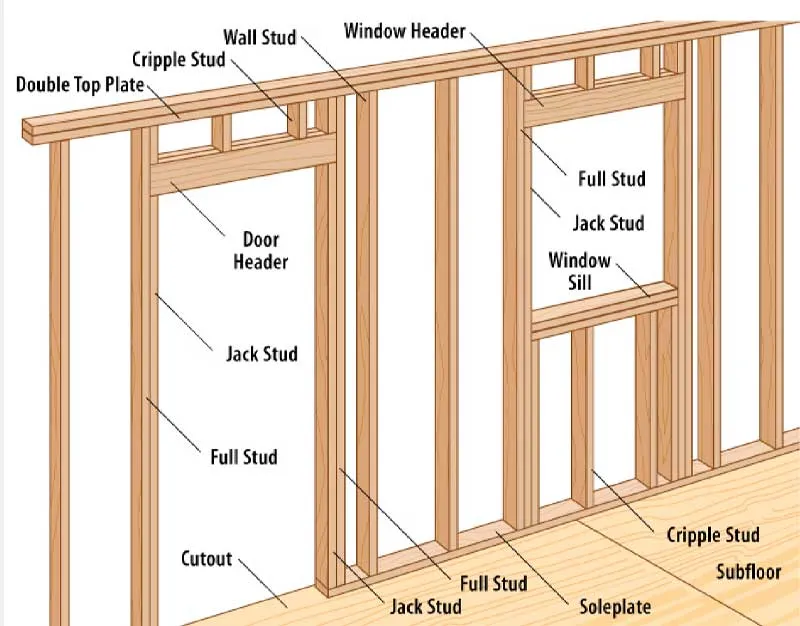
Decoding the Structure of a Header With Jacks, Kings, and Cripples
To build a header correctly, you have to understand the framing sandwich. A standard 2×4 wall is actually 3.5 inches thick. If you just nail two 2x6s together, you only have a 3-inch thick beam. This leaves a half-inch gap that will drive you crazy when you try to install your exterior sheathing or interior trim.
The pro way is to sandwich a piece of 1/2-inch plywood or OSB between your two pieces of dimensional lumber. This brings the total thickness to exactly 3.5 inches, flush with your framing.
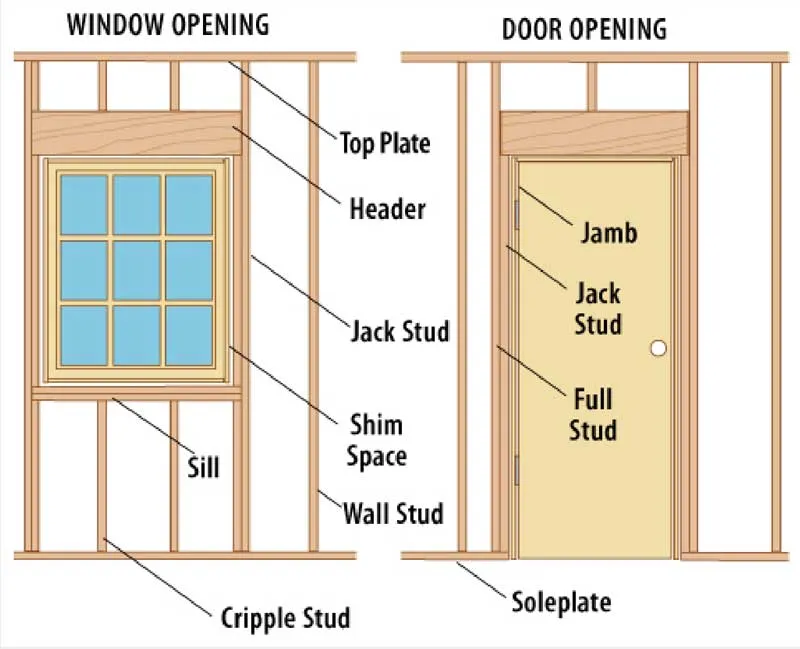
The header doesn’t just float there. It is supported by jack studs (sometimes called trimmers). These are the studs cut to length that sit directly under the header. The king stud is the full-length stud that runs from the bottom plate to the top plate, nailed to the side of the header and the jack stud. This creates a rigid C-channel of wood that prevents the opening from racking.
Then you have cripple studs. These are the short pieces of 2×4 that fill the space between the top of the header and the top plate of the wall. Their job is to maintain the 16-inch on-center spacing so you have something to nail your siding and trim to.
In many sheds with a standard 8-foot wall and a high door, you might not even have room for cripples, the header might sit directly under the top plate. That’s perfectly fine, and in fact, it’s often stronger as it eliminates a point of potential compression.
Every piece of lumber has a natural curve called a crown. Before you nail your header pieces together, sight down the edge of the boards. Always assemble the header with the crowns facing the same direction, and install the header with the crown up. Gravity will eventually flatten the board. If you install it crown down, gravity will only make the sag worse, leading to those dreaded sticking doors.
Load Paths
The reason we care so much about the jack stud is the crushing factor. Wood is softer than you think. If you simply nail a header into the side of a stud, the nails are the only things holding the weight. Over time, those nails will creep or shear. By placing the header on top of a jack stud, you are creating a wood-on-wood connection where the load is transferred directly to the floor joists and then to the foundation. This is a solid load path.
The LVL Advantage: When Dimensional Lumber Just Won't Cut It
Laminated Veneer Lumber (LVL) is essentially plywood on steroids. It’s made by gluing thin layers of wood together under immense pressure. Why would you use this in a shed? Because dimensional lumber, like a standard 2×12, is prone to checking (cracking), twisting, and shrinking. A 2×12 can shrink up to 1/2 inch in height as it dries out over its first year in a shed. If your door was fitted tight, that shrinkage alone will cause it to bind.
LVLs are dimensionally stable. They don’t shrink, they don’t twist, and they are nearly twice as strong as a Douglas Fir beam of the same size. If you are building a Modern Studio style shed with a massive 8-foot or 10-foot glass slider, do not even attempt to use 2x12s. They will sag under their own weight over a 10-foot span.
The one limitation of LVLs is their weight. A 10-foot LVL is incredibly heavy and usually requires two people, or a very clever setup with a floor jack, to install. But the peace of mind factor is huge. You won’t be coming back in three years to plane the top of your doors because the header decided to take a nap.
2×12 vs. LVL
Double 2×12 Header (8ft):
Approx. $60.
Pros: Easy to find, nails easily.
Cons: Heavy, prone to warping, high shrinkage.
Single 3-1/2″ LVL Header (8ft):
Approx. $110.
Pros: Zero sag, easy to install (one piece), no sandwiching needed.
Cons: More expensive, requires a trip to a real lumber yard (not always at the big box stores).
Pocket Mistake
I’ve seen many DIYers build a pocket for their header that is too tight. They hammer the header in so hard that it bows the king studs outward. When it comes time to install the door, the opening is hourglassed, wide at the top and bottom, but narrow in the middle. You want your header to be about 1/16th to 1/8th of an inch shorter than the distance between your king studs. It should slide in with a few firm taps, not a sledgehammer.
Nailing Patterns and Structural Integrity: Don't Just Wing It
The strength of a header isn’t just in the wood; it’s in the fasteners. If the two 2x6s aren’t bonded together properly, they act as two independent boards rather than a single beam. This reduces your load-bearing capacity by nearly 50%.
The Industry Standard for a built-up header is to use 16d (3.5-inch) nails. You should nail from both sides. I prefer a Stitched Pattern: three nails every 12 inches. One near the top, one in the middle, and one near the bottom. Then, flip the header over and repeat the process, offsetting your nails so you don’t hit the ones from the other side.
If you’re using a 1/2-inch plywood spacer, make sure the spacer is glued and screwed or heavily nailed. This prevents the spacer from sliding between the boards. While it seems like a small detail, that plywood acts as a web that helps resist the horizontal shear forces.
Toenailing is Not a Substitute
I’ve walked onto job sites where someone tried to install a header by toenailing (driving nails at an angle) through the header into the king studs without using jack studs. They think the strength of the nails will hold the weight. This is a structural failure waiting to happen. Nails have great shear strength (resisting sideways sliding) but poor withdrawal strength. Over time, the vibration of the door slamming and the weight of the roof will pull those nails right out. Always, always use a jack stud to provide a solid seat for the header.
Beware the "Green" Lumber
Cheap lumber from big-box stores is usually S-GRN (Surfaced Green) which has high moisture content. If you build your headers and immediately trim them out with tight tolerances, the wood will shrink. I’ve seen 2×10 headers shrink nearly 3/8ths of an inch in height. If your door frame is tight to the header, that shrinkage can actually pull the top of the door frame up, creating a gap for air and bugs. Leave a 1/4-inch shim space above your door units to account for this movement.
Dealing with "Low-Profile" Situations: The Flush Header Hack
Sometimes, you’re building a shed with short walls, maybe a 6-foot eave height, and you want a standard 6’8″ door. If you use a traditional header, the door won’t fit. This is where we use a Flush Header or a Structural Top Plate.
In this scenario, the header is moved up into the roof framing or integrated directly into the top plate of the wall. This is much more complex because you have to use joist hangers to attach the rafters to the side of the header rather than resting them on top. It’s a pro-level move that saves you about 5 to 7 inches of vertical space.
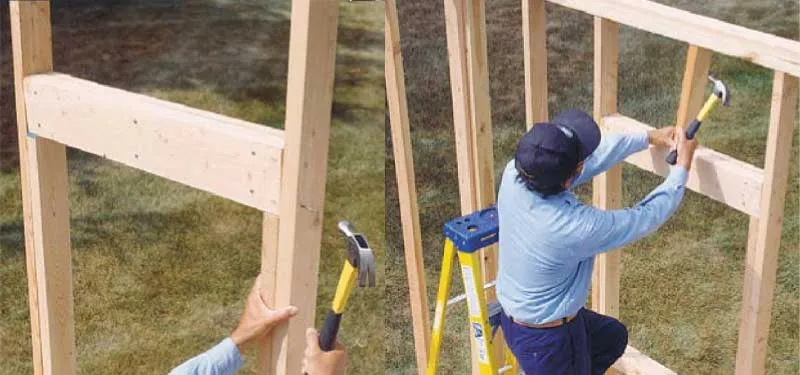
The "Pre-Assembled" Wall
If I’m building a shed on a concrete slab, I always build my header-inclusive walls on the ground. It is 10x faster to square up your door opening and nail your jacks and kings while gravity is working with you. Trying to toenail a 60-pound 2×10 header into place while standing on a ladder is a recipe for a trip to the ER and a crooked door. Build it flat then tip it up.
Reclaimed Headers
If you’re into the eco-friendly build, you can often find old true-dimensional 2x8s from house demolitions. An old-growth, true 2×8 (which is actually 2 inches by 8 inches) is significantly stronger than a modern nominal 2×8. Just be sure to check for powder post beetle holes or dry rot. A recycled header can add a lot of character if left exposed inside the shed, and it’s a great way to keep high-quality timber out of the landfill.
Another option is to use a steel L-header or a Flitch Plate. This involves sandwiching a 1/4-inch steel plate between two pieces of 2×4. The steel provides the stiffness of a 2×10 but in the vertical profile of a 2×4. It’s expensive and requires drilling through steel, but it’s the ultimate space-saver for tiny house-style sheds or low-clearance utility builds.
Managing Spans for Large Windows and Roll-up Doors
Shed windows are usually light, but modern-style sheds with large transom windows or black-frame picture windows require serious support. Because windows have glass, which has zero flexibility, any deflection (sagging) in the header will result in a cracked pane.
For windows, I use a Deflection Limit of L/360. This means the header should not sag more than the length of the span divided by 360. For a 5-foot window (60 inches), that’s only 0.16 inches, about the thickness of two pennies. To achieve this, you almost always need to go one size bigger than the minimum code requirement.
If you’re installing a roll-up garage door on a shed (common for mower access), the header needs to be even more robust. Not only does it hold the wall, but the door track itself is often bolted to the header. The vibration of that door rolling up and down will loosen nails over time. For these, I recommend using structural lag screws (like GRK or Simpson SDS) to secure the header to the king studs.
Never skimp on window headers because you think the window is small. Small windows are often the ones that leak first because people don’t flash them correctly or the frame gets tweaked by a sagging header. A double 2×6 is my absolute minimum for any window over 24 inches. It gives you a much better nailing surface for your interior window casing (trim) as well.
Ladder Header
In non-load-bearing walls (the gable ends where the rafters don’t sit), you can sometimes use a ladder header. This is two 2x4s laid flat with small blocks between them. It’s not structural, but it provides a great nailing backer for your trim and window flanges. It saves weight and material, but only use this on walls that are not carrying the roof load. If you’re unsure, stick to a standard vertical header.
Setting the Rough Opening Like a Pro (And Why Your Tape Measure Might Be Lying)
If there is one place where I see DIYers lose their cool, it’s during the rough opening (RO) phase. You’ve built a beautiful double 2×8 header, you’ve nailed your jacks and kings, and then you try to slide the pre-hung door in. It doesn’t fit. You’re off by a quarter-inch, and now you’re out there with a power planer or a reciprocating saw, making a mess of your structural lumber.
Most door manufacturers tell you to make the RO two inches wider and two inches taller than the door itself. For a 36-inch door, that’s a 38-inch opening. But in the real world, shed floors are rarely perfectly level, and your studs are rarely perfectly plumb. If you build exactly to the 38-inch spec and your floor has a 1/8-inch hump, your door frame will rack when you try to square it. I always add an extra 1/2 inch to the manufacturer’s RO. You can always fill a gap with shims, but you can’t easily stretch a header.

Shim Space and Air Flow
That extra half-inch isn’t just for errors. It’s for shim space. You need room to tilt and nudge that door frame until the reveal (the gap between the door and the frame) is perfectly uniform. If your header is sitting tight against the door jamb, any slight settling of the shed will translate directly into the door sticking. By leaving that buffer zone, you decouple the finish carpentry from the rough framing.
Nail Fin Ruse
Many modern shed windows come with integrated nailing fins or flanges. Beginners often forget that the header needs to be positioned so that the flange has something to bite into. If you make your header too high and try to compensate with a massive header filler, you might find yourself nailing your window flange into thin air or just the exterior sheathing. Always dry-fit your window against your framing before you nail the header permanently.
Mastering the Single-Ply Header for Interior Partitions
If you’re building a man cave or she-shed and adding interior walls, you don’t need the heavy-duty double-ply headers used for exterior load-bearing walls. However, you still need something to keep the drywall from cracking over the doorway. For these, I often use a Single-Ply 2×6 header.
This is a single 2×6 turned on edge, pushed to one side of the 3.5-inch wall cavity. Why one side? Because it gives you a solid nailing surface for your trim on that side, and you can add 2×4 flat blockers on the other side for the same purpose. It saves lumber, reduces the weight of the wall during tilt-up, and is more than enough to hold the weight of a standard interior door.

Header Hanger
In some high-end custom sheds, especially those with timber frame aesthetics, we use header hangers. These are heavy-duty U-shaped steel brackets (think Simpson Strong-Tie) that allow the header to sit flush with the top of the wall without needing jack studs. It’s used when you absolutely need every inch of vertical door clearance, such as fitting a tall tractor into a shed with low eaves.
L-Header for Extra Insulation
If you’re planning on insulating your shed, a standard sandwich header (two boards with plywood) creates a thermal bridge. It’s a solid chunk of wood that doesn’t insulate well. Instead, I sometimes use an L-Header. This is one 2×10 (or 2×8) with a 2×4 cap nailed to the bottom in an L-shape. This leaves a massive cavity behind the header that you can stuff with Rockwool or rigid foam. You get the structural strength of the 2×10 but the R-value of a fully insulated wall.
Dealing with the Widowmaker Spans: Headers Over 8 Feet
Once you cross the 8-foot threshold, common for double barn-style doors or small garage doors, standard dimensional lumber starts to fail the deflection test. A double 2×12 will technically hold the weight, but over a few seasons, it will smile (sag in the middle).
This is where I switch to Box Headers or Engineered Lumber. A box header is built by framing a small ladder of 2x4s and then skinning both sides with 1/2-inch structural plywood, glued and nailed every 4 inches. The plywood skins act like the web of an I-beam, creating an incredibly stiff structure that is much lighter than solid 2x12s.
Why Most DIY Barn Doors Fail
Most DIY barn doors drag on the floor after two years. People blame the hinges. It’s almost never the hinges. It’s the header. If your header sags just 1/4 of an inch, the swing of a 4-foot wide door is magnified. That 1/4 inch at the header becomes nearly an inch of drop at the far edge of the door. If you’re building wide doors, overbuild the header. If the chart says 2×10, go 2×12. If it says 2×12, go LVL.
Double-Sided Shed
I once consulted on a drive-through shed for an ATV. The owner put 6-foot doors on opposite sides of a 10-foot wide shed. Because so much of the wall was empty space, the remaining studs were taking double the load. The original builder used single 2×6 headers. Within a year, the roof ridge had dipped so significantly that the shingles began to pull apart. We had to install Flitch Plates (steel sandwiched in wood) to save the structure. When you have multiple openings in one wall, your headers aren’t just opening supports, they are the wall.
Golden Rule of Shed Openings: Plumb, Level, and Square
You can have the strongest header in the world, but if it isn’t level, your project is doomed. I’ve seen guys spend three hours building a triple-ply LVL header and then nail it in by eye.
When you install your jack studs, use a 4-foot level (or a laser level if you have the budget) to ensure the tops of the jacks are perfectly horizontal across the span. If one jack is 1/8th of an inch higher than the other, your header will sit at an angle. This means your door jamb will never be square, and your miters (the corner joints on your trim) will always have a gap.
How To Know You Nailed It
The Nickel Test: Once the header is in and the roof is loaded, place a nickel on top of the door frame. If the header sags enough to pinch the nickel, it’s deflecting too much.
The Level Sweep: Put a 4-foot level on the underside of the header. It should be dead nuts (perfectly level).
The King-to-Jack Tightness: There should be no visible daylight between the header and the jack stud it sits on. If there is a gap, you’re relying on nails, and that’s a fail.
Safety Of Hurricane Ties
In coastal or high-wind areas, headers are a lift risk. Wind catching a shed roof wants to peel the roof off like a lid. Your header needs to be tied to the king studs and the top plate with Hurricane Straps (like Simpson H2.5A). This ensures that the weight of the header helps hold the roof down during a storm. Check your local Wind Zone requirements; many counties now require these even for non-permitted outbuildings.


Read Next
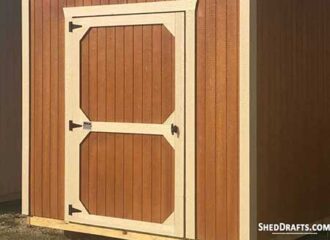 Build Single Shed Doors With Step-By-Step Plans
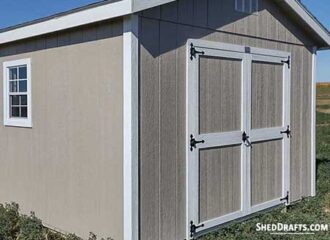 Build Double Shed Doors From Plans Step-By-Step
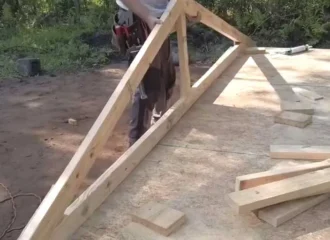 How To Build Shed Roof Trusses On A DIY Jig In One Weekend
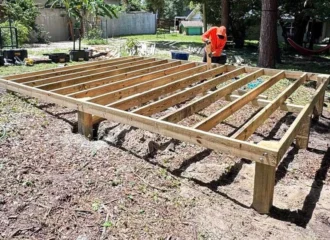 Shed Floor Framing: Step-By-Step Guide To A Sag-Proof Base
 How to Build a Concrete Slab Shed Foundation Correctly
 How to Build A Wooden Skid Shed Foundation Easily
Framing-to-Finish Roadmap: DIY Guides For Every Step of The Build


