
Shed Floor Framing: Step-By-Step Guide To A Sag-Proof Base
Most DIYers obsess over the siding or the roof pitch, but what about floor framing? That’s where the battle against gravity and rot is won or lost. Years ago, I got a call to repair a “sticky door” on a three-year-old garden shed.
When I crawled underneath, I found the homeowner had used non-rated lumber and spaced his joists at 24 inches on center to save thirty bucks. The floor had bowed under the weight of a riding mower, pulling the walls inward and racking the door frame. The fix cost him three times what the original floor did.
Use Pressure-Treated (PT) UC4A lumber rated for ground contact.
12-inch on-center (O.C.) joists are best for heavy loads (mowers/ATVs); 16-inch O.C. for general storage.
Use Hot-Dipped Galvanized nails or structural screws (Simpson SDS/GRK). Standard bright nails will dissolve in PT lumber.
3/4″ Tongue and Groove plywood or OSB (AdvanTech) is the industry favorite for floor sheathing.
If you get the floor framing wrong, everything else will be a problem. Your walls will rack and your expensive gear will feel like it’s parked on a trampoline.
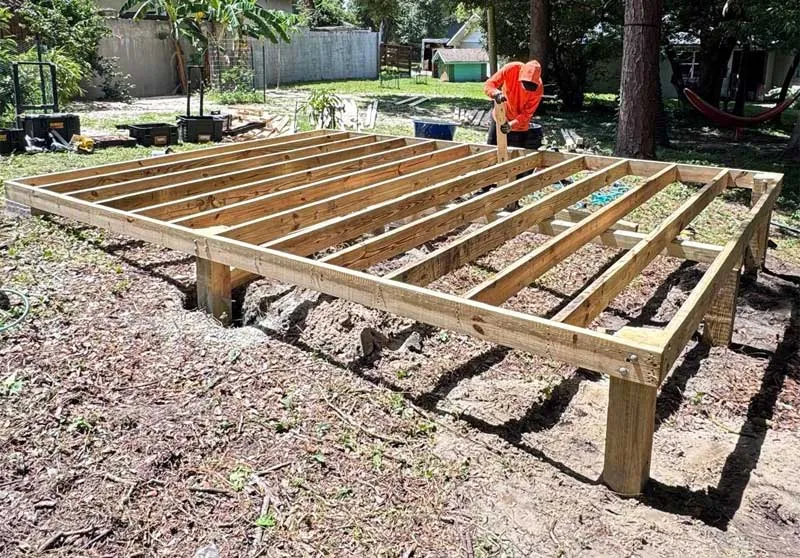
Breakdown Of A Shed Floor That Doesn’t Squeak
A shed floor is a system where every part has a specific job. Some components handle the vertical weight of your heavy equipment, while others prevent the structure from racking or leaning.
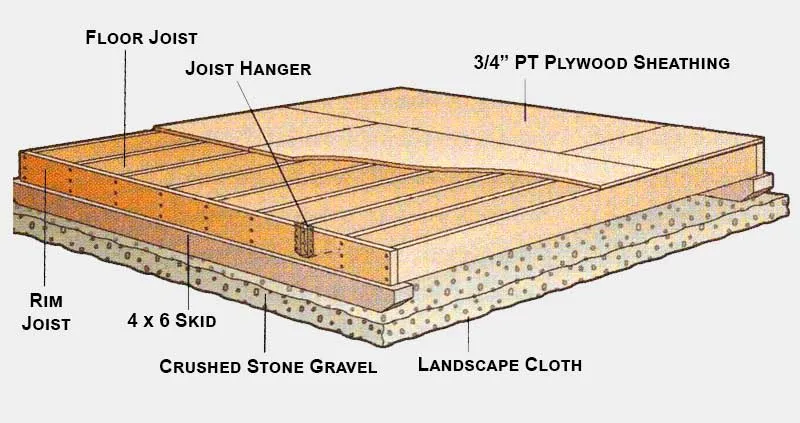
Skids (Runners) Are Ground-Level Anchors
The skids are the foundation of the foundation. These are typically 4×4 or 4×6 pressure-treated timbers that run the length of the shed. Their job is to distribute the entire weight of the structure across the gravel bed or concrete piers.
Rim Joists (Band Joists) Form The Structural Perimeter
The rim joists are the four boards that make up the outer box of your floor. Think of these as the perimeter walls of your foundation. They provide lateral stiffness and give you a solid surface to nail your wall plates into later.
Many DIYers use a single rim joist on the front and back where the ramp attaches. I’ve learned the hard way that you should double your rim joists on the side where you’ll be driving a 600-pound riding mower in and out. If you don’t, that outer board will eventually “smile” (bow downward) from the repeated impact.
Floor Joists Act As Internal Ribs
These are the 2×6 or 2×8 boards that span the distance between your rim joists. They are the “muscles” of the floor. In a professional build, we space these at 16 inches on center (O.C.) as a standard, or 12 inches O.C. if the shed is destined to be a heavy workshop or engine room.
Sheathing Provides The Protective Skin
This is the surface you walk on. We typically use 3/4-inch Tongue and Groove (T&G) plywood or specialized subflooring like AdvanTech.
The “Tongue and Groove” aspect is vital. It locks the edges of the sheets together between the joists. Without it, one sheet might flex more than the one next to it, creating a lip that catches your foot or prevents you from sliding heavy boxes across the floor.
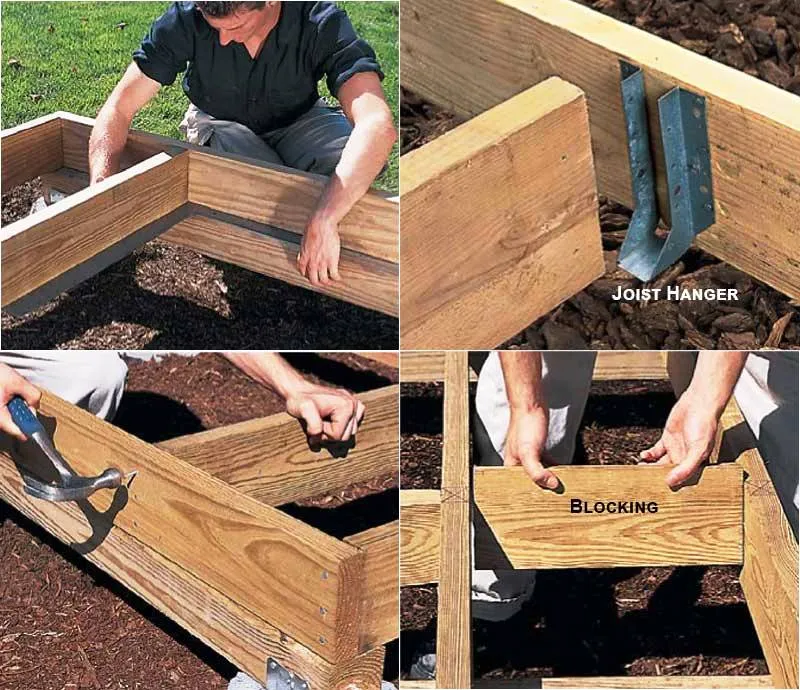
Bridging and Blocking Prevent Twist
Blocking refers to the short pieces of lumber installed between the joists, usually in a straight line down the center of the span.
Wood loves to twist as it dries. Blocking locks the joists in a vertical position. If a joist “rolls” even 10 degrees, it loses nearly half of its load-bearing capacity.
I stagger my blocking by about an inch so I can drive nails straight through the joist into the end of each block. It’s a small detail, but it’s much stronger than toe-nailing, which can split the wood.
Red Tape Reality Of Building Codes
Before you spark a saw or buy a single 2×6, you have to realize that you aren’t just building a floor; you’re entering a legal agreement with your local municipality. I’ve seen homeowners get halfway through a beautiful build only to have a “Stop Work” order taped to their front door because they ignored a five-foot setback rule.
Keep the Inspector Off Your Back
This is the big one. In many U.S. jurisdictions, a shed under a certain square footage (often 100 to 120 sq. ft.) doesn’t require a structural permit, but you still might need a zoning permit. I once knew a guy who ignored the permit office because he thought “it’s just a shed.”
Two years later, when he tried to sell his house, the buyer’s inspector flagged the unpermitted structure. The city made him tear off the siding and floor sheathing just to prove he used the right joist hangers and pressure-treated lumber. He spent $1,000 to save a $50 permit fee.
Foundation Depth and Frost Line
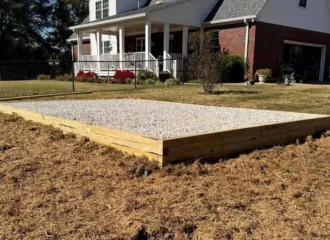
Your floor framing design is dictated by what it sits on. If you live in a region where the ground freezes (like the Midwest or Northeast), you must account for the frost line. Codes often dictate that if your shed is over a certain size, it must be on concrete piers or a slab. Smaller sheds can often “float” on skids over a gravel bed.
Shed Footprint and Intended Use
The dimensions of your floor frame determine the engineering required. A 16×20 workshop is a different beast than an 8×10 tool closet. For larger sheds, codes may mandate double rim joists or specific blocking patterns to prevent the floor from twisting. The type of shed matters too. If it’s a habitable space (like a she-shed or office), the floor framing must meet residential code, which usually means 2×10 joists and R-19 insulation capability.
Location and Setbacks
Where you put the floor on your property is often more regulated than how you build it. Most towns have “setback” requirements, meaning the shed must be a specific distance (usually 5 to 15 feet) from property lines, septic tanks, or the primary residence.
Take a photo of your proposed build site and a rough sketch of your floor framing plan (showing joist spacing and lumber size) to your local building department. They would much rather spend ten minutes helping you get it right on paper than two hours writing you a citation in the field.
Ground Contact
Even if code doesn’t explicitly mention it, always verify that your local rules allow for “on-grade” foundations if you are using skids. Some flood-prone areas require the floor frame to be elevated a certain height above the 100-year flood plain. If you frame too low, you won’t get insurance coverage, and your floor will be a sponge for every heavy rain.
Toolkit and Supplies For A Zero-Defect Build
Building a shed floor is an exercise in managing heavy and chemically treated wood that wants to warp and rust your fasteners. To beat the material, you need the right kit.
Pressure-Treated (PT) Lumber – You want stuff rated for Ground Contact (UC4A). We’re pulling 2×6 or 2×8 stock for the joists and rim boards. Don’t let them sell you “Above Ground” rated wood for a shed base; it’ll rot out before the mortgage is paid off.
PT Plywood – 3/4-inch is the sweet spot for the subfloor. It needs to be exterior-rated to handle the mud and snow you’ll be tracking in on your boots or mower tires.
Joist Hangers – These U-shaped brackets are non-negotiable for high-load floors. They transfer weight via shear strength rather than relying on nails driven into the end-grain (which have almost zero “pull-out” resistance).
3.5-inch Hot-Dipped Galvanized nails – The copper in PT wood eats standard nails for breakfast. Use galvanized or the chemicals will turn your fasteners to dust.
Exterior-Coated Screws – Grab a box of 1-5/8 or 2-inchers for tacking down blocks and the plywood skin.
Power Tools
- Circular Saw
- Miter Saw
- Nail Gun
- Palm Nailer – A lifesaver for driving nails into joist hangers in tight corners where you don’t have the “swing room” for a hammer.
- Jigsaw – Keep this handy for notching plywood around 4×4 posts or any conduit popping through the floor.
Hand Tools
- Tape Measure
- Speed Square
- 4-Foot Level
- Chalk Line
- Carpentry Pencils – Bring three. You’ll lose two in the grass within twenty minutes, that’s just the law of the job site.
Safety Glasses & Gloves: PT wood splinters are nasty and prone to infection. Plus, circular saws love spitting treated sawdust directly into your eyes. Wear the goggles.
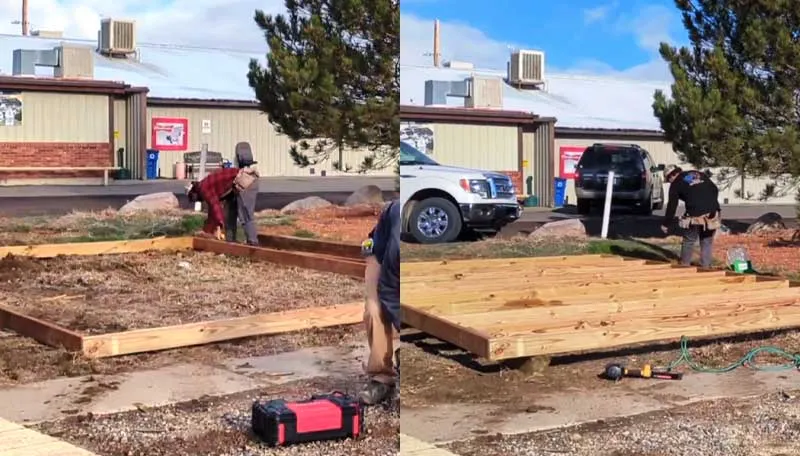
Steps To Build A Rock-Solid Outer Frame
If this perimeter isn’t dead-on, every single wall you build afterward will be a nightmare of shims and frustration. A mistake in the first twenty minutes of framing can add ten hours to the finishing work. So we are going to build the outer frame so tight it could hold water.
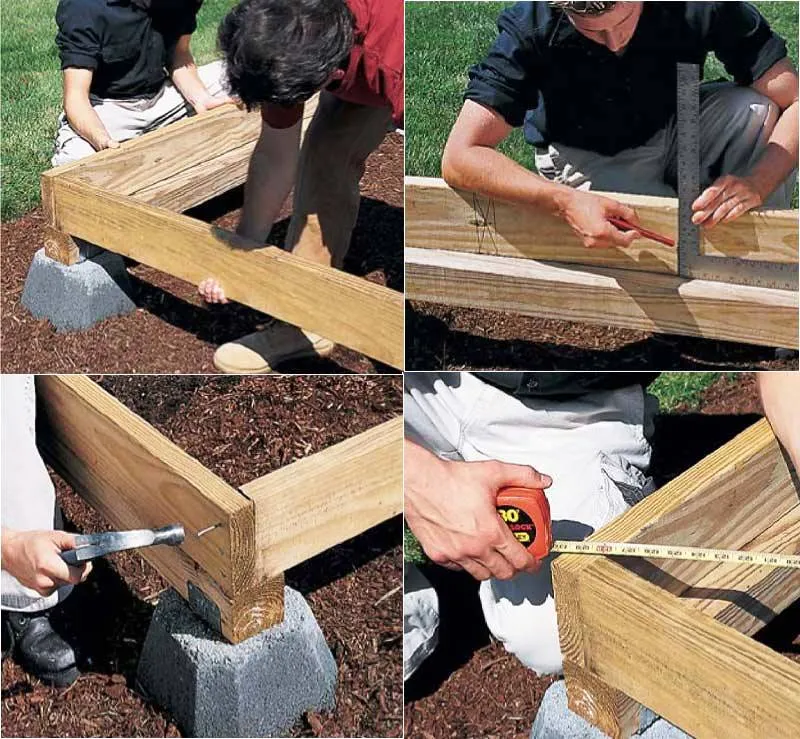
1. Mark and Cut The Rim Joists
The rim joists (or band joists) are the four boards that form the perimeter. Go through your lumber pile and find the four straightest 2x6s or 2x8s. Avoid anything with a “crook” or a “bow” for the perimeter.
Remember that 2x lumber is actually 1.5 inches thick. If you want a 120-inch-wide shed, and your side joists overlap the front/back joists, you must subtract 3 inches (1.5 + 1.5) from the shorter boards so the total footprint remains exactly 120 inches.
Lay your front and back rim joists side-by-side on the ground. Use your tape and speed square to mark your joist locations (16″ or 12″ on center) on both boards simultaneously. This ensures your internal joists will be perfectly parallel later.
2. Locking Down the Outer Perimeter
Stand your boards on edge. Align the end of one board flush with the face of the perpendicular board. Use three 3.5-inch hot-dipped galvanized nails or structural screws per corner. Drive them through the face of the overlapping board into the end grain of the receiving board.
If you’re working solo, use a “Bessey” clamp or a simple wood cleat to hold the corner in place while you drive the first nail. Nothing is more frustrating than a corner jumping out of alignment just as you strike the hammer.
3. Check The Diagonals And Brace
Hook your tape measure on the outside corner and pull it to the opposite diagonal corner. Record the number. Now, do the same for the other two corners. The numbers must match. If they are within 1/8 of an inch, you’re a hero.
If one diagonal is 144 inches and the other is 145 inches, the frame is “racked.” Use a sledgehammer (with a scrap wood block to protect the lumber) to tap the corners of the long diagonal toward the center until the numbers equalize.
Once it’s square, nail a 2×4 scrap diagonally across one corner of the box. This stays the frame so it doesn’t shift while you’re installing the interior joists.
Seating The Perimeter Box On Skids vs. Sills
The way you attach your outer frame changes significantly depending on whether you’re building a floating skid foundation or a fixed pier foundation.
Building a Floating Base That Won’t Sink
I position my skids about 6 to 12 inches inside the outer perimeter of the frame. This “cantilever” look hides the foundation and prevents water dripping off the roof from splashing directly onto the skids. To attach the frame to the skids, we toe-nail 3.5-inch galvanized nails through the rim joists and floor joists into the skid.
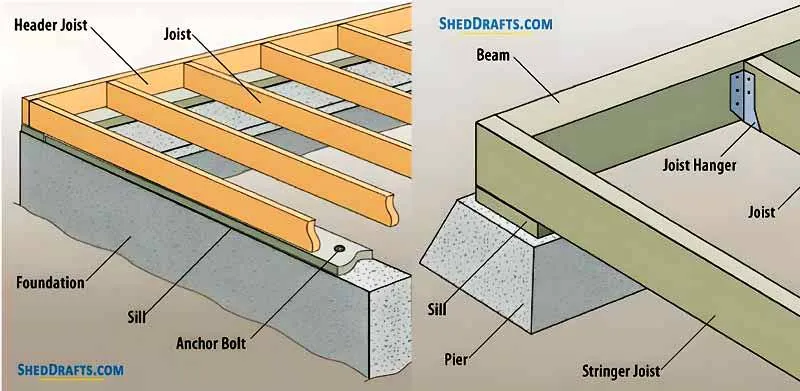
Pier & Sill Foundation
If you are building a large workshop or live in an area with a deep frost line, you’ll likely be installing your frame on sills atop concrete piers.
You don’t just set your 2×6 frame on raw concrete. You first install a 2×6 pressure-treated board that is bolted to the concrete piers using J-bolts or wedge anchors. This acts as the Sill Plate.
Use a Sill Sealer. It’s a thin, ribbed foam gasket that sits between the concrete and the wood. Concrete is porous; it sucks moisture out of the ground like a sponge. The sill sealer prevents that moisture from wicking into your frame.
The outer frame sits on top of this sill plate. We nail through the rim joists into the sill plate every 12 inches.
When To Anchor The Frame
Many people think the weight of a riding mower is enough to hold your floor frame down. That’s just betting against physics. Anchoring isn’t just a good idea. In many coastal or Midwestern “tornado alley” zones, it is a structural mandate.
If your shed is sitting on a concrete slab or piers, anchoring is built into the process via the sill plate. However, if you are building on a skid foundation, you are at risk. Any shed with a high roof profile or one situated in an open field acts as a sail. Check your Wind Zone rating. If you’re in a 110-mph wind zone, you likely need a minimum of four anchors, one at each corner.
If your shed sits on a slight incline, anchors act as “brakes” to prevent the structure from slowly creeping downhill over years of freeze-thaw cycles.
Steps To Install Bounce-Free Interior Joists
Once your outer box is ready, it’s time to install the ribs. You can’t mess up the spacing here, or your plywood seams won’t land on wood. And you’ll be left with a bouncy floor that feels like a trampoline.
1. Craft the Floor Joists
Measure the inside clear span of your outer frame at multiple points. Even a perfect box can have a slight belly in the middle.
I prefer to use a miter saw for this. Cut all your interior joists to the exact same length. If the outer box is bowed, the joists will actually act as “spreaders” to push it back into a straight line.
Sight down the edge of every board. Mark the “crown” (the high side of the curve) with a pencil. You want every single interior joist installed crown up. Gravity will eventually settle the floor flat; if you put them crown down, you’ll have a permanent dip.
2. Joist Spacing Like A Pro
Standard spacing is 16 inches on center (O.C.), but for heavy-duty workshops, I always go 12 inches O.C. Calculate the step between the joists as a multiple of your sheet width. Since a standard sheet of plywood is 96 inches long, your joist centers must divide perfectly into 96. At 16-inch spacing, your 6th joist lands exactly at the 8-foot mark.
When marking your rim joists, hook your tape on the end and mark at 15-1/4 inches, then every 16 inches after that. This ensures the edge of your first plywood sheet lands exactly in the center of the joist, giving the next sheet a “ledge” to sit on.
3. Fasten For The Long Haul
Don’t just end-nail through the rim joist. If you want a floor that doesn’t squeak or sag, use metal joist hangers.
Use G90 galvanized hangers. I’ve moved away from nails and now strictly attach joist hangers using Simpson Strong-Drive SD screws. They are specifically designed for this. They don’t vibrate loose, and if you make a mistake, you can back them out without destroying the wood.
If a joist is stubborn and won’t sit flush, use a “big hammer” to persuade it, but never trim the end of a joist to fit a crooked box. Force the box to match the joists. The wood will eventually thank you by staying straight.
Ensure the top of the joist is perfectly flush with the top of the rim joist. If it’s even 1/8-inch high, your plywood will teeter-totter on it.
4. Don’t Forget The Mid-Span Blocking
If your joists span more than 8 feet, they need mid-span bracing (blocking). Cut short blocks from your leftover joist material. Install them in a straight line (or slightly staggered) down the center of the floor.
This prevents the joists from “rolling” or twisting under load. A joist that twists loses its strength. I once saw a floor fail because the builder skipped blocking; the 2×8 joists simply laid over on their sides when a tractor was driven onto them.
5. Re-Square The Frame
After all the interior joists are in, your frame is much heavier and more rigid. The addition of the interior joists can sometimes push the frame out of square if they were cut slightly too long. So re-pull your diagonals.
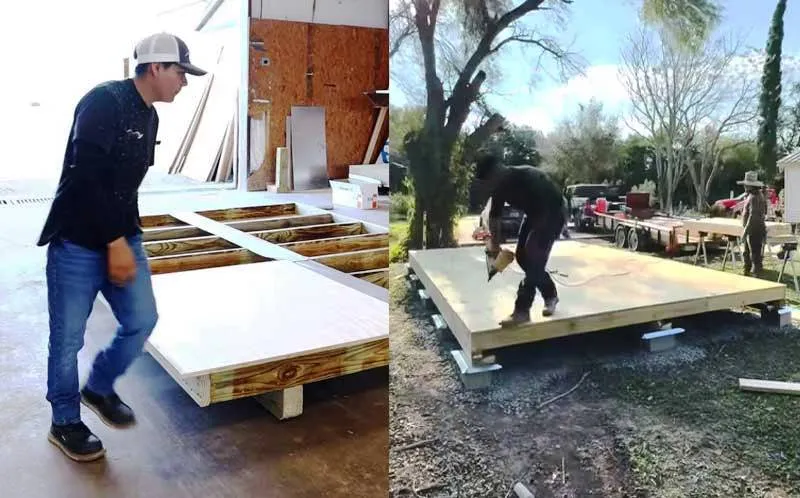
Steps To Fasten Plywood Sheathing
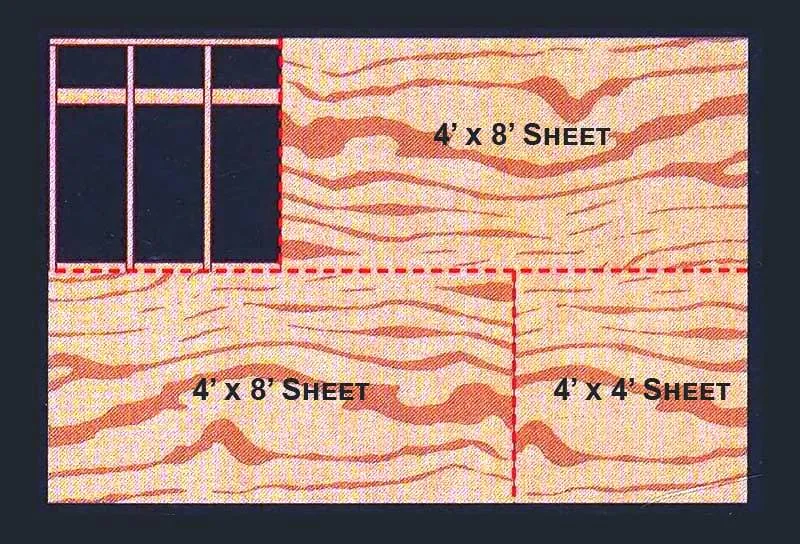
If you simply slap boards down in a row, you’re creating “hinge lines” that will cause the floor to flex and eventually fail. So you need to stagger the sheets.
1. Prep The Glue Bond
Before laying your first sheet, run a thick, serpentine bead of subfloor adhesive (like PL Premium) along the top of every joist.
Nails eventually loosen as wood dries and shrinks. Glue creates a permanent bond that turns the plywood and joists into a single, monolithic unit. I once skipped glue on a small 8×8 tool shed to save ten minutes; three years later, every step sounded like a haunted house floorboard.
2. Squaring the Deck with Your First Sheet
Start at the corner that is most “true.” Lay your first 4×8 sheet so that the long edge runs perpendicular to the joists.
I always snap a chalk line 48-1/8 inches from the edge of the rim joist. Aligning your sheet to this line (rather than the edge of the wood) ensures that if your rim joist has a slight bow, your plywood remains perfectly straight.
Use a 10d nail as a spacer to leave a 1/8-inch gap between the edge of the sheet and the rim joist. Wood needs room to breathe and expand with humidity.
3. A Staggered Layout Prevents Floor Flex
Never let the corners of four sheets meet at a single point. This is a major structural weakness. If your first row starts with a full 4×8 sheet, start your second row with a 4×4 half-sheet. By offsetting the seams, you distribute the load across multiple joists and prevent the floor from “folding” under weight.
When using Tongue and Groove plywood, use a “beater block” (a scrap of 2×4) to hammer the sheets together. Never strike the tongue directly with your hammer, or you’ll mushroom the wood, and the next sheet won’t seat.
4. The "Six-and-Twelve" Rule For Fastening
Drive your fasteners (2-inch exterior screws or ring-shank nails) every 6 inches along the edges of the sheet and every 12 inches in the “field” (the middle of the sheet where it crosses internal joists).
Before you cover the joists, mark their centers on the side of the rim joist. Once the plywood is down, snap a chalk line between those marks so you know exactly where to drive your screws without “missing” the joist below.
5. Correct the Overhang for a Dead-Flat Face
Sometimes, despite your best efforts, the plywood might overhang the frame by a fraction of an inch.
Use a circular saw with the blade depth set just 1/8-inch deeper than the plywood thickness. Use the rim joist as a guide to trim the excess plywood perfectly flush. This ensures your wall plates will sit flat against the edge later.
Add A Ramp And Bridge The Gap
Unless you’re planning on lifting your lawnmower or snowblower by hand every time you finish chores, a ramp is a non-negotiable addition. A shed floor is typically 6 to 12 inches off the ground, creating a “step-up” that is a nightmare for anything on wheels.
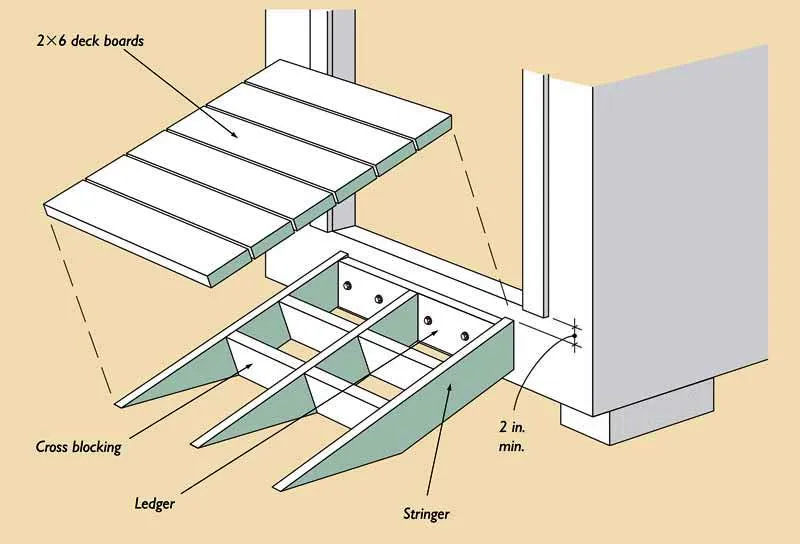
I’ve seen guys try to use two loose 2×10 boards as a temporary ramp. Eventually, one board kicks out, the mower tips, and someone ends up in the emergency room. It’s way better to build a permanent, framed ramp that’s as solid as the floor itself.
Heavy-Duty Coverings To Protect Your Subfloor
Raw plywood is a sponge; it drinks up humidity, oil spills, and mud. You need to shield the sheathing from the top down. People put everything from high-end epoxy to discarded carpet scraps in sheds, and I can tell you that the right covering isn’t just about looks, it’s about moisture management.
Elastomeric Deck and Dock Coatings
This is my go-to for most DIY builds. It’s a thick, rubberized paint designed to bridge small cracks and handle heavy foot traffic.
It creates a 100% waterproof barrier and usually contains an anti-skid grit. It’s thick enough to hide “checking” in pressure-treated plywood.
3/4-Inch Rubber Stall Mats
Often found in tractor supply stores for horse stalls, these are the “holy grail” for workshop sheds. They are virtually indestructible and provide incredible vibration dampening for power tools. They protect the wood frame from the impact of dropped heavy weights.
Garage Floor Epoxy (with Flake)
For those who are building a “Man Cave” or a high-end studio, epoxy gives you that professional, showroom look. It is completely impervious to chemicals and gasoline. It’s the easiest surface to sweep and mop.
Interlocking PVC Tiles
These are the “puzzle piece” floors you see in high-end garages.
You can easily install them with no adhesives. If you damage one section, you just pop out that tile and replace it. They allow for some airflow underneath, which is great for preventing wood rot.
Sheet Vinyl (Linoleum)
The budget-friendly way to get a clean, wipeable surface. They provide a seamless surface so liquid can’t reach the plywood seams.
Roll-Out Garage Mats (Vinyl/Rubber)
These are large, ribbed sheets that come in rolls of 8 or 10 feet wide. They have no seams to worry about. The “ribbed” pattern channels water and melted snow toward the door, keeping your tools dry.
Quality Checks Before The Walls Go Up
Before you start framing your walls, run through this 10-point inspection. If you miss one of these, the mistake is permanent once the walls go up.
- Check the end-tags on your joists and skids. Are they stamped UC4A Ground Contact Rated?
- Are all the crowns (the high humps) facing up?
- Are your diagonal measurements within 1/8-inch of each other?
- Look at the heads of your nails or screws. Are they verified Hot-Dipped Galvanized (HDG)?
- Check the gaps between your ribs. Is the spacing 12 or 16 inches on-center?
- Set your 4-foot level across the frame in both directions. Is the frame dead-level at all four corners?
- Crawl under the edge (if you can) or use a ruler. Is there at least 4 inches of clear space between the bottom of the joists and the grade?
- For any joist spans over 8 feet, did you install solid blocking in the center?
- Check the seams where your plywood sheets meet. Did you leave a 1/8-inch expansion gap?
- Did you remember the bead of subfloor glue on top of the joists?
If you follow the 16-inch O.C. rule and don’t skip the subfloor adhesive, you are building a structure that will outlast the mortgage on your house. Most people rush this stage because they want to see the walls go up, but the hour you spend double-checking your diagonals is the most important hour of the entire build.
Now that your floor is rock-solid and level, you’re ready for the next part. It’s time to walk through the structural secrets of framing shed walls so they don’t rack or lean.


Read Next
 Shed Roof Slope: Guide To Find the Right Weather-Proof Pitch
 Frame Shed Walls: A Step-by-Step Guide For Rock-Solid Builds
 Build Single Shed Doors With Step-By-Step Plans
 Build Double Shed Doors From Plans Step-By-Step
 Shed Foundation Guide: 11 Durable Builds And Traps To Avoid
 How To Build A Durable Shed: Complete Step By Step Guide
Framing-to-Finish Roadmap: DIY Guides For Every Step of The Build


