
37 Shed Building Tools For A Solid Build (Pro Checklist)
I’ve seen more backyard disasters than I care to count. A lot of them failed because the homeowner brought a pocket knife to a gunfight. Or more accurately, a cheap 16oz finish hammer to a pressure-treated framing job.
This guide is a breakdown of the shed building tools that actually survive a muddy job site and save your back when you’re working solo.
The right tool kit is an insurance policy against frustration and a guarantee that your shed won’t lean after the first winter frost.
A 22oz framing hammer, a high-visibility 25ft tape, and a 4-foot beam level are your holy trinity.
Invest in a pneumatic framing nailer and an impact driver; they will save your wrists and cut your framing time by 60%.
Use a moisture meter before you ever lay a floor sheet. If your pressure-treated joists are at 25% moisture, they will shrink and squeak once the sun hits them.
Budget about $800–$1,200 for a solid middle-of-the-road tool kit if you’re starting from zero. It’s cheaper than paying a contractor $5,000 for labor.
A Heavy-Duty Framing Hammer Is The Most Vital Shed Building Tool
If you walk onto my job site with a smooth-faced finish hammer to drive 16d sinkers, I’m sending you home. We aren’t hanging picture frames; we are slamming home 3.5-inch nails into wet, pressure-treated 4x4s. You need the weight.
Specifically, a 22-oz head, to let gravity do the work for you. I prefer a milled face (that waffle pattern on the head) because it bites into the nail head and prevents skipping, which is the fastest way to break a thumb.
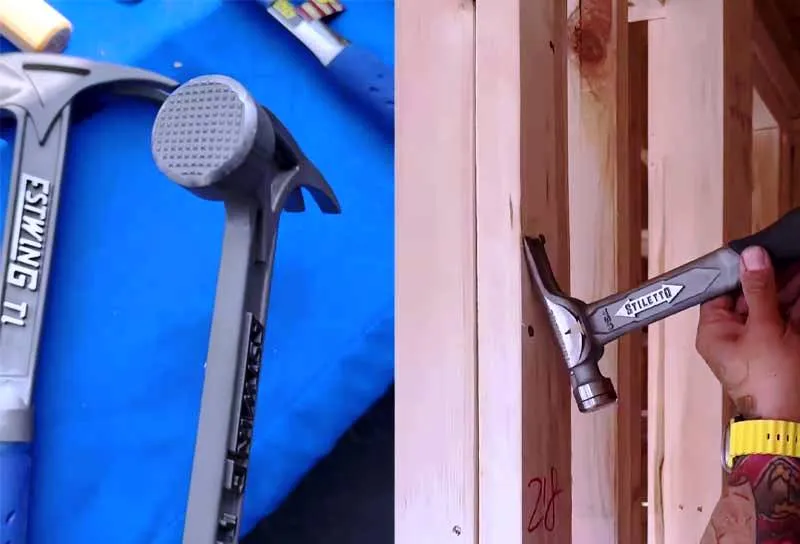
I remember a project in upstate New York where I switched to a titanium-handled Stiletto. It felt like swinging a feather, but it hit like a sledgehammer.
A cheap steel hammer costs $20 but gives you tendonitis. A high-end wood or titanium handle costs $100+ but saves your elbow for the next twenty years.
When you hold the hammer, the “sweet spot” should feel like it wants to fall forward into the wood. A 16-inch handle gives you the leverage to pull apart a “oops” stud without breaking your back.
As you’re swinging for the fences, keep your wrist stiff. Let the elbow and shoulder provide the power. If you find yourself pecking at the nail, you’re using the wrong tool. A pro drives a 16d nail in three swings: one to set, one to drive, one to bury.
Price Range: $35 – $250 (Titanium)
Buy/Rent/Borrow: Buy. This is your most personal tool.
Importance Score: 10/10
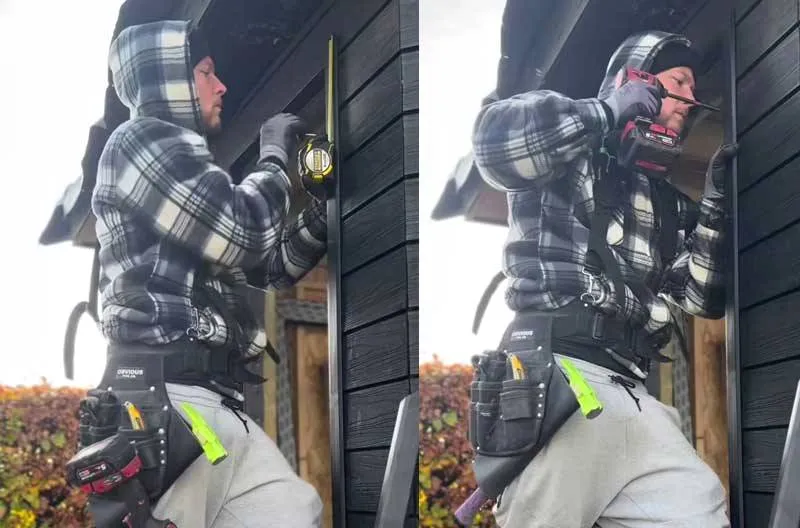
25-Foot Tape Measure With Standout and Hook Accuracy
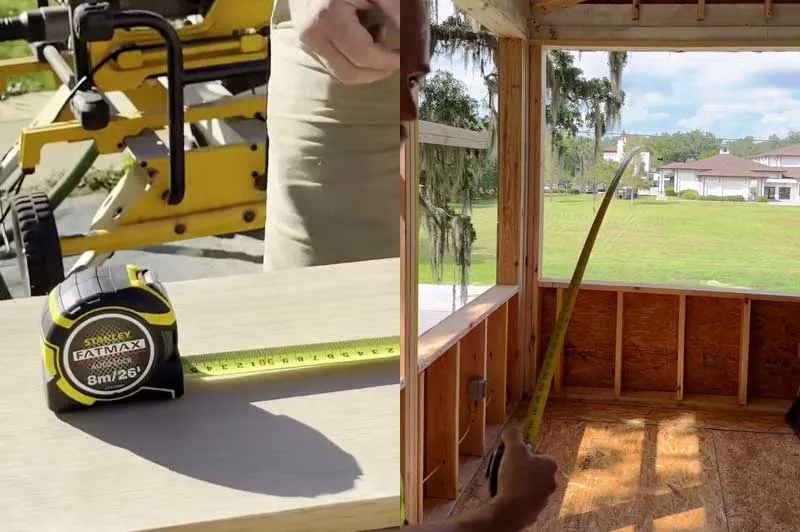
In the world of shed building, a “heavy” 1/8th of an inch is the difference between a door that swings shut and one that sticks every time it rains.
I’ve seen beginners use those flimsy 12-foot tapes meant for measuring curtains. On a job site, you need a 25-foot tape with at least 11 feet of standout. Why? Because when you’re measuring a diagonal to square up a floor frame by yourself, you need that blade to stay stiff across the gap.
Check the hook at the end. It’s supposed to be loose. Beginners often try to “fix” it by hammering the rivets tight. Don’t do that. That movement accounts for the thickness of the hook itself, ensuring your inside and outside measurements are both accurate.
If that hook gets bent or the blade gets a “kink” from being stepped on, throw it away. A compromised tape is a liability.
Price Range: $20 – $40
Buy/Rent/Borrow: Buy.
Importance Score: 10/10
4-Foot, 2-Foot, and Torpedo Levels
If your mudsill isn’t level, your walls will lean. When your walls lean, your trusses or rafters won’t sit flush. I carry three levels: a 4-foot I-beam level for walls and floors, a 2-foot level for headers, and a magnetic torpedo level for tight spaces like birdsmouth notches or vents.
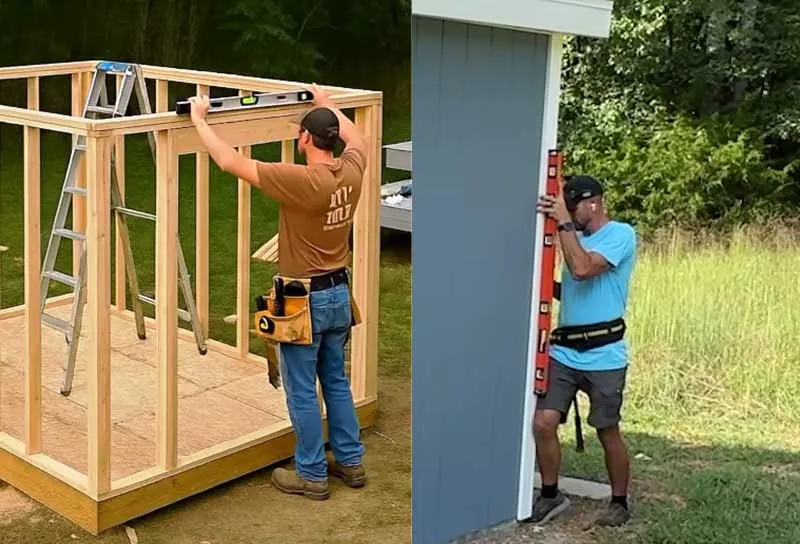
Never trust a level blindly. Always check the level by placing it on a surface, noting the bubble position, then flipping it 180 degrees. If the bubble doesn’t land in the exact same spot, the vial is out of calibration. Throw it in the trash; a lying level is worse than no level at all.
The ground is never flat. You’ll use your 4-foot level to find the high point of your site. I once worked with a guy who used a 2-foot level to check a 12-foot wall. He checked it in sections, and each section was “close enough,” but the cumulative error meant the wall was leaning two inches out at the top. We had to use a come-along winch to pull the whole structure back into plumb.
Price Range: $50 – $150 (for a set)
Buy/Rent/Borrow: Buy.
Importance Score: 10/10
Speed Square Is The Swiss Army Knife of Framing
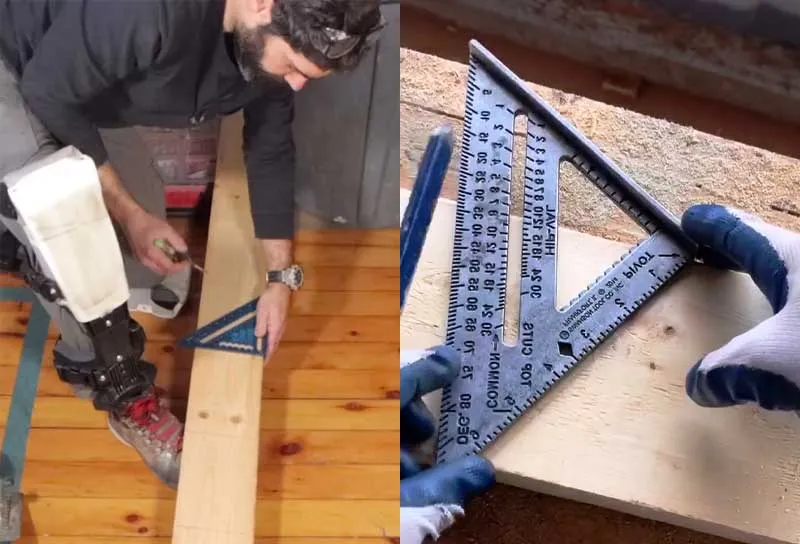
This triangular tool is your saw guide, your protractor, and your layout tool all in one. When you’re marking your stud layout on the top and bottom plates, the 1.5-inch width of the square is exactly the thickness of a standard 2x lumber. It’s built for the job.
Use your speed square as a fence for your circular saw. Instead of trying to eye-ball a straight 90-degree cut on a stud, press the square’s fence against the board, butt the saw’s base plate against the square, and slide them together.
It guarantees a perfectly square cut every single time, which is vital for “bearing” (making sure the wood sits flat against the next piece to transfer weight).
Price Range: $10 – $25
Buy/Rent/Borrow: Buy.
Importance Score: 9.5/10
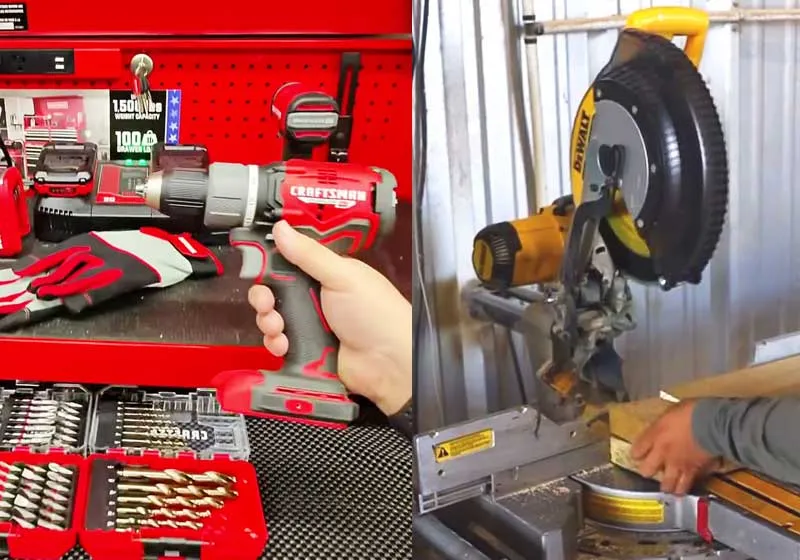
Circular Saw With The Right Blade Count
The “Skilsaw” (as we call it, regardless of the brand) is the workhorse of the shed build. You’ll use it for everything from chopping studs to ripping 4×8 plywood sheets.
The secret isn’t just the saw; it’s the blade. For framing, I use a 24-tooth carbide-tipped blade. It cuts fast and stays cool. For the exterior siding or trim, I swap to a 40 or 60-tooth blade to prevent “tear-out”—those ugly splinters that happen when a coarse blade hits thin veneer.
I’m partial to “worm-drive” saws for heavy framing because they have more torque and the blade is on the left side, making it easier for right-handed builders to see the cut line. However, they are heavy. If you’re building a small 8×8 garden shed, a standard sidewinder saw is more than enough.
Price Range: $100 – $230
Buy/Rent/Borrow: Buy.
Importance Score: 9.5/10
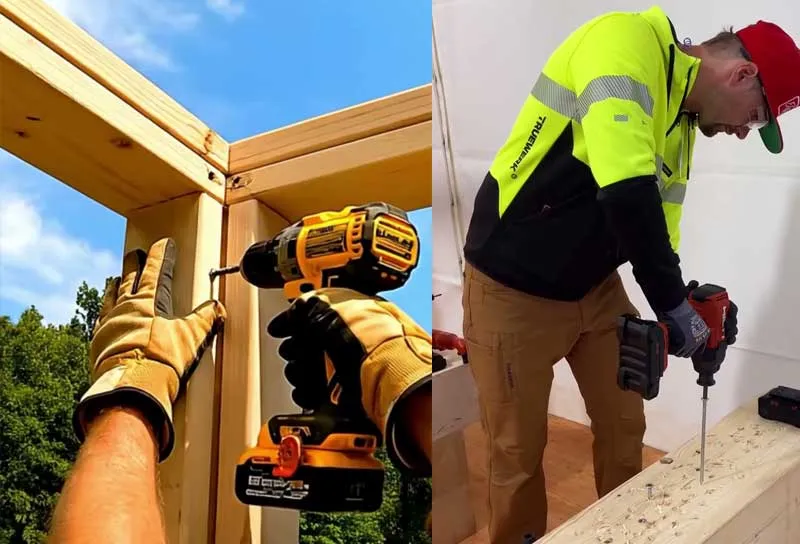
Cordless Power Drill with Impact Driver Combo
You need both. Don’t let a big-box store employee tell you a single drill is enough. The drill is for boring holes (vents, electrical, or pilot holes). The impact driver is for driving screws. An impact driver uses a rotational hammering action that prevents the bit from “camming out” (slipping out of the screw head).
Price Range: $150 – $350 (Combo Kit)
Buy/Rent/Borrow: Buy.
Importance Score: 9/10
When you’re pulling a warped 2×4 into place, you need the raw torque of an impact driver to sink a 3-inch deck screw through that lumber. If you try that with a standard drill, you’ll likely burn out the motor or strip the screw head.
I always keep a magnetic bit holder on mine. It sounds like a small thing, but when you’re 8 feet up on a ladder trying to secure a rafter, you don’t want to be fumbling with dropped screws in the grass.
A Pneumatic Framing Nailer Saves Two Days
If you are building anything larger than a 4×4 trash can enclosure, rent or buy a framing nailer. Driving 16d nails by hand into a full 12×16 shed frame will take you four days and leave your arm feeling like lead. With a nail gun, you can frame those same walls in four hours.
My first big “pro” shed, I didn’t check the oil in my nailer. I ran it bone-dry for three hours. The internal O-rings fried, and the gun started “double-firing”—spitting out two nails at once. One hit a knot and ricocheted past my ear. Now, I put three drops of pneumatic oil in the air intake every single morning before I plug in the hose. It’s a five-second habit that saves a $300 tool.
You’ll need a small pancake compressor to run it. Setting the depth of drive is critical here. You want the nail head to be flush with the wood. If it’s over-driven (sunk deep into the wood), you’ve crushed the wood fibers and weakened the connection. If it’s “proud” (sticking out), you’ll have to come back with a hammer and finish it off anyway.
Price Range: $200 – $400 (plus compressor)
Buy/Rent/Borrow: Rent for the weekend if you’re on a budget.
Importance Score: 8.5/10
Chalk Line Marks The Long Truth
You cannot eyeball a 16-foot straight line. Whether you are laying out the perimeter of your floor on a concrete slab or marking a straight line across 10 sheets of plywood for a roof cut, the chalk line is king.
Get permanent red chalk for the foundation layout because it won’t wash away in a light drizzle. Use blue chalk for everything else, as red can bleed through paint or stain. When you snap the line, pull it tight, like a guitar string tight, and pluck it straight up. If you pull it at an angle, the line will “roll” and give you a curve instead of a straight line.
On a humid morning, your chalk will get clumpy inside the box. I always keep a few moisture-absorbing silica packets (the ones you find in shoeboxes) inside my chalk reel case. It keeps the powder dry and ensures the line comes out crisp rather than looking like a smeared crayon mark.
Price Range: $10 – $20
Buy/Rent/Borrow: Buy.
Importance Score: 8.5/10
At Least Two Carpenter’s Pencils
A standard round pencil will roll off your roof and disappear into the abyss the moment you set it down. A carpenter’s pencil is flat, so it stays put. But more importantly, the lead is thick and strong. You can sharpen it to a chisel point with your utility knife, which allows you to scribe lines against rough lumber without the tip snapping.
I always carry two: one sharpened to a fine point for trim work, and one “fat” one for marking layout on pressure-treated 4x4s.
Price Range: $5 (for a pack of 12)
Buy/Rent/Borrow: Buy.
Importance Score: 8/10
Moisture Meter For Quality Control
This is the most underrated tool in a shed builder’s kit. Most DIYers who buy lumber from a big-box store just bring it home and start building. That lumber is often “wet”, meaning it has a high moisture content from the pressure-treatment process or from sitting in a rain-soaked yard.
If you nail down wet plywood subflooring, it will shrink as it dries. This creates gaps, squeaks, and can even cause your floor coverings to crack. I don’t start framing until my lumber is below 19% moisture.
Lumber yards often store “kiln-dried” wood outside under crappy tarps. Just because the stamp says KD-HT (Kiln Dried, Heat Treated) doesn’t mean it’s dry now. Always probe the center of the board, not just the end grain. The ends dry out first, giving you a false dry reading.
Price Range: $30 – $150
Buy/Rent/Borrow: Buy.
Importance Score: 7.5/10
Laser Level To Square the Foundation Solo
When you’re building a shed on a slope, a 4-foot spirit level isn’t enough to get your corner posts height-consistent. You’ll be chasing your tail all day. A rotary laser level allows you to set a “benchmark” height and transfer it to all four corners of your site with 1/16th-inch accuracy.
I use this specifically for setting piers or blocks. You set the laser in the middle of the site, and use the receiver on a story pole to make sure every corner of your foundation is perfectly level with the others.
Price Range: $150 – $600
Buy/Rent/Borrow: Rent. (Unless you plan on building five sheds).
Importance Score: 7.5/10
Adjustable Sawhorses Design A Mobile Workbench
Never cut wood on the ground. It’s bad for your back and bad for your saw blade (hitting dirt/rocks). A pair of adjustable-height sawhorses allows you to create a stable cutting platform anywhere. I prefer the ones with “2×4 support arms”. You can drop a couple of 2x4s between two horses to create a makeshift table that supports full sheets of plywood.
Price Range: $60 – $120 (pair)
Buy/Rent/Borrow: Buy or Make
Importance Score: 7/10
If you’re looking to be eco-friendly or save cash, you can build your own sawhorses out of scrap 2x4s from your framing stage. However, the “collapsible” metal ones are better for long-term viability because they don’t rot if you leave them out in the rain during the build, and they take up very little space in your finished shed.
Sliding Compound Miter Saw For Precision Bevels
While a circular saw does the heavy lifting, a 10-inch or 12-inch sliding miter saw is what makes your trim and rafters look professional. It allows you to make perfect 45-degree miter cuts for corner boards and complex “bevel” cuts for where the roof meets the fascia.
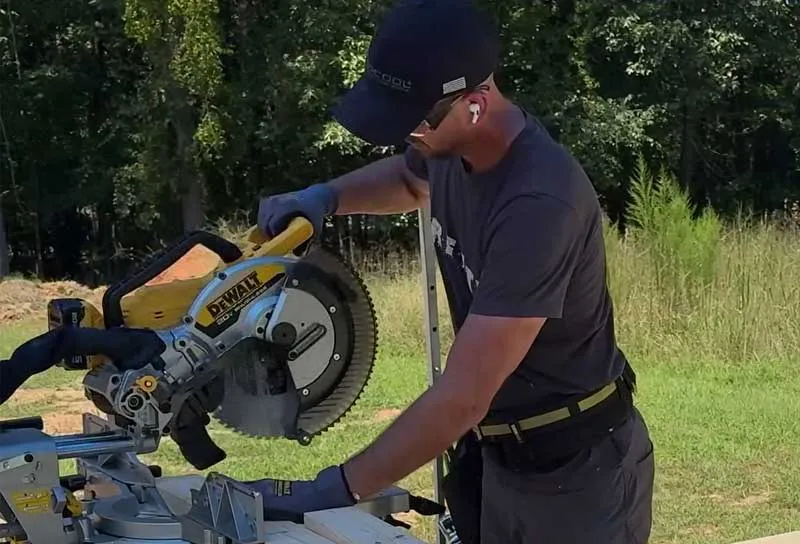
The sliding feature is key as it allows the blade to travel forward. Meaning you can cut a 1×12 trim board in a single pass. Without the slide, you’re limited to narrower boards.
Price Range: $250 – $600
Buy/Rent/Borrow: Buy if you love woodworking; otherwise, a circular saw and a speed square can do 90% of this work.
Importance Score: 6.5/10 (High for trim, lower for raw framing).
6-Foot Pro-Platform Stepladder
You’ll need a 6-foot fiberglass ladder. Why fiberglass? Because if you’re running a power cord for your drill and it gets nicked, an aluminum ladder becomes a lightning rod. I use the pro-platform style ladders that have a wide step at the top. It gives you a stable place to stand while you’re beating in those top plates or setting the ridge beam.
Safety Note
Never stand on the “Top Flop” (the very top plastic cap). I’ve seen more hospital trips from people losing balance on the top rung of a 4-foot ladder than people falling off roofs. If you can’t reach it comfortably, get a bigger ladder.
Price Range: $100 – $200
Buy/Rent/Borrow: Buy.
Importance Score: 7/10
The "Third Hand" Jack Has Become The Solo Builder's Best Friend
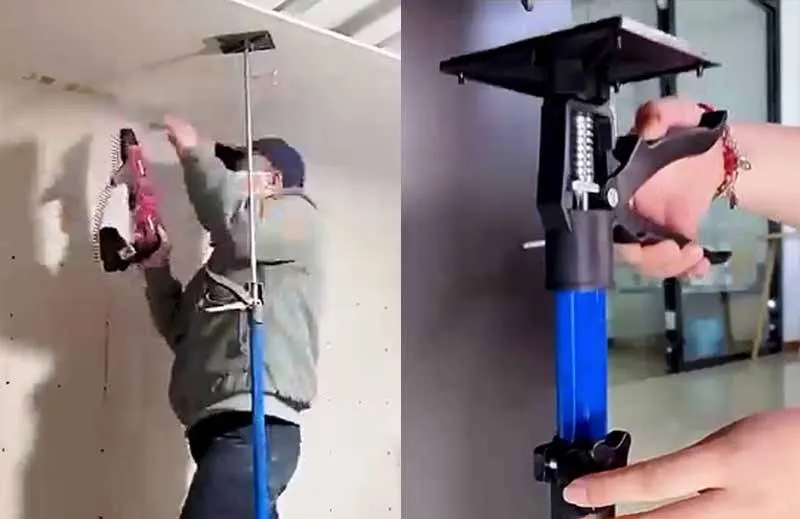
When you are building your shed alone, having a telescopic support pole called a “Third Hand” is very handy. This tool acts as a temporary brace to hold a heavy header or a ridge board in place while you level and nail it. It’s like having an assistant who never gets tired and doesn’t complain about the heat.
Price Range: $60 – $100
Buy/Rent/Borrow: Buy if solo; skip if you have a buddy.
Importance Score: 6/10 (10/10 for solo builders).
Tin Snips and Nibblers Master The Metal Bite
I’ve seen guys try to use their circular saw with a backward blade to cut drip edge and flashing. It’s loud, throws dangerous sparks, and leaves a jagged, rusted edge. A pair of “offset” tin snips (the ones with the red or green handles) allows your hand to stay above the metal while you cut, preventing those nasty guillotine slices on your knuckles.
Nibblers are the high-end alternative if you’re doing a full metal roof. They literally nibble a tiny channel out of the metal, leaving a clean edge. When you’re just doing shingles, a standard pair of aviation snips is more than enough for the rake and eave flashing.
Price Range: $15 – $45
Buy/Rent/Borrow: Buy.
Importance Score: 6/10
When installing drip edge at the corners, don’t just butt the pieces together. Use your snips to tab the overlapping piece. Cut a 1-inch slit, fold it over the corner, and tuck the next piece under it. This creates a continuous water-shedding path that prevents wicking (water creeping back under the shingles and rotting your plywood deck).
Wood Chisels Craft The Perfect Seat
You might think a chisel belongs in a fine furniture shop, not a backyard shed. But if you want your doors to hang correctly, you need a sharp 1-inch bench chisel. Most doors sag over time because the hinges were just screwed onto the surface of the wood.
A pro will “mortise” the hinge, meaning we cut a shallow recess so the hinge plate sits flush with the wood.
This flush-seating transfers the weight of the door to the wood frame rather than just the screws. I always keep a beater chisel (one with a metal cap on the handle) specifically for this. It can take the abuse of a hammer when I’m hogging out a notch for a door bolt or a lockset.
Price Range: $15 – $60 (for a set)
Buy/Rent/Borrow: Buy.
Importance Score: 5.5/10
Heavy-Duty Post Hole Digger To Fight Frost Heave
If your shed is sitting on posts rather than a slab, this tool is your morning workout. In the United States, building codes usually require you to get below the frost line (which can be 36 to 48 inches deep in some states). A standard shovel won’t get you a clean, vertical 4-foot hole.
You need the “clamshell” style digger. Look for one with fiberglass handles; I’ve snapped more than my fair share of wooden ones when prying against a stubborn rock. If your soil is heavy clay or full of ledge (solid rock), stop struggling and go rent a gas-powered auger. Your lower back will thank you.
Price Range: $40 – $70
Buy/Rent/Borrow: Buy (unless you need a gas-powered one, then Rent).
Importance Score: 8/10 (If building a pole-shed).
Sledgehammer To Set Foundations
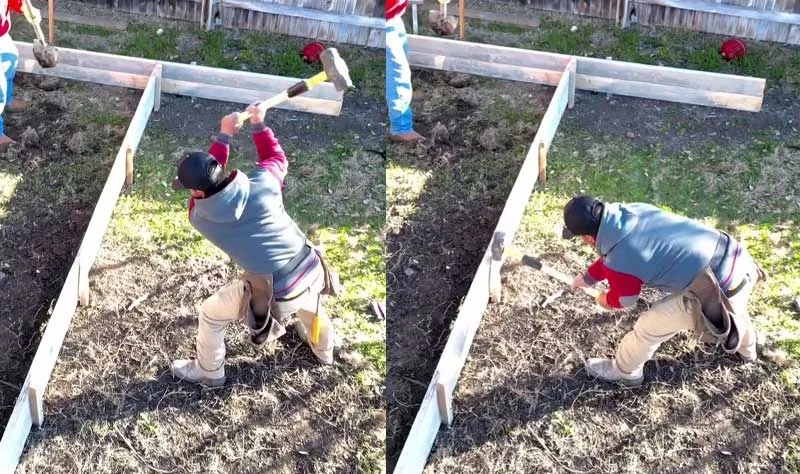
When you’re setting your 4×4 posts or trying to level out a concrete pier block in a bed of gravel, a 10-pound sledge is essential. It provides the blunt force needed to settle structural members into their final resting place.
I also use it for site prep. When there’s an old stump or a buried rock in the way of your foundation, the sledgehammer is your primary demolition tool.
Price Range: $30 – $50
Buy/Rent/Borrow: Buy.
Importance Score: 6/10
Float, Trowel, and Edger For Concrete Finishing
If you’re pouring a slab, these three tools are a non-negotiable set. The Magnesium hand float is used first; it opens the surface and pushes the large aggregate (rocks) down while bringing the “cream” (paste) to the top.
The finishing Trowel (steel) is used later, once the water sheen has disappeared, to create that smooth, hard-shell finish. Finally, the Edger creates a rounded perimeter.
A perfectly smooth concrete floor is dangerously slippery when it gets wet or covered in sawdust. Use the steel trowel sparingly. I prefer a “broom finish”, literally pulling a stiff-bristled broom across the wet concrete to create a non-slip texture. It’s safer and more practical for a workspace.
Price Range: $40 – $100 (for all three)
Buy/Rent/Borrow: Buy if pouring your own slab.
Importance Score: 9/10 (for concrete foundations).
Sliding T-Bevel and Contour Gauge To Handle Those Weird Angles
Your roof pitch might be a custom 7/12, or you might be fitting trim around a decorative eave. A T-Bevel allows you to “capture” an angle from one place and transfer it to your saw.
The Contour Gauge is a series of sliding pins that take the shape of whatever you press them against. If you’re siding around a pre-existing structure or a weirdly shaped post, this tool is how you get a zero-gap fit.
Price Range: $10 – $30
Buy/Rent/Borrow: Buy.
Importance Score: 4/10 (But 10/10 for custom trim).
Reciprocating Saw For Making Corrections
We call this the Sawzall. It’s not for precision; it’s for “correction.” If a stud is 1/4 inch too long and already nailed in, or if you accidentally ran your siding over a window opening, the reciprocating saw is the only tool that can get into those tight spots to undo the mistake.
I use it mostly for flush-cutting, taking off the ends of nails or bolts that are sticking out where they shouldn’t be. Use a demolition blade with a high TPI (teeth per inch) for the best control.
Early in my career, I was using a Sawzall to cut a vent opening. I didn’t check what was behind the wall. I sliced through a live electrical line and a PVC pipe in one go. The reciprocating saw is a “blind” tool. Always use a depth stop or mark your blade so you know exactly how deep you’re cutting into a cavity.
Price Range: $80 – $180
Buy/Rent/Borrow: Buy.
Importance Score: 7/10
Oscillating Multi-Tool For Plunge Cuts
If the reciprocating saw is the sledgehammer of saws, the Multi-Tool is the scalpel. It uses a vibrating blade to make plunge cuts. It is perfect for cutting out a hole for an electrical outlet in your finished shed walls or trimming the bottom of a door casing so the flooring can slip underneath.
It’s the tool I reach for when I say, “I wish I could just cut this one tiny sliver of wood without taking the whole wall apart.”
Price Range: $60 – $150
Buy/Rent/Borrow: Buy.
Importance Score: 6/10
High-Thrust Caulking Gun
Don’t buy the $4 orange caulking gun from the bin at the hardware store. It has a low thrust ratio, meaning you have to squeeze like a bodybuilder to get thick construction adhesive out of the tube. Buy a 18:1 or 26:1 high-thrust gun.
It makes a huge difference when you’re applying subfloor adhesive (like PL Premium) to your joists. If that adhesive isn’t applied in a thick, consistent bead, your floor will squeak.
Price Range: $20 – $40
Buy/Rent/Borrow: Buy.
Importance Score: 7/10
Most modern guns have a dripless feature, but if yours doesn’t, always hit the release trigger the second you finish a bead. This stops the pressure and prevents the caulk from continuing to ooze out and making a mess of your siding. Also, keep a “poking wire” (usually attached to the gun) to break the inner seal of the tube; don’t try to use a screwdriver, or you’ll get a blowout in the back of the tube.
Palm Nailer Gives Tight-Space Superpowers
There will be a moment in your build where you need to drive a 3-inch nail into a corner where your hammer can’t swing. This is where the palm nailer shines. It’s a small, pneumatic tool that fits in the palm of your hand. You press the nail into the guide, and the tool “rattles” it into the wood.
It’s perfect for joist hangers and hurricane ties. If you’re building in a high-wind zone (like Florida or the coast), you’ll be installing dozens of metal connectors. Doing that with a hammer in a tight eave is a nightmare; a palm nailer makes it a 5-second job.
Price Range: $40 – $80
Buy/Rent/Borrow: Borrow or Buy.
Importance Score: 5/10 (Unless you have 50 joist hangers, then 9/10).
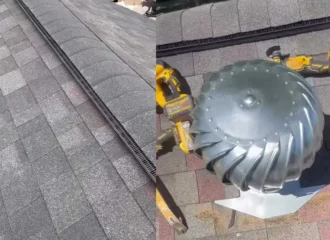
Step Drill Bits and Hole Saws For Ventilation
A shed that breathes is a shed that lasts. A shed without soffit and gable vents will turn into an oven in the summer, and condensation will rot your rafters in the winter. For vinyl or thin metal siding, step drill bits (Unibits) are the pro’s choice. They drill perfectly round holes without “grabbing” or tearing the material.
For larger vents or running a 4-inch PVC pipe for a workshop dust collector, you’ll need a carbide-tipped hole saw.
Price Range: $20 – $60
Buy/Rent/Borrow: Buy.
Importance Score: 6/10
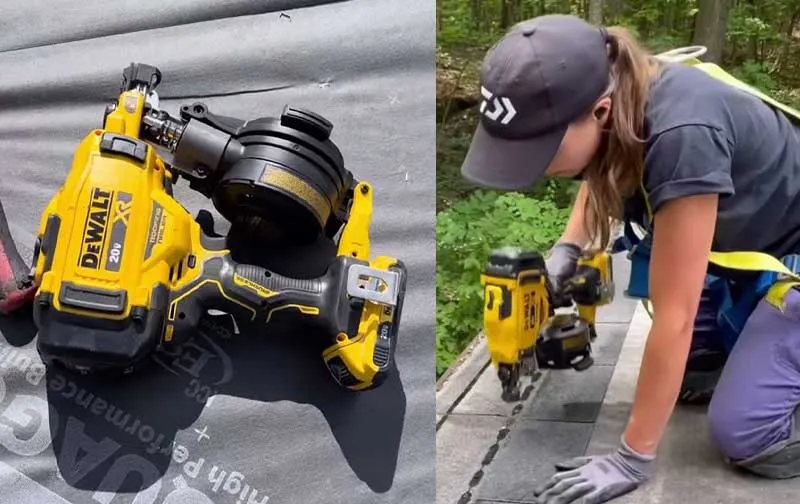
Roofing Nailer Speeds Up Shingling
If you’re using asphalt shingles, a pneumatic roofing nailer is a game-changer. It holds a coil of 120 nails, allowing you to fly through a roof in an hour.
The key here is the “shingle guide”, a small adjustable plate on the bottom of the gun that helps you keep your nail line consistent so you don’t accidentally “high-nail” the shingles (which leads to them blowing off in the first storm).
Price Range: $150 – $300
Buy/Rent/Borrow: Rent.
Importance Score: 5/10 (10/10 if you hate roofing).
Shingle Shear Cutter: Precision at the Rake
You can cut shingles with a utility knife, but after the 50th cut, your hand will be cramping, and your lines will look like a mountain range. A shingle shear works like a giant paper cutter.
It gives you a perfectly straight, factory-quality edge every time. For a simple 10×12 shed, skip it. When you’re doing a 20×20 garage-style shed, the time saved and the lack of blade changes (shingles dull utility knives in seconds) make this a winner.
Price Range: $30 – $100
Buy/Rent/Borrow: Buy for larger projects.
Importance Score: 5/10
Electric Brad Nailer Provide Interior Finish
Once the shell is done, you’ll likely want to add some “inside” flair. Some trim around the windows or a workbench. An 18-gauge brad nailer is perfect for this. It shoots tiny nails that leave almost no hole, meaning you don’t have to spend hours with wood filler and sandpaper.
Price Range: $50 – $150
Buy/Rent/Borrow: Buy.
Importance Score: 4/10
Orbital Sander, Paint Sprayer, and Nail Punch For Finishing
These are your cosmetic tools. The Orbital Sander cleans up the rough edges of your trim and doors. The Nail Punch is used to sink those few proud finishing nails below the surface of the wood.
And if you want the best-looking shed in the neighborhood, a Paint Sprayer (HVLP) will give you a “factory finish” on your siding in about 20 minutes, compared to 4 hours with a brush.
Price Range: $50 – $300
Buy/Rent/Borrow: Buy the sander; Rent the sprayer.
Importance Score: 4/10
Personal Protective Equipment (PPE) Is Non-Negotiable
I saved this for last because it’s the most important. Safety Glasses and Ear Protection are not optional. Modern wrap-around glasses prevent side-impacts from flying wood knots.
For ear protection, I recommend “Electronic Muffs.” They allow you to hear conversation but clip the loud noise of a circular saw or nailer. If you can’t hear your partner saying “Watch out!”, you’re in a dangerous spot.
Price Range: $20 – $100
Buy/Rent/Borrow: Buy. (Never share earplugs!)
Importance Score: 11/10
Tool Readiness Checklist
Before you start construction, take 5 minutes to run through this.
Tape Measure: Is it 25ft? Is the hook straight?
4-Foot Level: Did you “check” it by flipping it 180 degrees?
Speed Square: Is it metal (not plastic)?
22oz Framing Hammer: Is the face clean of old adhesive?
Circular Saw: Do you have a fresh 24-tooth carbide blade?
Impact Driver: Do you have at least two fully charged batteries?
Chalk Line: Is it filled with Blue or Red chalk?
Carpenter’s Pencils: Do you have at least three?
Moisture Meter: Did you check the lumber? (Target: <19%)
PPE: Are your glasses scratch-free?
Tin Snips: Are they offset handles?
Caulking Gun: Is it a High-Thrust (18:1) model?
Stepladder: Is it 6-foot fiberglass?
Nail Gun/Compressor: Did you buy pneumatic oil?
If you’re standing in the aisle of a tool store feeling overwhelmed, remember that precision is a choice, not a gift. You can build a shed with a hand saw and a rock if you have enough time, but you’re here because you want to build something that lasts.
If you “cheap out” on the tools, you will spend the rest of the project fighting every single board. Go get your kit together. Start with the framing hammer and don’t look back. The next step after this is to prep the site and lay the foundation. That’s where the real dirt begins. Good luck, and keep your fingers away from the blade.


Read Next
 9 Pro-Tested Shed Ventilation Ideas For DIY Builds
 Shed Rafters vs. Trusses Comparison: Pro-Tested DIY Guide
 21 Costly Shed Building Mistakes (& Pro Tips To Avoid Them)
 11 Pro Shed Organization Ideas To Maximize Storage Space
 Shed Building Codes and Permit Guide For DIY Builders
 How To Build Shed Roof Trusses On A DIY Jig In One Weekend
Framing-to-Finish Roadmap: DIY Guides For Every Step of The Build


