
9 Pro-Tested Shed Ventilation Ideas For DIY Builds
Once I walked into a customer’s high-end cedar workshop in humid Georgia. It was a beautiful $15,000 build, but the air inside hit me like a wet wool blanket. The owner hadn’t prioritized airflow, thinking the gaps in the door would breathe enough. Six months later, his $2,000 table saw was pitted with rust, and the underside of his roof decking was feathered with white mycelium. It broke my heart.
If you think ventilation is just poking a hole in the wall, you’re setting yourself up for ruined gear and a workspace that feels like a sauna. We’re going to go deep into the reality of Net Free Area, and the industry secrets that keep a backyard structure bone-dry for thirty years.
When Air-Tight Becomes a Death Sentence for Wood
In the world of carpentry, we often talk about dry-in like it’s the holy grail. We want that building sealed against the rain. But once you seal the water out, you’ve also trapped the moisture in.
Most DIYers don’t realize that the very ground their shed sits on is constantly exhaling water vapor. Even with a vapor barrier, temperature swings cause condensation on the underside of your metal or shingle roof. It’s like wearing a plastic bag while running; you’re going to get soaked from your own sweat.
Battle of Hot and Cold
Temperature control isn’t just about your comfort while you’re tinkering on a lawnmower; it’s about the expansion and contraction of your materials. When a shed sits in the sun with zero airflow, internal temperatures can easily soar 40 degrees above the ambient outdoor air.
I’ve seen plastic storage bins warp and oil-based finishes in cans literally pop their lids from the pressure. In the winter, the opposite happens. You get ice damming effects if the shed is even slightly heated, where snow melts on the roof, runs to the cold eaves, and freezes, backing up under your shingles. Proper ventilation keeps the roof deck temperature close to the outside temperature, neutralizing these thermal stresses.
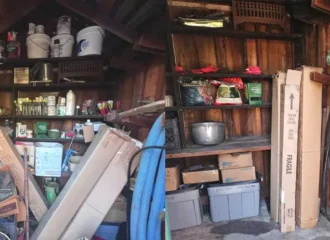
Moisture: Silent Invitation For Carpenter Ants
Moisture management is where most people fail. I call it the “shed sweat” phenomenon. When warm, moist air hits a cold surface (like your tools or the roof tins), it turns back into liquid. This leads to delamination of plywood, which is when the glue fails and your walls start peeling like an onion.
Worse, damp wood is the dinner bell for subterranean termites and carpenter ants. They don’t want dry wood; they want the soft, punky stuff that happens when air stays stagnant.
Stale Air Safety Hazard
If you’re storing a gas-powered weed whacker, a mower, or even just half-empty paint cans, you’re dealing with off-gassing. Without a constant exchange of air, these fumes concentrate. I’ve had lightbulb moments, literally, where a spark from a light switch in a poorly vented shed with a leaky gas cap made my hair stand on end. You need to scavenge those heavy vapors out.
Early in my career, I built a 12×16 she-shed for a client who wanted it hermetically sealed for her art studio. I over-insulated and used high-end vapor barriers but skimped on the ridge vent because she didn’t like the look. Within one season, the moisture from her acrylic washing and even her own breath had nowhere to go. The T1-11 siding started buckling from the inside out. I had to eat the cost, strip the interior, and retro-fit a powered gable fan. I learned then: air must move, or the building will move.
The Sniff Test: If you open your shed after it’s been closed for 48 hours and it smells like old basement, your ventilation has already failed. A healthy shed should smell like the wood it’s built from, or nothing at all. If you smell musty, you’re already losing the war to mold.
Decoding NFA: It’s Not Just the Size of the Hole
Net Free Area (NFA) is the most misunderstood term in shed building. If you buy a vent that is 12″ x 12″, you do not have 144 square inches of ventilation. You have a 144-square-inch hole covered by louvers, and screens. Each of those bits of hardware creates friction and blocks air.
Typically, a standard louvers-and-screen vent only provides about 50% to 60% of its actual physical size in NFA. This is where common pitfalls happen: people calculate they need 1 square foot of venting, cut a 1-foot hole, put a vent over it, and wonder why the shed is still roasting. They effectively only provided half the air the building needs.
Calculating Your Needs Like a Pro
To do this right, you look at the manufacturer’s stamp on the vent. A reputable vent will tell you 60 sq. in. NFA. You then sum these up until you hit your target. If you’re building a 10×10 shed (100 sq. ft.), the 1/150 rule says you need about 96 square inches of NFA. To balance that, you want 48 sq. inches down low (intake) and 48 sq. inches up high (exhaust).
Ventilation works because of the stack effect or chimney effect. Hot air is less dense and wants to rise. As it escapes through your ridge or gable vents, it creates a slight vacuum that pulls cooler, denser air in through the soffit or floor vents. If you only have high vents, the hot air gets trapped in a dead zone at the top, and the air at the floor stays stagnant. You need that low-to-high path to create a continuous conveyor belt of air.
The Short Circuit
One of the biggest mistakes I see is putting an intake vent too close to an exhaust vent, such as a gable vent right next to a ridge vent. The air will take the path of least resistance, entering one and exiting the other, leaving the rest of the shed’s air completely untouched. Spread your in and out as far apart as possible.
Active vs. Passive - Choose Your Weapon Wisely
In the shed world, we divide the battle for breath into two camps: passive (letting nature do the work) and active (forcing the air to move).
The Zen of Passive Ventilation
Passive systems are the old reliable of the industry. They involve no moving parts, no electricity, and no noise. This includes your standard gable vents, ridge vents, and soffit strips. In most of the US, a well-designed passive system is all you need for basic storage. It relies on two things: thermal buoyancy (heat rising) and wind aspiration (wind blowing across a vent and pulling air out).
If you’re still in the planning phase, look at the prevailing winds on your property. If you place your intake vents on the side that gets the breeze and your exhaust on the leeward side, you’ve just doubled your airflow for free. It’s passive-plus.
Power of Active Systems
Active ventilation uses fans, either solar or hard-wired AC, to scrub the air. If you’re using your shed as a gym, a man-cave, or a workshop where you’re welding or sawing, passive ventilation is a joke. You need an active system that can provide at least 6 to 10 air changes per hour (ACH).
Solar vs. Wired
A solar fan (active) might cost you $150–$300 upfront but $0 to run. A hard-wired fan is cheaper ($60–$100) but requires an electrician or serious DIY wiring skills, plus a monthly bump on the power bill. However, solar fans often quit just when you need them most, at dusk when the shed is still radiating heat but the sun has dipped. For a serious workshop, I always recommend a hard-wired fan with a humidistat/thermostat controller.
If you install a powerful exhaust fan but don’t have enough intake (soffit vents), the fan will struggle. It will try to pull air from anywhere it can, including through the gaps in your floorboards or under the door, often pulling in dust, bugs, and humid ground air. Your fan is only as good as your intake.
Pick Your Player From Top Ventilation Options
In this section, we’re going to break down the actual hardware of the trade. I’ve installed thousands of these, and each has a specific use case where it shines and others where it’s a total waste of money.
1. Soffit Vents Are A Low-Profile Hustle
When I’m framing out a new build, the soffit is often an afterthought for the client, but for me, it’s the starting line. These intake vents are the foundation of what we call the balanced system. You’re looking at a very low entry barrier here; a pack of ten circular or small rectangular vents will barely dent your wallet, often coming in under $40 for the whole project.
They are absolutely the best choice for any shed with an eave overhang, so if you’ve got rafters that extend past the wall, you’d be a fool not to utilize that shaded, protected underside for air intake.

The beauty of the soffit vent is its stealth nature. You get a massive amount of airflow without altering the silhouette of the roofline or worrying about rain driving in sideways during a thunderstorm. Because they face downward, gravity is your friend. However, the challenge isn’t the vent itself, it’s the internal anatomy of the shed.
If you’re a DIYer who loves to pack the rafters with insulation or attic storage, you’re likely to accidentally smother these vents. I can’t tell you how many times I’ve been called to fix a damp shed only to find the owner had shoved a roll of fiberglass right over the intake holes. You have to install baffles to keep that airway clear, which adds a bit of labor.
From a cost-benefit perspective, the labor is the only real expense because you have to spend time on your back looking up, which is a literal pain in the neck. But the payoff is a shed that stays significantly cooler because it’s pulling air from the lowest, shaded point of the structure. In all my years, I’ve found that skipping these is the #1 reason ridge vents fail to perform. Without the pull from the bottom, the push at the top is just a suggestion.
The Shadow Gap
If you don’t want to buy individual plastic vents, you can create a continuous shingle-mold gap where the siding meets the soffit. It looks like a design choice but acts as a high-volume intake. Just make sure you back it with a fine metal screen to keep the no-see-ums and wasps from claiming your rafters as their new headquarters.
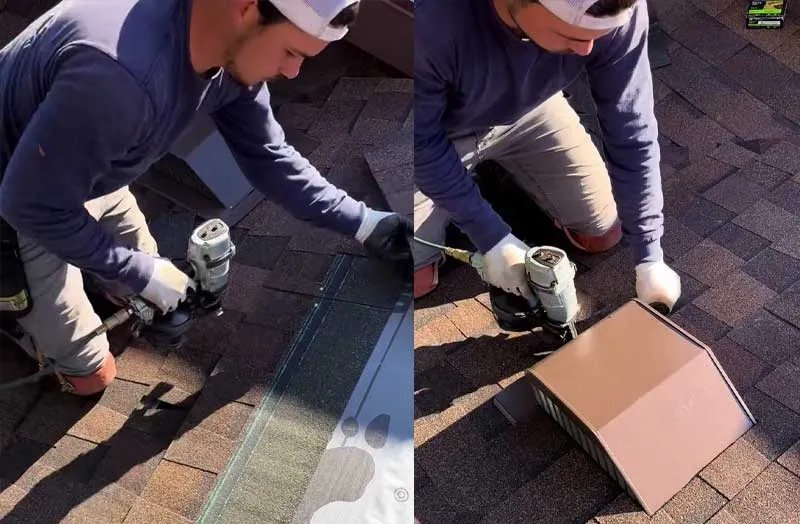
2. Turtle Roof Vent (Louvres)
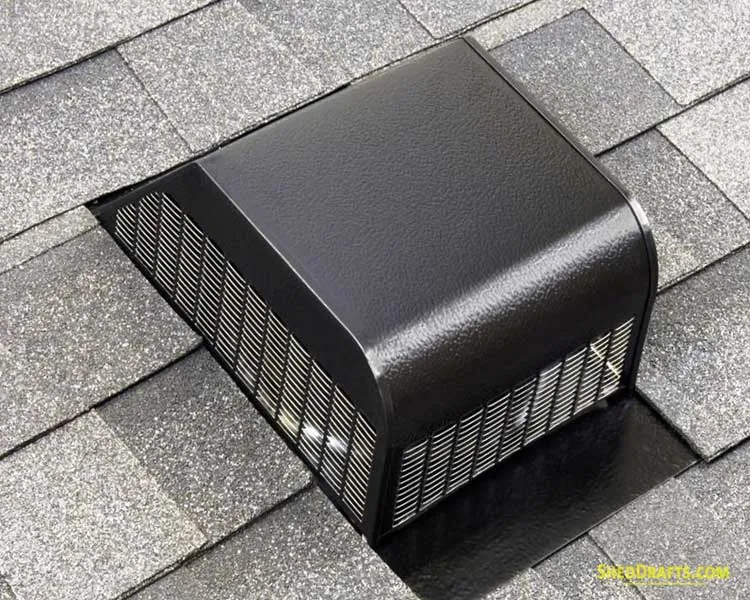
In the trade, we call these turtles because of their humped, protective shell. They are the bread and butter of residential roofing, and they transition perfectly to sheds. If you’re dealing with a shed that has a complex roofline or several hips where a long ridge vent just isn’t feasible, the turtle is your go-to exhaust. It’s a localized, high-punch vent. The challenge with these is the dead spot factor; they only vent the area they are directly cut into. If you have a 16-foot long shed and only one turtle in the middle, the corners of your roof deck are going to bake and eventually delaminate.
The price point is very friendly, usually around $20 to $35 per unit, making it a middle-of-the-road option for folks who want more than a hole in the wall but don’t want to redo their entire ridge.
To do this right, you have to weave the vent flange into the shingles. If you just screw it onto the top of the shingles and slather it with roofing tar, I promise you it will leak within three seasons. The tar will crack under the UV rays, and the water will find the screw holes. You have to slide the top flange under the course of shingles above it and over the course below it so water flows around it like a rock in a stream.
I find these best for sheds that are already built. Retrofitting a ridge vent is a nightmare, but cutting a 10-inch hole for a turtle is a Saturday morning job. The biggest benefit is the durability; these things are often made of high-impact plastic or galvanized steel and can take a beating from hail or falling branches without losing their shape.
Just be careful with placement, if you put them on the side of the shed that faces the street, they can look a bit industrial. I always try to tuck them on the back slope where they can do their job in private.
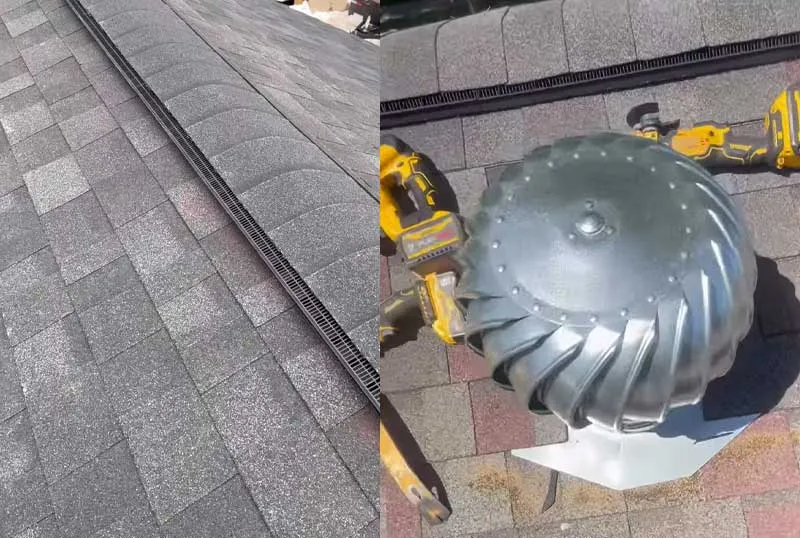
3. Peak Performance Ridge Vent
If I’m building a top-notch shed, I am almost certainly using a ridge vent. This is a long, narrow vent that sits right on the peak of the roof. Because it runs the entire length of the building, every single rafter bay has an exit point for hot air. It’s the most efficient passive system known to man.
But, it’s not for every shed. It is strictly for shingled or specific metal roofs with a peaked ridge. If you have a Lean-to style shed with a single-slope roof, this isn’t even an option for you.
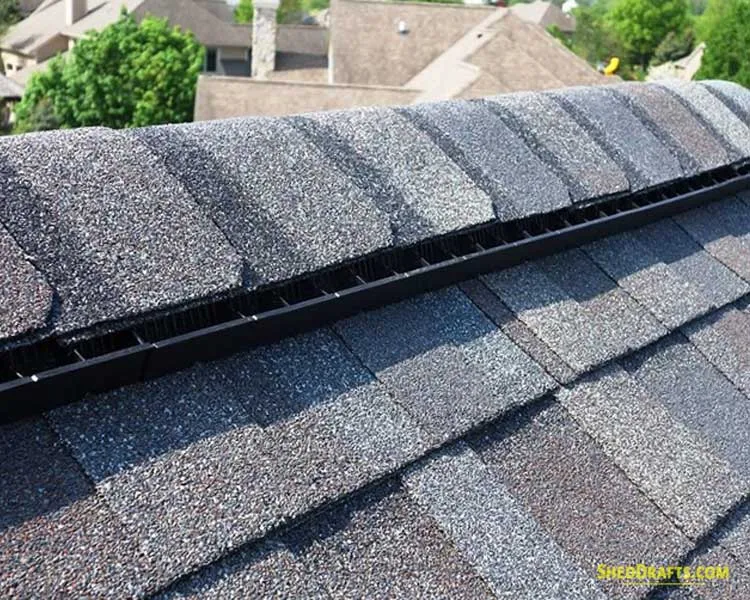
End Plug Mistake
I’ve seen plenty of pros mess this up: you have to stop the ridge vent about 6 to 12 inches away from the edge of the gable. If you run it all the way to the edge, wind can blow rain straight into the end of the vent. Most ridge vents come with end plugs, don’t throw those away! They are the only thing keeping your workbench dry during a sideways gale.
Cost-wise, you’re looking at about $15 per 4-foot section. For a standard 10×12 shed, you’re only out about $45 in materials, which is a steal considering the performance. However, the hidden cost is the ridge cap shingles you have to buy to go over the top of it. You can’t just use regular shingles; you need tabbed ridge caps that can handle the sharp bend at the peak.
The real challenge here is the precision of the cut. You have to snap a chalk line and cut a 2-inch slot through the roof decking while being careful not to nick your ridge board. If you cut too deep, you’re compromising the structural spine of your roof.
In my experience, a ridge vent combined with soffit intakes creates a thermal siphon that works even on windless days. As the sun hits the shingles, the air under the peak heats up and escapes, pulling cooler air from the soffits. It’s a silent, moving machine that requires zero electricity and zero maintenance for the life of the roof.
4. Solar Roof Ventilation Fan Is An Active Heat-Killer
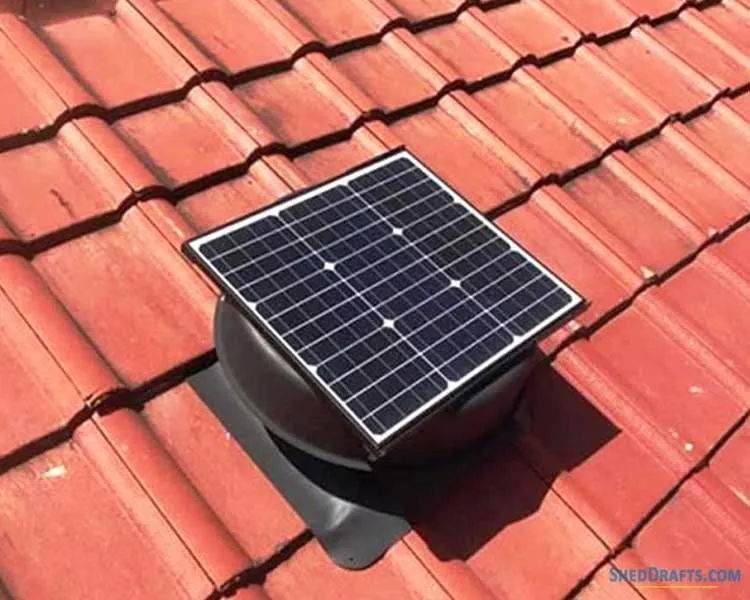
When you’ve got a shed that’s sitting in a sun-drenched backyard in the middle of Texas, passive vents are like bringing a squirt gun to a house fire. You need to move air mechanically. The solar roof fan is a beautiful piece of tech because it solves the power problem. You don’t have to dig a trench or hire an electrician to run a 110v line out to the shed. The fan is best for sheds that are used as workshops or housing heat-sensitive equipment like lithium-ion batteries for your lawn tools.
One nuance I always tell my clients is that these fans create negative pressure. If you don’t have enough intake vents, the fan will actually try to pull air down through your ridge vent or in through the gaps in the floor, which can pull in damp ground air. You have to over-spec your intake when you go solar. I once had a client whose shed actually started smelling like the dirt crawlspace beneath it because his 1500 CFM solar fan was so powerful it was sucking air through the cracks in the tongue-and-groove floorboards.
The Georgia Workshop
I installed a $350 solar fan on a 12×20 woodworking shop. Before the fan, internal temps hit 115°F. After the fan, and after we added four additional soffit vents to provide makeup air, the temperature stayed within 5 degrees of the outdoor ambient air. The client’s glues stopped drying out in the bottle, and his sawdust stayed dry enough for his vacuum system to handle.
You’re looking at $200 to $500 for a unit that actually moves enough CFM (cubic feet per minute) to matter. The cheap $50 solar fans you see on discount sites are toys, as they don’t have the torque to overcome the static pressure of a hot shed. The benefit, of course, is the set it and forget it nature. As long as the sun is shining, the fan is scrubbing that hot air out. But the challenge is the cloud factor. If you have a humid, overcast day, the fan might not kick on, even though the humidity inside is skyrocketing.
5. Skylight Vents Are The Artist’s Choice
If you’re building a hobby space or a she-shed art studio, a skylight vent is a game-changer. It’s the only option that addresses two problems at once: lighting and ventilation. Usually, these are manual hatches made of high-impact polycarbonate. They are best for steep-pitched roofs where the chimney effect is most pronounced. Because they sit at the highest point and can be opened wide, they allow for a massive dump of hot air that a louvered vent just can’t match.
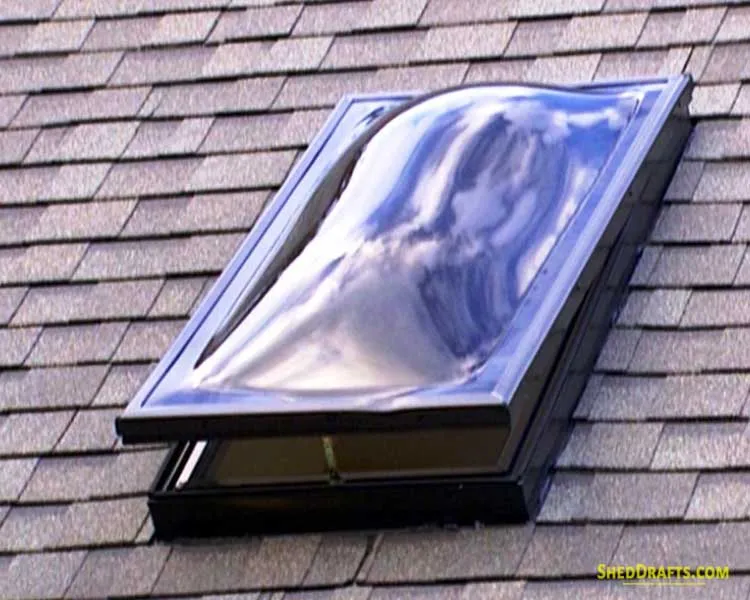
I personally love these for potting sheds. The plants love the light, and the ability to crack the hatch prevents that swampy, humid air that leads to root rot or mold on your potting bench. Just remember the UV truth: constant sunlight through a skylight can degrade the plastic housings of your power tools over time. I usually suggest a frosted or tinted version to diffuse the light while still getting the heat-exhaust benefits.
The cost is a significant jump from a standard vent; expect to pay between $250 and $450 for a quality unit that won’t leak. The benefit of natural light cannot be overstated, as it saves you from having to run lights during the day, which keeps the shed even cooler. But the challenge is the maintenance. Every few years, you need to climb up there and check the seals and clear out any debris. If you live in an area with heavy snow, you also have to be mindful that a skylight vent can be a weak point for ice damming.
If you want to know if your skylight vent is actually working, take a single square of toilet paper and hold it up to the opening while it’s unlatched. If the paper flutters toward the sky, you’ve got a healthy upward draft. If it stays still, you need more intake vents down low to push that air up and out.
6. Architect’s Statement: The Cupola
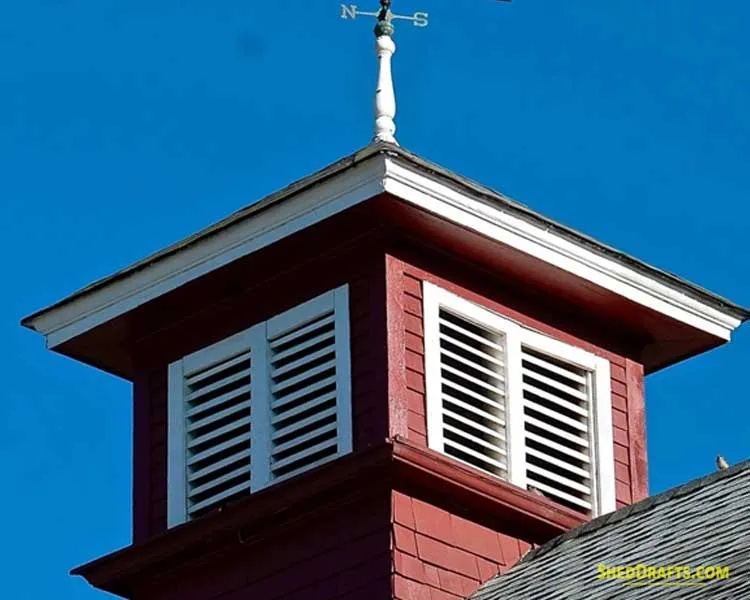
A solid vinyl or cedar cupola is going to run you anywhere from $300 for a basic 18-inch model to well over $1,000 if you want a copper roof and a custom weather vane.
It’s a high-ticket item, but if you’re building in a neighborhood with a strict HOA, this might be the only vent they’ll actually let you install because it looks like architecture rather than hardware. The challenge, beyond the cost, is the installation. You’re cutting a large square hole in the very peak of your roof, which is the most vulnerable spot for leaks. You have to build a curb or a mounting base that matches the pitch of your roof perfectly. If your angles are off by even a few degrees, the cupola will sit crooked, and every neighbor will notice.
When I’m designing a backyard structure that needs to look like it belongs on a luxury estate, I reach for a cupola. This isn’t just a vent; it’s a statement piece. It sits proudly on the ridge like a crown, and while its primary benefit is massive, high-point exhaust, its secondary benefit is pure curb appeal. I’ve seen a well-placed cupola increase the perceived value of a shed by thousands of dollars. It’s the gold standard for colonial or barn-style builds where you want that traditional farmhouse aesthetic.
In terms of performance, the cupola is best for large sheds (12×16 and up) because it provides a centralized, high-volume exit for air. It works on the principle of wind aspiration; even a light breeze hitting the louvers creates a vacuum that pulls air up from the floor. I once worked on a 14×20 workshop where we replaced two standard gable vents with one 24-inch cupola. The internal temperature dropped by 12 degrees almost instantly because the cupola was tapping into the stack effect at its most efficient point, which is the absolute peak.
Just be prepared for the maintenance; if you go with wood, you’ll be up on a ladder every three years painting or staining those tiny louvers.
7. Whirlybirds Are Wind-Powered Industrial Muscle
The turbine ventilator, affectionately known as the whirlybird, is the unsung hero of the shed world. The benefit of a turbine is that it’s an active vent without an electric motor. It uses the kinetic energy of the wind to spin its vanes, creating a centrifugal force that literally sucks air out of the building. It’s incredibly effective, as a 12-inch turbine can move hundreds of cubic feet of air per minute in a 10-mph breeze.

These are best for sheds located in open areas where they can catch the wind. If your shed is tucked in a narrow alley between your house and a fence, a whirlybird won’t do much but sit there. One thing to keep in mind is the snow load. In northern climates, heavy, wet snow can weigh down the turbine and prevent it from spinning, or worse, the wind can blow fine snow up and under the spinning vanes, leading to a small drift inside your shed. I usually suggest these for my clients in the south or the midwest where wind is plentiful and heavy snow is rare.
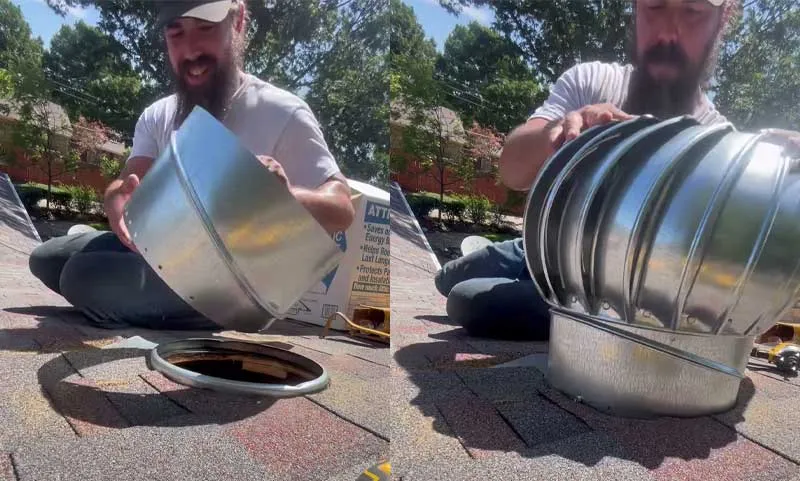
The cost is surprisingly low, usually hovering between $60 and $100. This makes it a fantastic choice for the budget-conscious woodworker who needs more than passive airflow but doesn’t want to wire up a fan. The challenge, however, is the bearing burnout. I’ve walked into many a backyard and heard the screech of the whirlybird.
If the internal bearings aren’t sealed, they will eventually rust or seize. Once that happens, the vent stops spinning and becomes a very expensive, leaky hole in your roof. When you buy one, check the box for permanently lubricated ball bearings, because it’s worth the extra ten bucks.
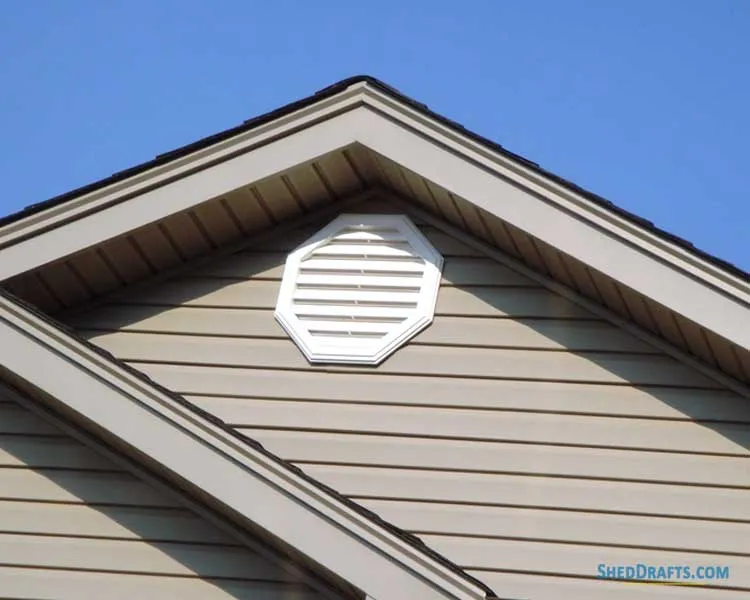
8. Wall Vents: Low-Cost Logistics Champions
Sometimes, the simplest solution is the best one. Wall vents (or gable-end louvers) are the workhorses of the industry. These are best for smaller sheds or lean-to structures where a roof-mounted vent would be overkill or impossible to seal. The primary benefit is the ease of installation. You don’t need to be a roofer; you just need a jigsaw and some caulk. You cut a hole in the siding, pop the vent in, and you’re done.
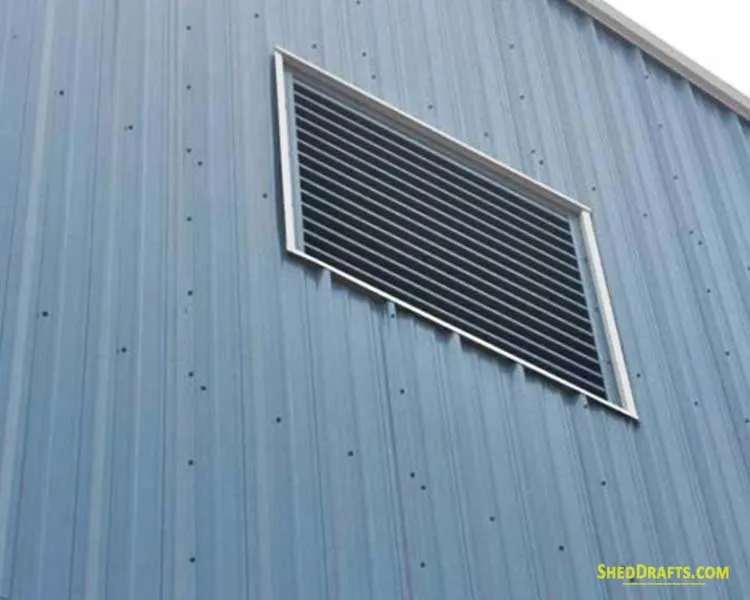
From a cost perspective, these are the winners. You can find plastic ones for $10 or heavy-duty aluminum ones for $25. They are incredibly affordable. But the challenge is the dead zone problem. Since these vents are located in the walls, the air at the very peak of the roof, located above the top of the vent, can become trapped and stagnant. This is where I see ceiling rot happen even in sheds that look well-vented. To combat this, you have to mount them as high up in the gable as possible, practically touching the roofline.
Cross-Breeze Setup
I always install these in pairs, with one on the windward side and one on the leeward side. If you only have one wall vent, you aren’t venting; you’re just equalizing pressure. You need that through-draft to actually flush out the heat. If you’re storing a lawnmower, place a small intake wall vent low on one side and a larger exhaust vent high on the opposite side.
This creates a diagonal scavenging effect that clears out heavy gasoline fumes that tend to settle near the floor. It’s a simple efficiency hack that doubles your air quality for the price of a burger.
9. Powered Gable Fans Are Great For "Scrubbing"
When you are serious about your workshop, you go with a powered gable fan. This is a motorized fan mounted inside the shed, behind a set of shutters. The benefit is instant air change. If you’re painting, staining, or just finished a heavy session with the table saw, you can flip a switch and clear the air in sixty seconds. It’s the ultimate for temperature control because most of them come with a built-in thermostat. You set it to 90 degrees, and the fan handles the rest.
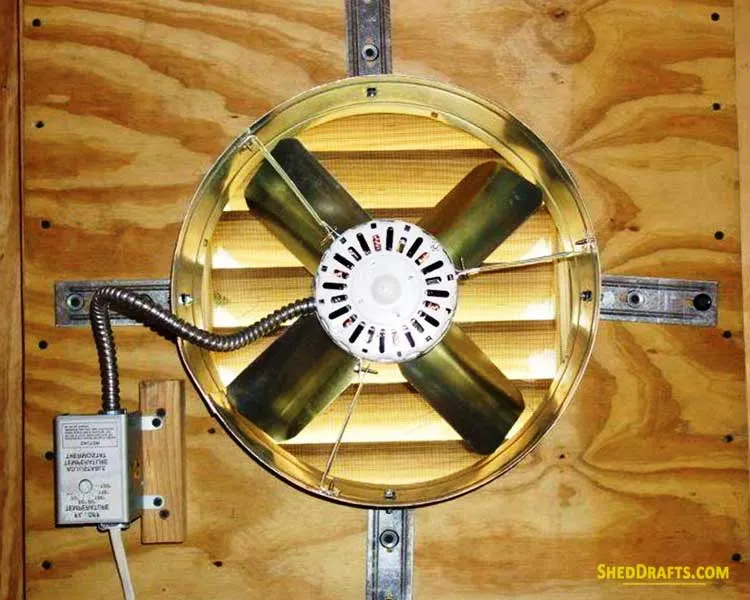
These are best for large, insulated workshops. If you’ve spent the money to insulate your shed, you’ve essentially created a thermos. You must move that air mechanically or you’ll trap moisture behind your insulation, leading to mold that you won’t see until the wall studs are mush. Ensure you get a fan with automatic gravity shutters. These stay closed when the fan is off to keep out bugs and cold drafts, but the force of the air blows them open when the motor kicks in. It’s a small detail that saves you from a shed full of spiders.
The cost is moderate for the hardware: $80 to $150, but the challenge is the hidden costs of power. You have to get electricity to the shed. If you’re already wired for lights, it’s a simple addition, but if not, you’re looking at a $300-$500 electrical job. Also, these fans are loud. If your shed is right next to your neighbor’s patio, that drone might start some backyard warfare. I always recommend buying a fan with variable speed so you can dial it down when you’re just doing light work.
Shed Airflow Audit Checklist
Use this checklist to determine if your current shed is suffocating or if your new build plan is solid.
- Do your tools have a fine orange dust (rust) despite being used recently? (Yes = +2)
- Is there a dark staining on the underside of your roof plywood? (Yes = +5)
- Does the temperature inside feel more than 20 degrees hotter than outside? (Yes = +3)
- Can you smell gasoline or musty wood from 5 feet away? (Yes = +3)
- Are there water trails on the inside of your windows? (Yes = +4)
Scoring:
- 0-3: Your airflow is acceptable.
- 4-8: You have stagnation zones. Add two more soffit vents.
- 9+: Your shed is in critical failure. You are actively losing money to rot. Install a powered fan immediately.
How to Select Your System
Choosing a vent isn’t about what looks cool in the catalog; it’s about Siting, Size, and Substance.
Step 1: Analyze Your Micro-Climate
If your shed is under a tree, you’ll have a leaf clog problem. Ridge vents and whirlybirds will get jammed with pine needles and oak tassels. In this scenario, I always go with large gable vents. They are much easier to clean from a ladder than a ridge vent.
Step 2: The 1/150 Calculation (The Right Way)
Let’s do a real-world case study. You have a 12×16 shed (192 sq. ft.).
- Requirement: 192 / 150 = 1.28 sq. ft. of NFA.
- Conversion: 1.28 x 144 = 184 sq. in. of NFA.
- Balance: You need 92 sq. in. for intake and 92 sq. in. for exhaust.
- Hardware Choice:
Two 12×12 gable vents (approx. 60 sq. in. NFA each) = 120 sq. in. exhaust.
Four 4×12 soffit vents (approx. 25 sq. in. NFA each) = 100 sq. in. intake.
Passive systems (gable + soffit) will outlast you. They have no motors to burn out and no wires for squirrels to chew. If you are building an heirloom shed that you want to stand for 40 years, stick to passive. If you need performance now for a specific hobby, go active, but build in an access panel so you can replace the fan motor easily in 5 years.


Read Next
 37 Pro-Tested Tools For Building DIY Sheds That Last
 11 Pro Shed Organization Ideas To Maximize Storage Space
 Shed Rafters vs. Trusses Comparison: Pro-Tested DIY Guide
 Shed Foundation Guide: 11 Durable Builds And Traps To Avoid
 21 Costly Shed Building Mistakes (& Pro Tips To Avoid Them)
 Shed Security Tactics That Protect Backyard Storage From Theft
Framing-to-Finish Roadmap: DIY Guides For Every Step of The Build


