
How To Build 11 Different Shed Foundations & Traps To Avoid
A homeowner spent $5,000 on a beautiful cedar shed, then spent three weekends painting it to match his house. But by the following spring, the doors wouldn’t shut. The frame had twisted like a pretzel. Why? Because he treated the shed foundation as an afterthought.
I once made a similar mistake of “eyeballing” a gravel pad for my mother-in-law’s 10×12 storage shed early in my career. What I didn’t know was that there was a hidden soft spot in the clay. Two heavy rainstorms later, the back-left corner sank four inches and cracked the floor joists like toothpicks. It was an expensive and embarrassing lesson in soil drainage that I’ll never repeat.
Cheat Sheet for Busy Homeowners
Best for Drainage: Gravel Pad (Crushed Stone).
Best for Heavy Shops: Poured Concrete Slab.
Best for Sloped Land: Concrete Piers or Adjustable Metal Jacks.
Easiest DIY: Plastic Grid Systems or Concrete Pavers.
A shed foundation isn’t just a place for your building to sit. It’s a drainage system and a structural stabilizer. If you get this wrong, the freeze-thaw cycle of a typical US winter will rack your frame and turn your investment into a sagging eyesore.
Foundation Basics: Check The Soil Before Doing Anything Else
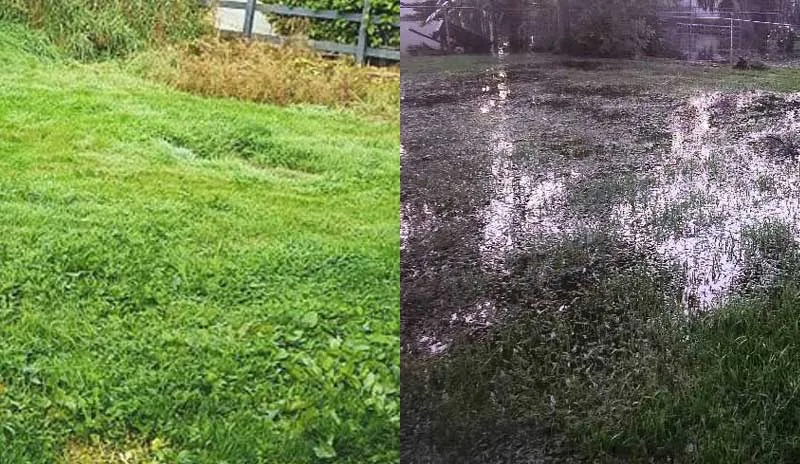
Before you even think about buying a bag of concrete, you need to read the land. I see DIYers pick the back corner of the yard because it’s out of the way, failing to notice it’s the natural catch-basin for the entire neighborhood’s runoff.
When I’m scouting a site, I look for the high side. You want the shed on a slight elevation. If you’re forced to build in a low spot, you aren’t just building a foundation. You’ll have to build a drainage system.
One trick I use is the Five-Gallon Bucket Test. Pour five gallons of water on your intended site during a dry spell. If that water is still sitting there ten minutes later, your soil has high clay content and zero “perk.” You’ll need to excavate deeper and use more aggregate than the average manual says.
Maintenance Perimeter
Your shed needs room to breathe. Never tuck a shed right against a fence or a thicket of trees. You need at least 36 inches of clearance all the way around. Why? Because you’ll eventually need to repaint or repair a shingle, and if you can’t fit a ladder or your own body between the shed and the fence, you’re in trouble. Plus, airflow is the number one enemy of rot. A shed pinned against a fence stays damp, and dampness slowly kills wood.
Watch out for any overhanging danger. Building under a beautiful old oak looks aesthetic, but falling limbs and constant bird droppings will destroy your roofing felt and clog your drip edges. Also, the drip line of a tree is where the roots are most active. If you dig pier holes there, it can kill the tree and destabilize your shed as its roots shift.
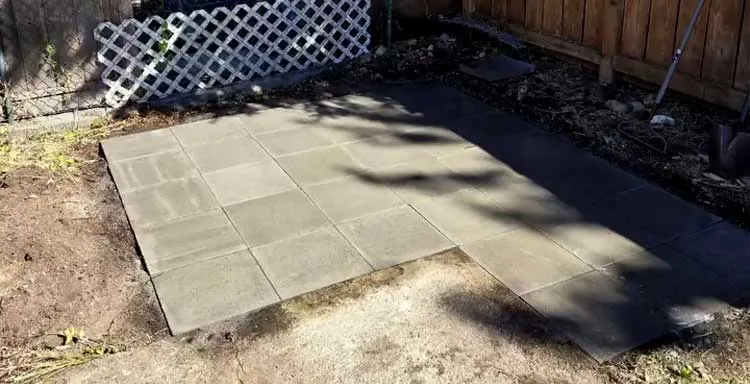
1. Concrete Pavers Craft A Starter Foundation
Difficulty: 1/10 (Easy) | Est. Cost: $5 – $9 per sq. ft.
Concrete pavers are the most common DIY starting point, but they are also the ones installed incorrectly most of the times.
A concrete paver foundation uses individual pre-cast masonry units set on a compacted sand and gravel bed to create a flat, on-grade surface for small-to-medium lightweight sheds.
But you can’t just toss some pavers on grass and call it a day. That’s a recipe for a sinking shed.
Why They Work (and When They Fail)
Pavers are fantastic for small 6×8 or 8×10 resin sheds (like Suncast or Lifetime) because they provide a continuous flat surface. However, don’t forget about the sub-base. If you don’t excavate at least 4 inches of topsoil and replace it with compacted 3/4″ minus gravel, those pavers will heave the first time the ground freezes.
Benefits:
- Low profile, with no big “step up” into the shed.
- Quick build in one afternoon.
- Aesthetic appeal for high-visibility backyards.
Challenges:
- Extreme labor (lots of heavy lifting).
- Can’t use it for heavy equipment sheds that store stuff like riding mowers (individual pavers can crack or tilt under point loads).
The Sand Sandwich
The secret to a paver base that doesn’t shift is the Sand Sandwich. Use 3 inches of compacted gravel, then 1 inch of leveling sand. Use a 2×4 screed board to get it perfectly flat. If you skip the gravel and put sand on dirt, the sand will eventually migrate into the soil, and your shed will look like a topographical map.
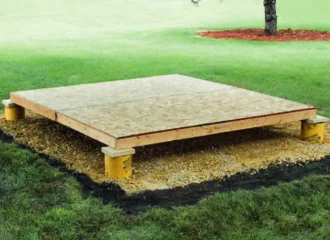
2. Plastic Deck Blocks Allow A Quick-Lift Hack
Difficulty: 2/10 (Easy) | Est. Cost: $12 – $25 per block
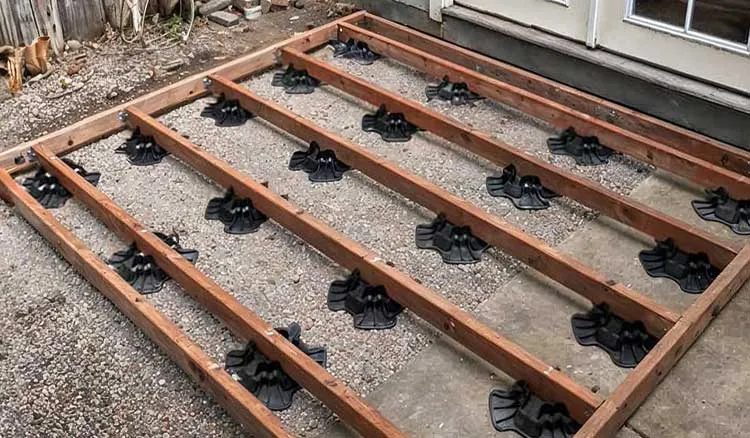
Usually sold under brands like TuffBlock, these are the lightweight cousins of the heavy concrete deck block. I love these for tight-access backyards where you can’t get a truck or a heavy cart in.
Plastic blocks are high-density poly-resin pedestals designed to hold 4×4 or 2×6 lumber, providing an instant elevated floating foundation without the weight of masonry.
Floating Reality
We call this a floating foundation because it’s not anchored deep. It sits on the surface. This is perfect for areas where you aren’t allowed to break ground due to utility lines. I once used these on a job in a historical district where excavation was a legal nightmare. We cleared the weeds, laid a weed barrier, and set 12 of these in an hour.
Benefits:
- Unbelievably light, you can carry 10 at once.
- Built-in slots for 2×4, 4×4, and 2×6 joists.
- Lifts the wood floor 6 inches off the damp earth and ventilates.
Challenges:
- High wind risk: Since the shed isn’t bolted to the earth, a hurricane-force gust can turn your shed into a kite.
- Requires a perfectly level sub-surface (usually a gravel bed) to prevent “creeping.”
Don’t let anyone tell you these rot in the sun. They are UV-stabilized. But there is a very real danger in point loading. If you’ll build a heavy workshop with a cast-iron table saw, then these blocks will definitely settle into soft soil. So you should always put a concrete paver under the plastic block to spread the footprint.
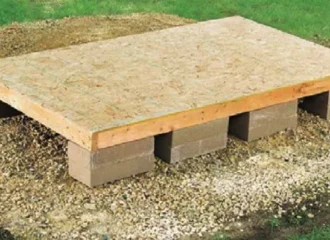
3. Concrete Blocks: The Budget Veteran’s Choice
Difficulty: 3/10 (Moderate) | Est. Cost: $2 – $8 per sq. ft.
This is the old school way. Go to any rural property in America, and you’ll see 20-year-old sheds sitting on 8x8x16 cinder blocks. It’s cheap, it’s effective. But it’s easy to mess up the squaring.
Concrete block foundations use stacked solid CMU blocks on compacted earth or gravel to level a shed frame on uneven terrain.
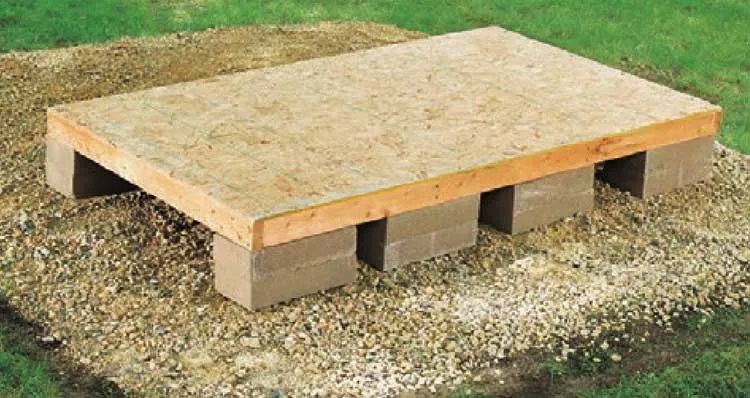
Solid vs. Hollow Blunder
Never, and I mean never, use hollow cinder blocks for the main weight-bearing points. Because those are designed for lateral pressure in walls, not vertical compression. Hollow blocks will shatter under the weight of even a single cord of firewood stored in a shed. Use solid concrete blocks (often called cap blocks or “solid soaps”).
Benefits:
- Cheapest way to get a shed 12+ inches off the ground.
- Allows for easy leveling on slopes up to 15 degrees.
- Extreme durability, as concrete doesn’t rot.
Challenges:
- Looks cheap (has the “trailer park” aesthetic).
- Prone to settling if the ground isn’t tamped with a 10lb sledge or plate compactor.
To prevent your floor joists from sagging over time (the bouncy floor syndrome), never space your block stacks more than 4 feet apart. If you’re building a 10×12, you need blocks at the corners and at the 4ft and 8ft marks on your rim joists.
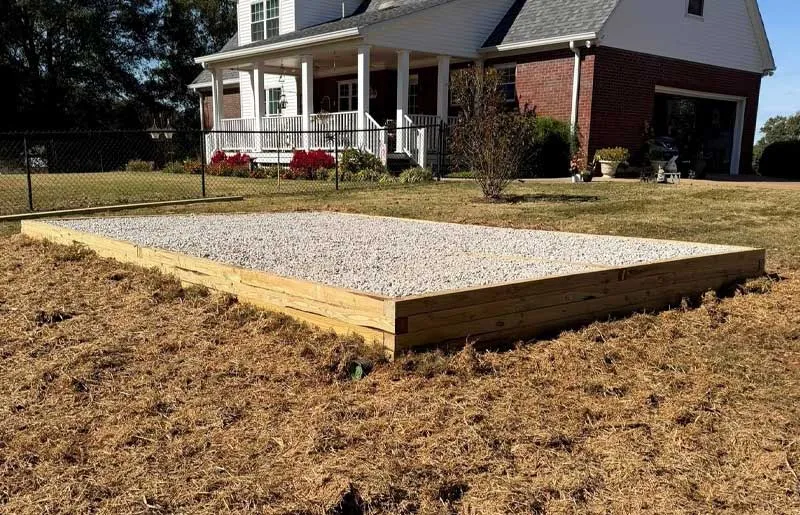
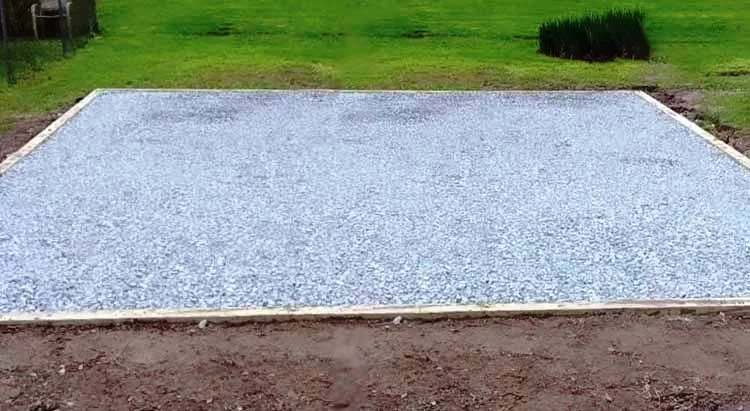
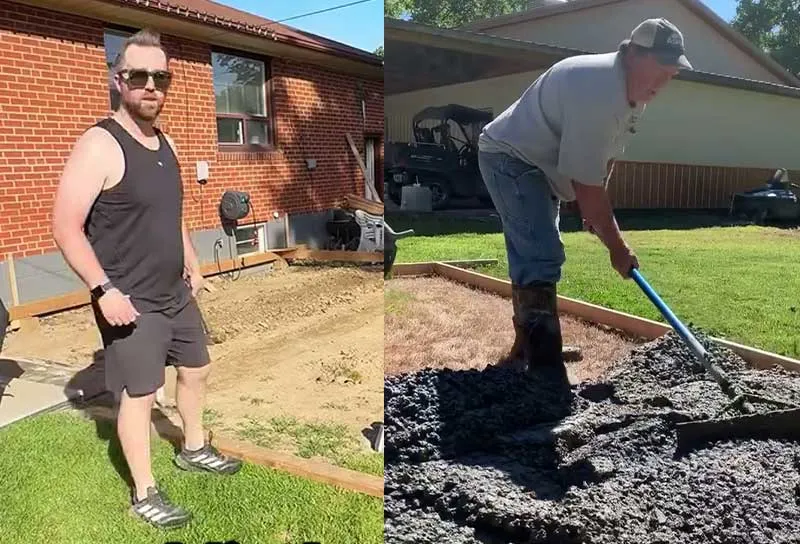
4. A Gravel Pad Is The Gold Standard for Drainage
Difficulty: 4/10 (Moderate) | Est. Cost: $4 – $8 per sq. ft.
If you ask any professional shed hauler what foundation they prefer, 9 out of 10 will say Crushed Stone Pad. It is the most technically sound on-grade foundation you can build.
A gravel pad (or crushed stone base) consists of a timber-framed perimeter (usually 4×6 or 6×6) filled with 4-6 inches of compacted 3/4″ clean crushed stone.
Why "Clean" Stone Matters
I’ve seen DIYers use Pea Gravel (the round, smooth stuff). That is one big mistake. Pea gravel is like a ball-pit, as it never locks together. What you need is 3/4″ clean crushed limestone. The jagged edges interlock under compaction, creating a surface as hard as pavement but as porous as a sponge.
Benefits:
- Amazing Drainage: Water falls off the roof, hits the gravel, and disappears. No splashback onto your siding.
- Vermin Proof: Rats and groundhogs hate digging in sharp, crushed stone.
- Self-Leveling: It’s easier to level a pile of rocks than a slab of concrete.
Challenges:
- Requires building a box (timber perimeter) to hold the stone.
- Moving 5 tons of stone with a wheelbarrow is a workout you won’t forget.
Outsize Principle
Always build your gravel pad 1 foot larger than your shed on all sides. If you have an 8×10 shed, build a 10×12 gravel pad. This creates a “drip path.” When rain runs off your eaves, it hits the gravel instead of the dirt, preventing mud from splashing up and rotting your bottom trim. I’ve seen this one tip double the life of a T1-11 wood shed.
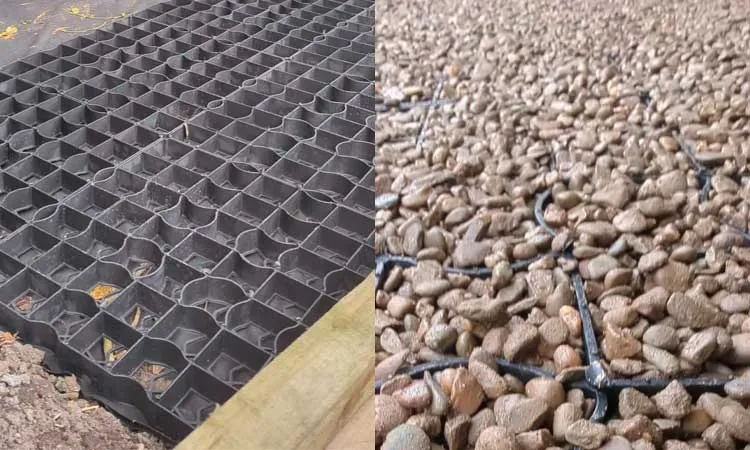
5. Plastic Grid Systems Are Bringing A Geo-Grid Revolution
Difficulty: 4/10 (Moderate) | Est. Cost: $6.00 – $9.00 per sq. ft.
Think of this as a honeycomb for your yard. These systems (like TrueGrid or CORE) are becoming hugely popular because they solve the “squish” problem of muddy yards.
A plastic grid foundation uses interlocking HDPE cells laid over a thin sub-base and filled with gravel. This creates a permeable, high-load-bearing floating mat.
When you pour gravel into these grids, the plastic walls prevent the rocks from spreading out. This means you can drive a 5,000lb tractor over a plastic grid foundation and it won’t rut. It’s the grid that turns a loose material into a rigid structural member.
Benefits:
- 100% permeable (great for cities with “impervious surface” tax).
- Prevents gravel from migrating into your lawn.
- Very easy to cut-to-fit around trees or corners.
Challenges:
- Initial cost of the grids can be higher than wood timbers.
- Requires a weed-free prep, or else the grass will grow through the honeycomb.
If you want your shed to look like it’s floating on the grass, you can actually overfill the grid with a mix of gravel. The grid provides a clean gravel border that looks architectural rather than industrial.
6. Skid Foundations Provide A Portable Base
Difficulty: 5/10 (Moderate) | Est. Cost: $3 – $6 per sq. ft.
If you’ve ever bought a pre-built shed from a lot, it likely arrived on some skids. This is the vintage American shed base.
A skid foundation consists of heavy-duty, pressure-treated timbers (usually 4×4 or 4×6) laid directly on a prepared surface, acting as the primary runners that support the floor joists.
It’s designed for mobility and simplicity. But if you don’t treat the wood properly, you’re essentially building a termite buffet.
Ground Contact Lie
Back in the 90s, I bought pressure-treated 4x4s from a big-box store and threw them on the dirt. Three years later, I could poke a screwdriver through the middle of them. Why? Because there’s a massive difference between “Above Ground” treated and “Ground Contact” (.40 or .60 retention) treated lumber. So check very carefully before you buy.
Benefits:
- If you move houses, you can winch the shed onto a trailer.
- The skids act like a backbone, preventing the floor from flexing.
- Keeps the shed low to the ground for easy ramp access.
Challenges:
- Vulnerable to rot if air circulation is blocked.
- Requires a perfectly flat (not necessarily level, but flat) site to avoid bowing the runners.
Pocket Trap
I often see DIYers construct a beautiful skid base and then wrap the bottom in skirting to hide the gap. You really shouldn’t do this. By closing that gap, you’re creating a humid area that sucks moisture into the wood and invites wood-boring beetles. If you must skirt it, better use a lattice that allows at least 50% airflow.
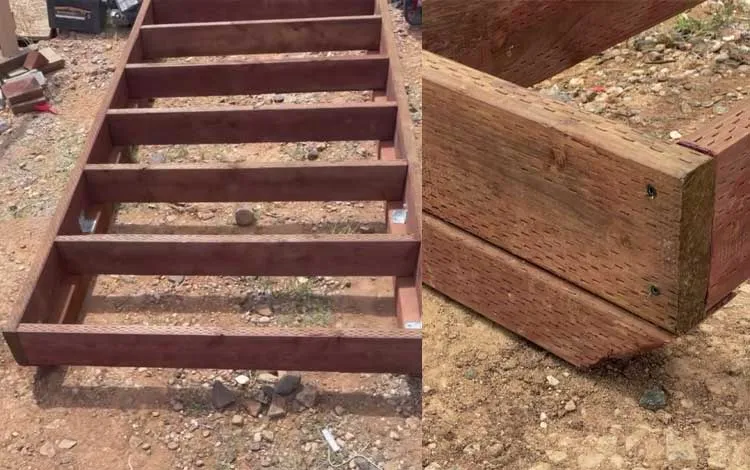
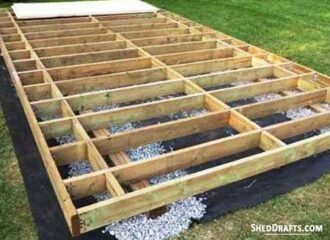
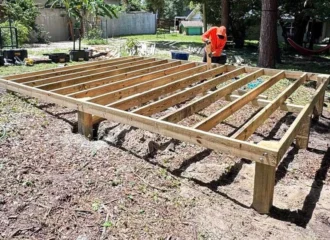
7. Timber-Frame Foundation: The Heavy-Duty Platform
Difficulty: 6/10 (Moderate/Advanced) | Est. Cost: $7 – $12 per sq. ft.
This is where we move from sitting something on the ground to building a real structure. A timber-frame base is essentially a deck built just a few inches off the dirt. It’s the best way to handle a yard that has a 6-to-12-inch slope without digging out half the hillside.
A timber-frame foundation uses a perimeter of 6×6 or 2×8 treated lumber, often supported by notched posts, to create a rigid, elevated wooden stage for the shed.

Notch the Posts
Most amateurs just butt a beam against a post and bolt it. A master carpenter knows that’s a “shear” failure waiting to happen. You should notch the 4×4 or 6×6 post so the weight of the timber frame actually sits on the wood, not on the bolts. We call this bearing. Bolts are just there to keep it from moving; the wood should do the heavy lifting.
Benefits:
- Excellent for uneven terrain where one side of the shed is 2 feet higher than the other.
- Massive under-floor airflow keeps everything bone dry.
- Can be anchored deeply to resist frost heave.
Challenges:
- Requires advanced carpentry skills.
- High material cost (lumber prices fluctuate wildly).
On a timber frame, people often forget the center support. If your shed is 10 feet wide, don’t just have a beam on the left and right. You need a Center Stringer to prevent the floor from bouncing. I tell my clients, “If you can jump in the middle and hear the change jingle in your pocket, you need more blocking.”
8. Adjustable Metal Jacks Work As A Modern Leveler
Difficulty: 6.5/10 (Moderate/Advanced) | Est. Cost: $20 – $150 per jack
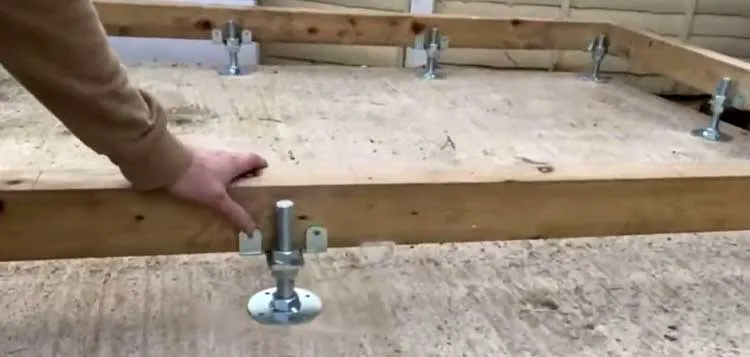
In the UK, these were already quite common. Now Americans have started using them more and more.
Adjustable metal jacks (or Shed Jacks) are steel screw-posts that allow for precision height adjustments of the shed frame long after the building is completed.
They are essentially heavy-duty threaded steel pedestals. If you’re building on a slope that makes you dizzy, this is your best friend.
Settling Solution
The beauty of these is the long game. Every new shed settles. It’s like a natural law. If you have a concrete slab, you’re basically stuck. With these jacks, it works like a charm. You just grab a massive wrench (we call it the “persuader”) and give the nut a quarter turn. Now your doors are aligned again in no time.
Benefits:
- You can level a shed to within 1/16th of an inch.
- No waiting for concrete to cure or digging deep trenches.
- Doesn’t disturb the root systems of nearby trees.
Challenges:
- Can be expensive for larger sheds (you might need 12-16 jacks).
- Requires a solid footing (like a buried paver) so the jack doesn’t just drill into the mud.
Grease The Threads
This sounds simple, but 99% of people forget it. Before you set the shed on the jacks, slather the threaded rods in Marine Grade anti-seize grease. Ten years from now, when you actually need to adjust it, you’ll be able to turn the nut. If you don’t, they will rust solid, and you’ll be back to using a bottle jack and a prayer.
9. Concrete Piers Create A Frost-Proof Anchor
Difficulty: 8/10 (Advanced) | Est. Cost: $80 – $150 per pier
If you live in a place like Minnesota or Maine, frost heave is a very real nightmare. The ground literally breathes, pushing foundations up in the winter and dropping them in the spring.

Concrete piers are vertical columns of concrete poured into deep holes (below the frost line), topped with metal brackets to hold the shed’s main beams. These piers are one of the most effective ways to battle frost heave.
Dig Below The Line
The secret here is the Frost Line. In some parts of the US, this is 48 inches deep. You have to get the bottom of that concrete below where the ground freezes. If you only go 2 feet down in a 4-foot frost zone, the ice will grab the bottom of your pier and jack it out of the ground like a loose tooth.
Benefits:
- Permanent, rock-solid stability.
- Separates the wood from the ground entirely.
- The “Professional” choice for large, heavy-duty workshops.
Challenges:
- Digging 4-foot holes with a manual post-hole digger is a young man’s game. Use a power auger.
- Concrete is wet work; it’s messy and requires a 24-48 hour cure time.
Don’t just pour a straight cylinder of concrete like the guy in the below video. Use a Bell shape at the bottom (or a plastic Bigfoot form). This acts like an anchor in the soil and prevents the pier from being pushed up by lateral frost pressure. It’s like an upside-down mushroom that stays put.
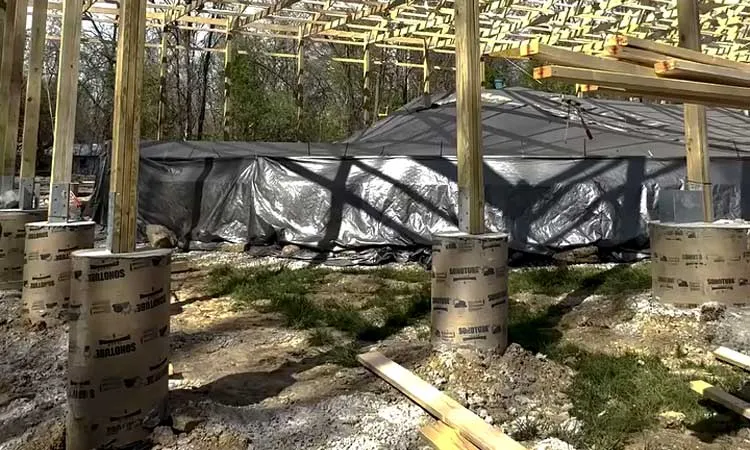
10. Craft An Integrated Base With The Pole Frame
Difficulty: 9/10 (Professional) | Est. Cost: $10 – $15 per sq. ft.
Also known as Post-Frame or Pole Barn style. This isn’t just a foundation, it’s the actual skeleton of the shed.
A pole-frame foundation uses structural posts (buried 3-4 feet deep) that extend upward to become the wall studs, creating an incredibly wind-resistant, integrated structure. The foundation is the walls.
If you live in a high-wind zone (Florida, coastal Carolinas), this is what you want. Since the foundation is literally buried 4 feet deep and connected to the roof, the wind can’t blow the shed off its base. The shed is the base.
Benefits:
- Massive resistance to wind uplift.
- No need for a separate floor frame if you want a dirt or gravel floor (perfect for tractors).
- Can handle extremely steep slopes.
Challenges:
- Very difficult to DIY alone. You need at least two people to plumb the poles while backfilling.
- Harder to get square because the poles can shift as you pour the concrete/gravel around them.
Green Rot
Never use standard 4×4 posts for this. Use UC4B-rated Permanent Wood Foundation grade timbers. Standard Home Center 4x4s are only rated for 15-20 years in the ground. For a pole frame, you want 50-year-rated timbers, or you’ll be replacing the bottom of your shed while it’s still standing.
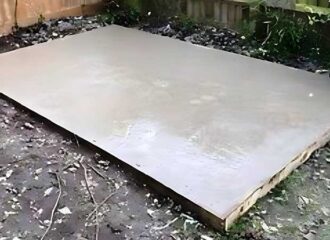
11. A Concrete Slab Will Always Be The Forever Foundation
Difficulty: 10/10 (Professional/Heavy DIY) | Est. Cost: $12 – $20 per sq. ft.
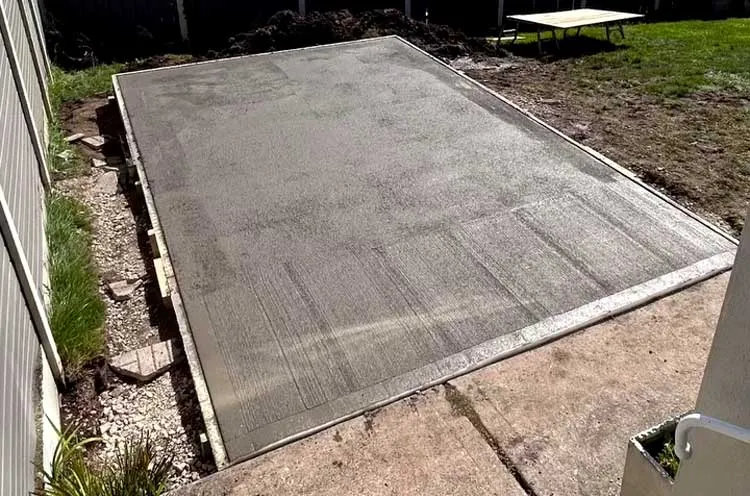
This is the King of foundations. A concrete slab is a monolithic, steel-reinforced raft of concrete that can serve as both the base and the floor. It’s usually 4-6 inches thick. If you are building a She-Shed or a home office, the slab is the only way to go. It is the most expensive and the most difficult, but it is the gold standard. If your shed is going to hold any super-heavy gear, like vehicles or stacks of lumber, then this is your best option.
Most people think concrete dries. It doesn’t. It cures through a chemical reaction called hydration. If it dries too fast, it cracks. I’ve seen $2,000 slabs ruined because the owner didn’t mist it with water on a hot day. You want that concrete to stay damp for at least 3 days to reach its full PSI (pounds per square inch) strength.
Benefits:
- Zero maintenance.
- Perfect for heavy rolling loads (cars, machinery, lathes, heavy motorcycles).
- Fireproof and pest-proof.
Challenges:
- Once the concrete is hard, you can’t move the bolts or fix a hump.
- When the cost of concrete, rebar, gravel, and delivery is all put together, it will be a huge bill.
Thickened Edge
Don’t just pour a 4-inch flat square. You need a Thickened Edge (or “Monolithic Pour”). This means the outer 12 inches of the slab should be 12 inches deep. This is where the weight of the walls sits. Without a thickened edge, the weight of the shed can actually crack the perimeter of the slab.
Frost Depth Calculator For All U.S. States
The below tool gives approximate frost depth values across all 50 states in USA.
Which Base is Best Quiz
- How long do you plan on staying in this location?
- A) Under 5 years (Go with Plastic Blocks or Pavers)
- B) 5–15 years (Go with Gravel Pad or Skids)
- C) This is my Forever Home (Go with Concrete Slab or Piers)
- What is the slope of your yard?
- A) Flat as a pancake (Gravel Pad or Slab)
- B) Slight bump (Pavers or Skid)
- C) I need a mountain goat to mow it (Piers or Timber-Frame)
- What are you putting in the shed?
- A) Christmas lights and a lawnmower (Plastic Grid or Pavers)
- B) A riding mower and a workbench (Gravel Pad or Timber-Frame)
- C) A 1967 Mustang or a heavy woodshop (Concrete Slab)
Result: If you chose mostly As, look for On-Grade temporary bases. Mostly Bs? You need a Semi-Permanent drainage-focused base. Mostly Cs? It’s time to call the concrete truck.
You can buy the fanciest architectural shingles on the market, but if you skimp on the dirt-work, you’re just building a very elaborate pile of kindling. This is what makes me walk away from jobs where homeowners refused to dig out the sod. Because “it looks level enough” to them. Then two years later, they call me asking why their $10,000 studio is leaning like the Tower of Pisa.
Spend the extra Saturday wrestling that plate compactor or sweating over a transit level. After that gravel is locked in, or those piers are set stone-cold straight, you can get rid of the “house of cards” anxiety. You would’ve earned the right to move off the ground and start the real carpentry.
Now that you’ve conquered the earth, it’s time to start thinking about spans and joist hangers. Let’s get into the nitty-gritty of crafting and squaring your floor frame.


Read Next
 How to Build a Concrete Slab Shed Foundation Correctly
 How To Build a Concrete Block Shed Foundation Effectively
 How To Build A Concrete Pier Shed Foundation Quickly
 How to Build A Wooden Skid Shed Foundation Easily
 Shed Floor Framing: Step-By-Step Guide To A Sag-Proof Base
 9 Pro-Tested Shed Ventilation Ideas For DIY Builds
Framing-to-Finish Roadmap: DIY Guides For Every Step of The Build


