
How To Select The Best Building Site For A Shed
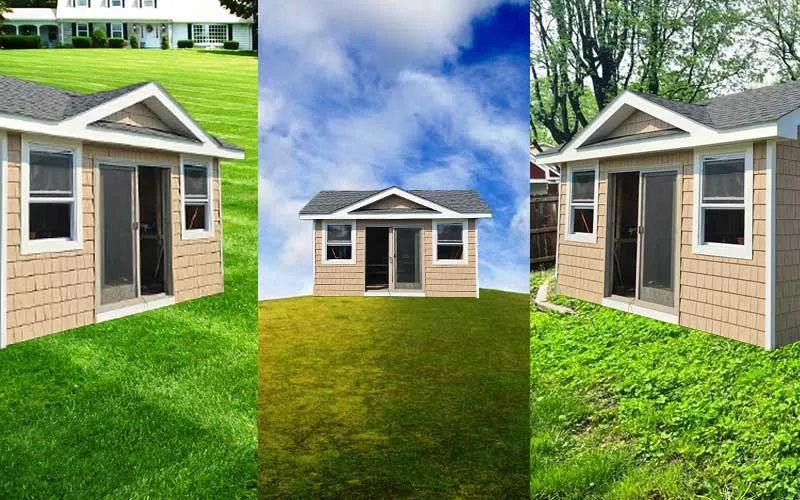
Where you choose to put your shed is the most important decision you’ll make in your backyard’s history. Over the last two decades, I’ve seen wrongly placed $5,000 custom cedar sheds rot into the mulch within three years. And I’ve seen $800 plastic kits last twenty years, because they were put at the best spot in the yard.
Most homeowners treat shed location as an afterthought, tucking it into a dead corner of the yard, only to realize later they’ve blocked their drainage or violated a municipal setback.
In this guide, we are diving into soil compaction and water runoffs. We will look at how sunlight can age your shed and how zoning rules can cause legal troubles. It doesn’t matter if you’re building a DIY masterpiece or just getting a pre-fab delivery; we will show you how to make a legal shed that lasts beautifully for the next thirty years.
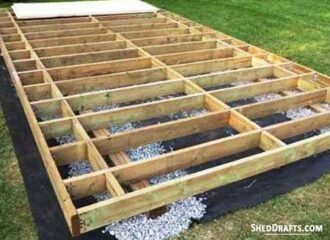
To maximize shed life, prioritize high ground away from runoff. Ensure setback compliance by keeping a space of 3–15 feet from property lines. Give your shed enough airflow by having at least 2 feet of clearance from fences. Avoid low spots where water pools and never place a shed directly over utility lines or septic tanks. The best base is a level gravel pad about 6 inches deep, which will provide drainage that concrete or dirt cannot.
Shed Placement: A Legal Minefield Of Zoning, Permits, and Setbacks
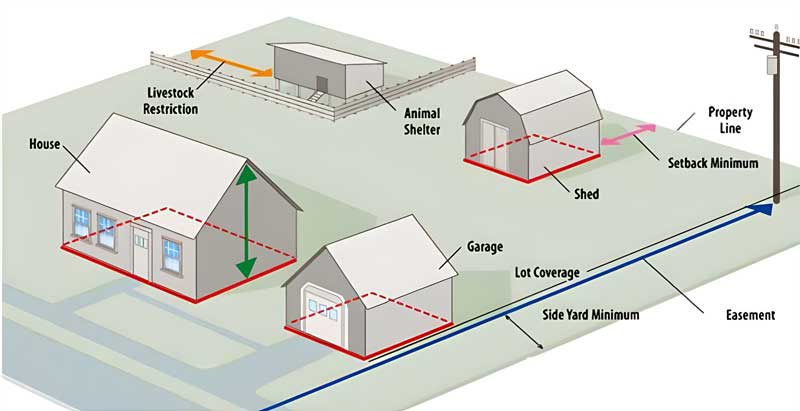
Setbacks are legal minimum distances that must be maintained between your shed and property lines, or other structures. These setbacks can vary by municipality but typically range from 2 to 10 feet. Violating these can result in forced removal. That is when the city orders you to tear down or move the shed at your own expense.
When I started out, I once watched a homeowner lose a $12,000 hobby studio because he placed it 18 inches from his neighbor’s fence. The local ordinance required a 5-foot setback for accessory structures. Of course, the neighbor complained, and the inspector came out with a tape measure. And that was the end of that.
Before you even look at a shovel, you need to visit your local building department’s website or office.
You’re looking for three specific numbers:
- Allowable square footage before a permit is required (often 100–200 sq. ft.)
- Maximum height (usually 10–12 feet)
- Setback requirements
Don’t forget Easements. An easement is a right-of-way for utility companies. If you build over a buried power line or a sewer main, then the utility company has a legal right to bulldoze your shed when they need to access those pipes. And they won’t pay your damages.
The HOA Trap
Even if the city says you’re fine, your Homeowners Association (HOA) might have viewblock or aesthetic uniformity rules. I’ve seen HOAs demand that sheds be painted the exact hex code of the primary dwelling or be hidden entirely from street view. You must always get written approval from your HOA board before the truck arrives.
High Ground Rule That Ensures Drainage
Your yard’s natural slope will have a big effect on where you can put your shed. That slope will decide how water interacts with your shed’s foundation. A shed at the bottom of a hill will go through a dam effect that will trap moisture against the floor joists. Ideal placement is on a slight natural rise or a leveled pad that sits 4 inches above the surrounding grade to ensure positive drainage.
Water is the shed killer. I cannot stress this enough. Moisture will lead to rot, and rot will lead to structural failure.
When looking at a site in your yard, wait for a heavy rainstorm. Put on your boots and go outside. Where does the water pool? Where does it flow like a river? If your intended spot has standing water 30 minutes after the rain stops, you can’t put the building there.
The 1% Rule
If your yard has more than a 1-foot drop over a 10-foot span (a 10% grade), you should opt for a post-and-beam foundation rather than a flat gravel pad. This allows you to keep the shed level without moving tons of earth or creating a massive retaining wall.
If you must build in a less-than-ideal spot, you have to engineer your way out of it. This means installing a French Drain uphill of the shed or using a floating gravel pad.
A gravel pad (using 3/4″ crushed stone) acts as a massive sponge that allows water to pass through and dissipate into the soil rather than soaking into your pressure-treated rim joists. We always aim for the high and dry philosophy.
Soil Integrity and Compaction
Different soils will have different load-bearing capacities. Clay soil will hold moisture and expand or contract, which leads to heaving. On the other hand, sandy soil drains well but can shift. You must identify your yard’s soil type to help you choose the right foundation. You can use concrete piers for unstable ground or a simple gravel bed for rocky soil.
I’ve seen sheds “walk” across a yard over five years because they were built on uncompacted fill dirt. If you’ve recently had excavation work done or a pool filled in, that soil is loose. It takes years for soil to settle naturally. If you build on top of it now, one corner of your shed will eventually sink, causing the doors to bind and the roofline to warp.
To test your soil, you must dig a hole 12 inches deep. If you hit hardpan (dense, difficult-to-dig earth), you’re in luck. If it’s soft, dark organic matter or muck, you need to dig deeper and replace that organic material with compacted structural fill or crushed stone.
For large 12×20 sheds, I often recommend a Dynamic Cone Penetrometer test. Or you can use my favorite “Old Timer’s Test”. See if you can drive a piece of rebar into the ground with one hand. If you can, then the soil isn’t ready to hold a building.
Sunlight And Shade Change A Shed's Lifespan

Exposure to sunlight and shade will greatly change your shed’s lifespan. If your shed is in constant shade, then moss and mildew will grow on your wood siding. On the other hand, intense, direct UV exposure will degrade asphalt shingles and peel paint. The perfect sweet spot is a location with morning sun to dry off dew, and afternoon shade to keep the interior from becoming an oven.
Many DIYers think tucking a shed under a massive oak or maple tree is a great way to hide it. I strongly advise against this. Firstly, the leaf litter will clog your gutters (if you have them). This will trap moisture against the roof and can lead to premature shingle failure. Secondly, falling tree branches in a windstorm can puncture a T1-11 roof in seconds.
Third, and most importantly, the roots. Tree roots are opportunistic. If you put a heavy shed on top of a root system, you’re compressing the feeder roots that provide the tree with oxygen. You might kill the tree, or the tree might fight back by lifting your shed three inches out of the ground. Always keep your shed’s footprint outside the tree’s canopy.
Heat Management
If you plan to use your shed as a workshop or She-Shed, orient the longest side of the building toward the North. This provides consistent light without the solar gain of South-facing windows, keeping your workspace significantly cooler in July.
Accessibility and The Swing Factor
You should maintain at least 2 to 3 feet of clearance on all sides of the shed. This allows for ladder placement for painting, air circulation to prevent rot, and enough room to maneuver large items (like lawnmowers) through the doors without hitting fences or landscaping.
3-Foot Maintenance Perimeter
If you can’t walk all the way around your shed with a weed whacker or a paint bucket, it’s too close to the obstacles. This breathing room is the difference between a shed that lasts 10 years and one that lasts 40.
One of the not-so-smart mistakes I’ve seen over the years is the Mower Trap. A homeowner builds a shed with a 60-inch double door, but places it too close to a fence or a raised garden bed. So, they can’t actually make the turn with their zero-turn mower. You must always visualize the turning radius of your equipment.
Think about the swing of your doors, too. If you have barn-style out-swinging doors, do they hit a tree when opened? If you have a ramp, does the ramp’s incline start in a low spot that turns into a mud pit?
I always recommend staking out the shed with strings and then literally walking through your daily routine. Pretend to pull your mower out. And then pretend to carry a sheet of plywood in. If you feel cramped during the simulation, you’ll hate the reality.
Utilities and Trench Strategy
You are usually not allowed to place a shed over buried utilities. Building over gas, water, or electric lines is dangerous and mostly illegal. If you plan to run power to your shed, placement should consider the distance to your home’s main electrical panel to minimize voltage drop and the cost of expensive copper wire and trenching.
If you want lights, a heater, or a table saw in your shed, placement becomes a financial decision. Trenching 100 feet through rocky soil or under a paved patio can cost more than the shed itself. I generally recommend keeping powered sheds within 30 to 50 feet of the main house.
Always call 811, the national “Call Before You Dig” number, before settling on a spot. They will quickly mark your underground lines for free. And it might just save you a very expensive repair bill from the water company.
Prevailing Winds and Structural Orientation
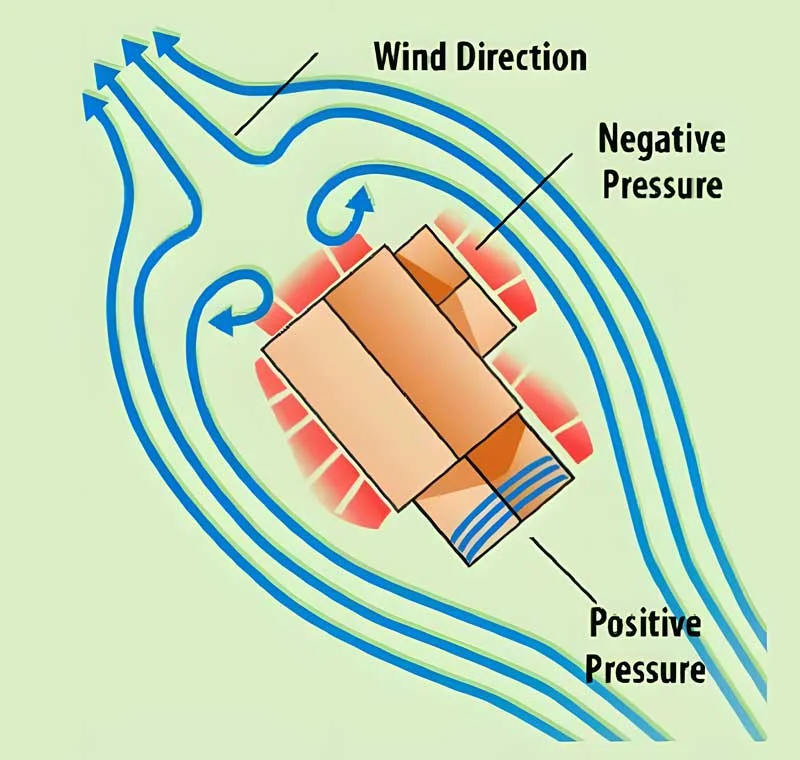
Prevailing winds will affect your shed’s heat resistance and also its structural integrity. Facing your doors away from the dominant wind direction prevents wind loading, where a sudden gust can rip a door off its hinges or force rain through the door seals and into your dry storage area.
In my years of coastal building, I’ve seen what a 60-mph gust can do to a shed with a kite-like profile. If you live in a high-wind zone, you must be extra careful. You’ll need to orient the shed so the smallest wall (the gable end) faces the direction the wind usually blows from. This splits the wind and reduces the pressure on the broad side of the building.
Furthermore, you’ll need to consider the Wind Tunnel effect. If you place a shed in a narrow gap between your house and a neighbor’s house, the wind speed can actually double due to the Venturi effect. This doesn’t just threaten your shingles, it even makes that area a magnet for dead leaves and snowdrifts.
Pressure Relief Valve
If you are building an airtight shed with high-quality siding, consider the internal pressure. I always install gable vents on both ends. Because this allows air to flow through the structure. Without it, a heavy wind hitting the front of the shed will create a vacuum on the back that will literally pull the siding boards loose over time.
If you’re in a snow-heavy state like Minnesota or Maine, placing the door on the leeward side (the side protected from the wind) ensures you aren’t digging out a 5-foot drift just to get your snowblower out.
Arrival Paths Can Cause Delivery Day Nightmares
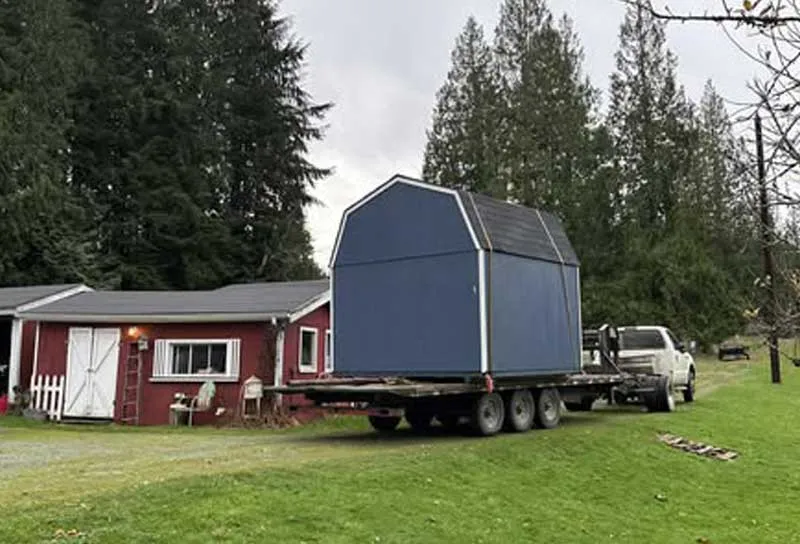
If you are going to buy a pre-manufactured shed, the Mule (the machine used to move sheds) needs a clear path at least 2 feet wider than the shed itself. Low-hanging branches and narrow gates will become obstacles that prevent a shed from reaching its ideal spot.
Septic No-Go Zone
Never, under any circumstances, allow a delivery truck to drive over your septic tank or leach field to reach a shed site. The weight will crush the pipes or the tank lids. I have seen cheap shed deliveries turn into $12,000 septic replacements. If your spot is behind a septic field, you must build the shed on-site from scratch.
I once saw a delivery driver arrive with a beautiful 12×16 shed, only to realize the homeowner’s gate was just 10 feet wide. Then the driver had to leave their shed on the driveway. Finally, the homeowner had to spend the next two days taking down a section of their fence. So before you commit to a spot in the far corner of the yard, measure the arrival path.
Check for:
- Vertical Clearance: Power lines and tree limbs (usually need 14 feet).
- Ground Firmness: A 5,000-lb shed on a trailer will sink into a soft lawn, leaving massive ruts.
- Turn Radius: Can the truck make the swing around the corner of your house?
A Placement That Works for Hobbyists
If you will use the shed as an office or workshop, then the shed’s distance from your house becomes really important. You need to balance convenience and noise control. The site has to be close enough to access easily, but shouldn’t be so close that a screaming miter saw or a loud Zoom disturbs the people inside the main house.
When I built my own workshop, I placed it 40 feet from my house. This was the Goldilocks distance. It was close enough that I didn’t mind the walk in the rain, but far enough that my wife couldn’t hear me hammering at 11 PM. If you’ll only be using the shed for storage, the furthest corner in your yard is fine. If it’s for daily use, then every foot closer to the back door increases the likelihood that you’ll actually use it.
Also, look at the entry plaza. Don’t just place the shed and call it a day. You need a 4×4-foot area in front of the door that is paved or decked. This prevents you from tracking mud into the shed every time you enter, and it gives you a stable place to stand while you’re fumbling with the padlock.
Security Through Visibility
A shed tucked into a completely hidden blind spot is a prime target for thieves. If you are storing expensive power tools or e-bikes, try to place the shed within the line of sight of a house window or a motion-activated security light.
Vital Shed Placement Checklist
- Call 811: Before you do any digging or receive deliveries, have all underground utility lines marked.
- Review Local Ordinances: Call the council and confirm the maximum height and square footage that is allowed without any permit. Double-check the specific setback feet for your zip code.
- Check HOA Bylaws: Ensure the color and placement meet community standards.
- Rain Test: Observe the site during and after a heavy storm to ensure water doesn’t pool.
- Measure Gate Width: Ensure a delivery truck or Mule can physically reach the site.
- Identify the Drip Line: Keep your shed away from the overhanging branches and root systems of large trees.
- Orient for Wind: Face the doors away from the prevailing wind to prevent door damage.
- Solar Safety: Aim for a spot with morning sun and afternoon shade to control temperature and moisture in your shed.
- Verify Setbacks: Use a transit or a laser measure to ensure you are the legal distance from property lines.
- Foundation Depth: Ensure you can dig deep enough for a proper gravel base (usually 4-6 inches) without hitting rock or pipes.
- Maintenance Access: Ensure there is at least a 24-inch gap between the shed and any fences or walls for future painting and repairs.
Folks Usually Ask
Can I put a shed right against my neighbor’s fence?
Almost never. Even if your neighbor doesn’t mind, building codes usually require a fire separation or maintenance gap of 2 to 5 feet. If you build it right against the fence, you can’t paint the back side, and trapped moisture will rot both your shed and their fence.
How do I level a shed on a slope?
For minor slopes, you can cut and fill the gravel pad. For steeper slopes, you must use concrete piers (Sonotubes) or solid concrete blocks. Never stack “cinder blocks” more than two high without filling them with concrete and rebar, as they can tip under the lateral pressure of the shed.
What’s the biggest mistake people make with shed placement?
Placing it in the lowest spot of the yard. People want to hide the shed, so they put it in the back corner where the yard naturally drains. This turns the shed into a “barge” that sits in a puddle half the year, destroying the floor system.
Can I put my shed on grass?
Never. Placing a shed directly on grass is a big mistake that leads to floor rot within 2-4 years. The grass traps moisture against the wood and blocks airflow. Always use a base of 4-6 inches of crushed stone to break the capillary action.
How far should a shed be from the house?
For fire safety, many areas require 10 feet of distance from the main residence. Practically, you want it far enough that roof runoff from the house doesn’t hit the shed, and close enough that you don’t need a Sherpa to go get your lawnmower.
Can I place my shed under power lines?
You can, provided you meet the vertical clearance requirements of your utility provider (usually 10-15 feet). However, if the utility company needs to replace the pole or the lines, your shed might be in the way of their bucket truck, and they usually have an easement that allows them to move it.
Is it okay to put a shed under a tree?
It is possible, but requires metal roofing and a skid foundation. Avoid digging deep footings that damage the tree’s critical root zone, and be prepared for increased maintenance due to falling leaves and branches.


Read Next
 Shed Building Codes and Permit Guide For DIY Builders
 37 Pro-Tested Tools For Building DIY Sheds That Last
 21 Costly Shed Building Mistakes (& Pro Tips To Avoid Them)
 How to Build A Wooden Skid Shed Foundation Easily
 Shed Roof Guide: How To Frame & Sheathe For Weatherproofing
 How To Build Shed Door & Window Headers That Never Sag
Framing-to-Finish Roadmap: DIY Guides For Every Step of The Build


