
11 Pro Shed Organization Ideas To Maximize Storage Space
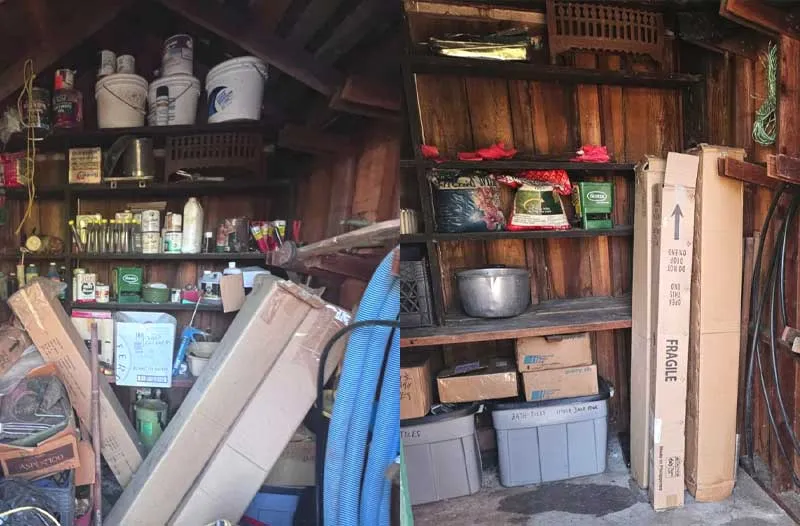
A friend of mine spent a three-day weekend looking for a specific $4 masonry bit in a shed that looked like a hardware store had vomited in a plywood box. He had the tools, he had the talent, but he had zero flow because his workspace was a graveyard of “I’ll put this away later” decisions.
That is the silent killer of DIY joy, the friction of findability. When your shed is a disaster, you do not just lose time; you lose the motivation to start projects at all.
Effective shed organization is not about buying matching plastic bins that look pretty on Pinterest. It is about high-throughput spatial logic. It is about understanding the relationship between your high-frequency gear and your bulk storage. This guide is for those who have finally had the realization that a shed should work for you, not the other way around.
Defying Gravity With Structural Floating Shelves

Floating shelves in a shed environment are not the dainty decorative pieces you see in a kitchen. We are talking about structural L-braced or Torsion Box platforms capable of holding 40-pound jugs of pool chemicals or stacks of 2×4 offcuts. The primary challenge here is not the shelf itself; it is the pull-out force on your wall studs.
Most DIYers screw a bracket into the siding or thin OSB and wonder why their shelf is sagging six months later. You have to hit the meat of the framing.
The benefit of a true floating or wall-mounted shelf is the total elimination of leg-room interference. When you do not have vertical posts running to the floor, you can slide your miter saw stand or a rolling job site table directly underneath the storage area. It creates a nested ecosystem.
However, you cannot treat a floating shelf like a pallet rack. If you overload the front edge, you are putting massive leverage on the upper lag bolts, which can eventually oval-out the pilot holes in your soft pine studs.
I generally reserve floating shelves for mid-weight items that need to be visible but off the bench, such as circular saws, router bases, or gallon-sized wood glue containers.
They are best used in sheds with open-stud framing where you can easily identify your attachment points. If your shed is finished with drywall or pegboard, you will need a stud finder and a prayer, or better yet, a horizontal ledger board to distribute the load across multiple framing members.
I have seen guys use 3-inch deck screws to hang shelves and call it a day. Do not do this. Deck screws have high tensile strength but terrible shear strength, meaning they can snap under a vertical load. Always use 1/4-inch or 5/16-inch lag bolts or high-quality structural screws (like GRKs) for floating shelves. I once saw a shelf loaded with coffee cans of nails shear off the wall because the builder used drywall screws. It did not just fall; it exploded.
Textbooks tell you to use a bubble level and make every shelf perfectly 0.0 degrees. In the real world, most sheds settle. If your shed has a slight 2-degree lean to the left, and you make your shelf perfectly level, it will look crooked to the eye and might even interfere with the door swing. I always level to the structure first, then check for functional level so things do not roll off. Sometimes, visually straight beats mathematically level in a backyard build.
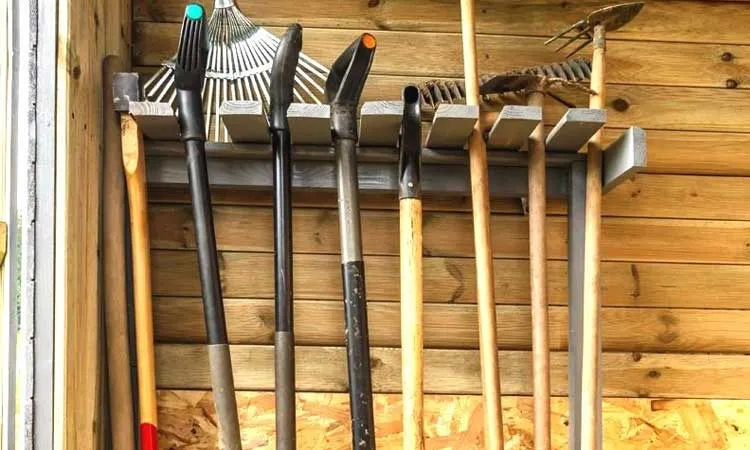
Everything Hook Strategy: Mastering All-Purpose Storage
Hooks are the lowest-hanging fruit of shed organization, yet most people buy the wrong ones. Those flimsy, vinyl-coated J-hooks from the bargain bin are the bane of my existence. They bend, the coating peels, and they never sit flush against the wall. When I talk about hooks, I am talking about heavy-gauge steel T-hooks and Tornado-style hangers that can bite into a 2×4 and hold a ladder without flinching.
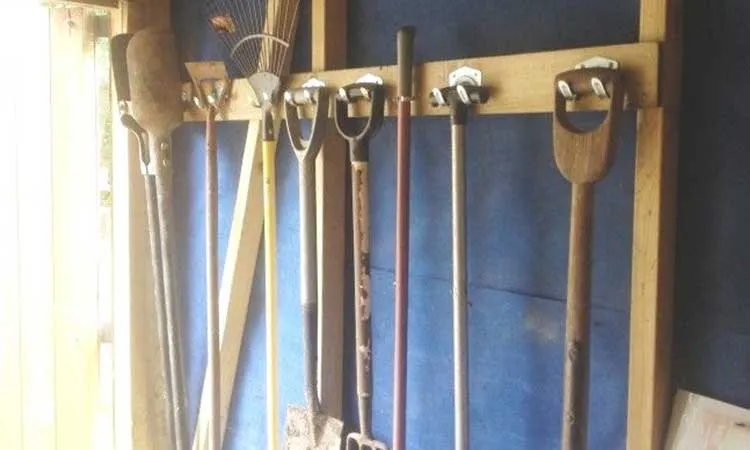
The beauty of a hook-based system is Instant Accessibility. There is no drawer to open, no bin to unstack. You see the weed whacker, you grab the weed whacker. It encourages the put-back culture because the barrier to entry is so low. The challenge, however, is Visual Noise. If you have 50 hooks on a wall, it starts to look like a scrap yard. You lose the ability to quickly scan for what you need because the silhouette of the tools overlaps.
I find hooks are best for long-handled gear. Shovels, rakes, hoes, and sledgehammers. Items that are awkward to lean in a corner should always be hooked. The secret is to stagger the heights. Put your spade shovel head-up on a high hook, and the next one head-down on a lower hook. This interlocking method lets you fit twice as many tools in the same horizontal run of wall.
Shadow Board Shortcut
Once you have laid out your hooks, take a thick permanent marker and trace the outline of the tool on the wall. It sounds shop-teacherish, but it is the fastest way to maintain order. I spent years yelling at my kids for not putting the loppers back, only to realize I had so many hooks even I forgot where they went. The shadow board eliminates the “Where does this go?” mental load instantly.
You know your hook system is successful if you can retrieve and replace your three most-used outdoor tools with one hand without shifting any other items. If you have to move a rake to get to your shovel, your hook spacing is a failure. A successful setup allows for clean extraction, meaning no tangling, no clanging, and no frustration.
Apothecary Method Of Hanging Glass Jars for Fastener Sanity
There is a certain old-school satisfaction to the jar under the shelf trick, but it is often dismissed as a grandpa hack. In reality, it is one of the most space-efficient ways to handle the small-parts nightmare. By screwing the lids of glass (or heavy-duty plastic) jars to the underside of a shelf, you utilize the dead air that exists above your bench.
The biggest benefit is Total Transparency. You can see exactly how many 2-inch galvanized nails you have left without opening a single drawer. It also keeps moisture away from your fasteners better than an open bin. If you use cheap, thin lids, the weight of the jar (especially if filled with lead anchors or large bolts) will cause the lid to distort, making it nearly impossible to thread the jar back on with one hand.
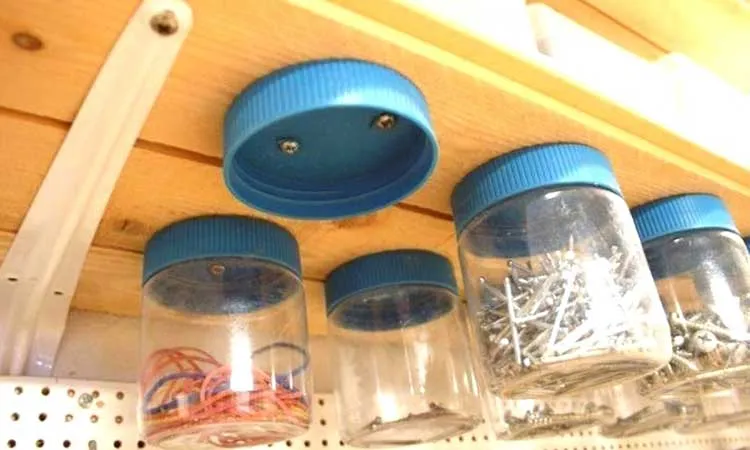
This method is best for the fiddly bits, like washers, cotter pins, specialty screws, and those weird IKEA Allen wrenches you refuse to throw away. I prefer using wide-mouth Mason jars because the glass is thick enough to handle a stray bump from a 2×4, and the lids are two-piece, which allows you to secure the ring or the disc more firmly.
Glass jars don’t cloud over time when exposed to sawdust or chemical fumes. However, if you drop a glass jar on a concrete shed floor, your Saturday is ruined. If you are a butterfingers or have kids in the shed, use heavy-duty PET plastic jars. They are not as pro, but they will not send shards of glass into your shop vac.
Lid Fastening Mechanics
Most people use one screw in the center of the lid. Fail. The jar will spin like a top every time you try to tighten it. You need at least two screws, spaced 1/2-inch apart, to lock the lid’s orientation. Furthermore, if you are screwing into a 3/4-inch plywood shelf, use 5/8-inch screws so the tips do not poke through the top of your shelf and snag your hand later.
Murphy Workspace: Installing a Foldable Workbench
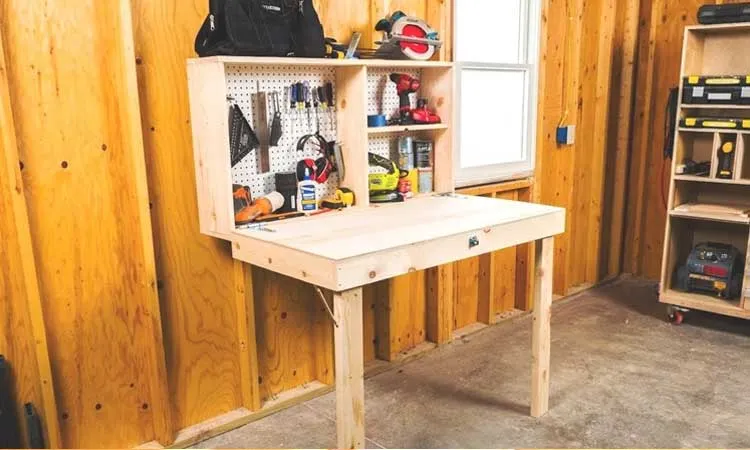
In a standard 8×10 or 10×12 shed, a permanent 6-foot workbench is a land grab that you often cannot afford. A foldable, wall-mounted workbench is the Swiss Army Knife of shed layouts. When you need to sharpen a mower blade or glue up a birdhouse, you flip it up. When you need to pull the snowblower in for the winter, you flip it down.
The primary challenge here is Rigidity. A folding table that wobbles is worse than no table at all; it is dangerous for precision work. You need a locking leg system or heavy-duty folding brackets (look for the ones rated for 500+ lbs). The benefit, beyond space saving, is that it forces you to keep the surface clear. You cannot store junk on a table that has to be folded away to close the door.
Many DIYers think a long piano hinge is the best way to mount a folding bench because it looks strong. In reality, piano hinges are great for alignment but terrible for weight. They have tiny screws that pull out of the end-grain easily. Use Heavy Duty Gate Hinges or dedicated Folding Shelf Brackets that bolt directly into the side of the studs. It is less pretty but will not collapse when you lean on it.
This is appropriate for any shed that serves a Dual-Purpose (for example, storage and workshop). If your shed is strictly for the mow-and-go lifestyle, a folding bench is overkill. But for the Weekend Warrior, it is the difference between working comfortably and hunched over on the floor. I recommend a sacrificial top of 1/2-inch MDF over a solid plywood base. When the top gets too many drill holes or paint spills, you just unscrew it and slap a new sheet on.
A high-quality folding bracket set costs about $40 to $60. A fixed 2×4 workbench costs about $20 in lumber. You are paying a 200% premium for the folding hardware. However, if that folding bench saves you 15 square feet of floor space in a shed that cost $3,000 to build, you are earning back $450 worth of real estate. The math almost always favors the fold.
Magnetic Attraction: High-Force Strip for Reach-and-Grab Tools
In a high-intensity workspace, the three seconds it takes to fumble through a plastic drawer for a 10mm wrench is three seconds of momentum lost.
I am a massive proponent of the magnetic tool strip, but not the cheap, decorative ones meant for kitchen knives. For a shed, you need industrial-grade neodymium or high-flux ceramic magnets encased in a steel channel. These can hold a 16-ounce claw hammer or a set of heavy-duty pliers without them sliding down the wall every time you slam the shed door.
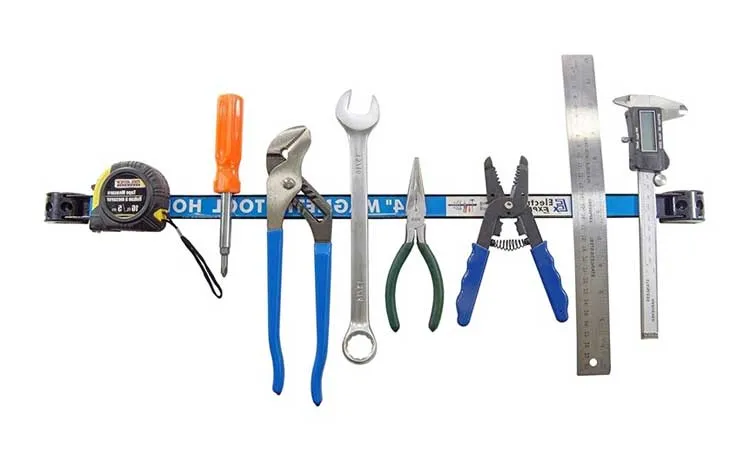
You can fit twenty screwdrivers in the same horizontal space that three hooks would occupy. It also keeps your edge tools (chisels, scrapers, and drill bits) from knocking against each other, which preserves the sharpness of the steel.
However, if you’re grinding metal nearby, the magnetic strip will attract every microscopic shard of steel dust in a six-foot radius. Within a month, your tool strip looks like it’s growing a beard of iron filings, which can get into your tool pivots and cause rust or seizing.
I find magnetic strips are best used directly above a workbench or on the inside of a shed door. If it’s made of ferrous metal and weighs less than two pounds, it belongs on the magnet. I’ve even used them to hold the extra keys for my lawnmower and padlock, so they are never buried under a pile of work gloves.
Electronic Kill-Zone
Never place a high-powered magnetic strip near your tool battery charging station. I once mounted a magnetic strip and a row of Makita chargers on the same plywood panel. The magnetic field, combined with the heat from the chargers, eventually fried the circuitry in two of my rapid-chargers. Keep your magnets at least 18 inches away from anything with a PCB or a digital screen.
Entryway Guardian: Create a Large Tool Hanger Near the Door
The first three feet of your shed are the high-value real estate. This is where the transaction happens; you go in, you grab, you leave. Most people make the mistake of burying their largest, most-used tools (like the leaf blower or the heavy-duty rake) at the back.
I advocate for the large tool hanger right next to the door jamb. This is usually a custom-built fork or a heavy-duty U-bracket designed to handle the girth of power equipment or long-handled landscaping tools.
Entry-point storage prevents you from walking the path of destruction. Every foot you walk into a cluttered shed is a foot where you might trip over a bucket or snag your shirt on a saw blade. By keeping the big stuff at the door, you minimize foot traffic inside the shed. The challenge is weather exposure. If your shed door doesn’t have a perfect seal, the tools stored right at the entrance are the first to experience humidity spikes and wind-blown rain. I’ve seen expensive Stihl blowers develop surface crust because they were stored six inches from a leaky door gap.
This setup is best for high-frequency, low-finesse items. Your string trimmer, your snow shovel (in winter), and your primary push broom. These are tools that don’t require a climate-controlled jewelry box but need to be out of the way of your walking path.
I recommend building a French Cleat section right by the door so you can swap these tools out seasonally, with snow shovels in the front in January and garden rakes in the front in May.
When mounting large hangers near the door, always measure your swing radius. There is nothing more infuriating than mounting a $30 heavy-duty hook only to realize the handle of the tool prevents the shed door from opening past 90 degrees. I always mock-up the tool’s position with a piece of blue painter’s tape first, then swing the door fully open and closed before I drive a single screw.
Rainy Day Protocol
If your budget is $0, use a 2×4 scrap and two 6-inch timber screws driven at a 15-degree upward angle. This creates a dead-simple fork that can hold a heavy weed-eater. If your budget is $100, invest in a track system (like Gladiator or Rubbermaid FastTrack). The track system is superior for the entryway because as your tool fleet grows, you can slide the hooks left or right without redrilling holes in your shed’s structural headers.
Taming the Kraken: Hose and Cord Organizers to Prevent The Tangle
Nothing kills the zen of a clean shed faster than a 50-foot extension cord that has turned into a Gordian Knot. Garden hoses and extension cords are the Krakens of the shed; they will expand to fill every available square inch of floor space if you let them. The standard arm-wrap method of coiling a cord is actually what causes the tangles because it introduces a twist into the internal copper or rubber every time you loop it.
Over-Under Coil
The over-under coiling technique (also known as the Roadie Wrap) is a lifesaver. By reversing the direction of each loop, you neutralize the internal tension. When you throw the cord out, it uncoils perfectly straight with zero tangles. If I catch an apprentice arm-wrapping a $100 12-gauge cord, they’re on sawdust-sweeping duty for a week. It’s that important for tool longevity.
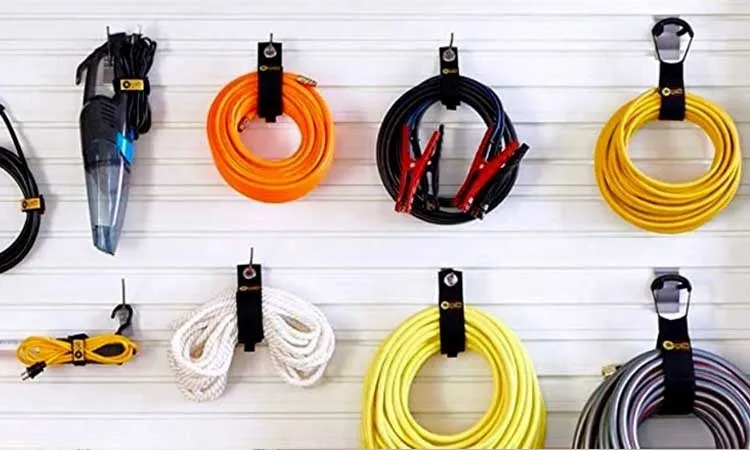
The benefit of a dedicated organizer, whether it’s a wall-mounted reel or a simple jumbo j-hook, is coil memory preservation. If you store a hose correctly, it stays flat and manageable. If you throw it in a pile, the rubber sets in a kinked position, and you’ll be fighting that kink for the rest of its life. The challenge is weight and leverage. A 100-foot rubber garden hose filled with residual water can weigh 40 pounds. If you hang that on a single hook attached to 7/16-inch OSB siding, it will pull the wall down over time.
No one is exempt from cord-crawl. I prefer using wide-radius hangers, such as a piece of 6-inch PVC pipe cut in half and mounted to the wall. The wider the radius of the hanger, the less stress you put on the cord’s jacket. For air hoses, a retractable reel is the ultimate luxury, but for 90% of DIYers, a simple Velcro strap and a sturdy hook are all you need to keep the Kraken at bay.
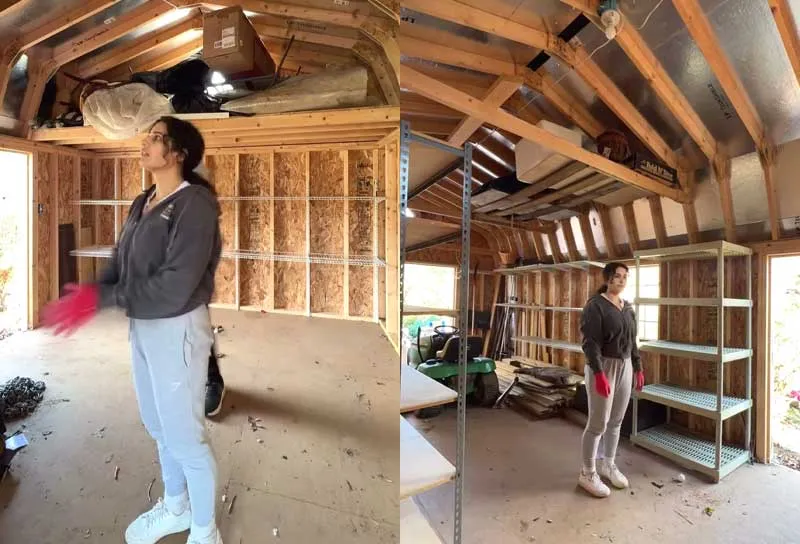
Iron Backbone: Heavy-Duty, Freestanding Metal Shelving
When you have bulk items, like bags of concrete, five-gallon buckets of paint, or tubs of holiday decor, you need a storage solution that doesn’t rely on your shed’s walls. Freestanding metal shelving units (the industrial wire or slotted angle variety) are the iron backbone of a professional shed. They transfer the weight directly to the floor joists, which is exactly where the load should be.
Metal shelves don’t absorb oil spills like plywood does, and wire shelving doesn’t collect sawdust drifts. The challenge is the bottom-heavy rule. If you put your heavy stuff on the top shelf, the whole unit becomes a tip-over hazard. In a shed, which might not have a perfectly level floor, a top-heavy metal shelf is a widowmaker. You must anchor the top of the unit to a wall stud with a safety strap, even if it’s freestanding.
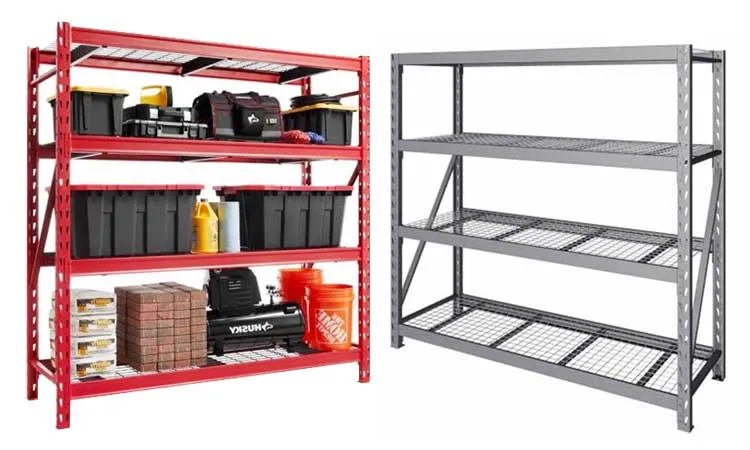
The ordering of operations here is critical: Put your ground-level items (like lawnmowers or heavy compressors) under the bottom shelf if it’s a bolt-less design that allows for a high first shelf. Then, stack by weight, with heavy at the bottom and light at the top. As your needs change, you can adjust the shelf heights without a hammer or a drill.
Depth Trap
Do not buy 24-inch deep shelves for a small shed. You think you’re getting more storage, but you’re actually creating a black hole. Anything stored more than 12 inches back is effectively lost until you move out. Stick to 18-inch depth for bulk items and 12-inch depth for hand tools. It keeps the sight lines clear and prevents the double-stacking that leads to organizational decay.
Beginners often buy zinc-plated wire shelving because it looks shiny and clean. In a shed, which is a high-humidity micro-environment, zinc-plating is worthless. It will start to white-rust within two seasons. Always look for powder-coated or epoxy-coated steel. I learned this the hard way when I stored my good hand planes on a zinc shelf; the zinc-bloom transferred to the cast iron of the planes and caused deep pitting.
Rustic Modular System To Stack Gear in Wooden Crates
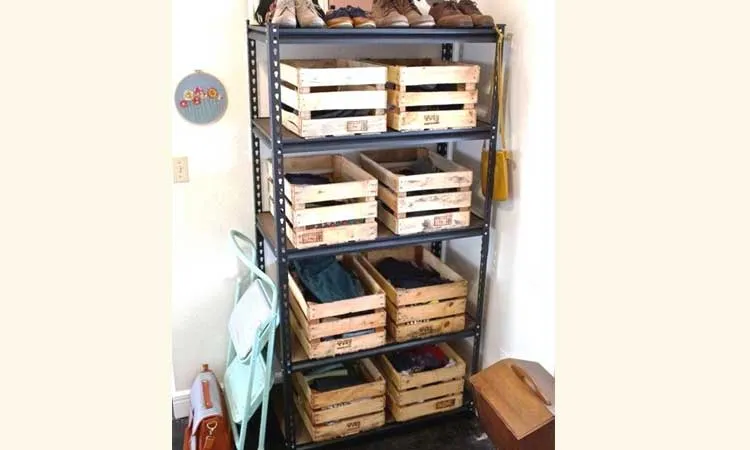
There is a reason the humble wooden crate has survived for centuries: it is the ultimate unit of transport. In a shed, using wooden crates, specifically those you build yourself from 1×4 pine or reclaimed pallets, provides a modular flexibility that plastic bins simply can’t match. You can screw them directly to the wall studs to create instant cubbies, or you can stack them log-cabin style for seasonal storage.
Unlike plastic bins, which crack in the winter and bow under the weight of metal hardware, a well-built wooden crate is a forever solution. It also breathes. If you’re storing damp rags or garden gloves, wood allows for a level of airflow that prevents the musty rot common in sealed containers. The challenge, however, is uniformity. If you use randomly found crates, you lose the ability to stack them efficiently. You end up with gaps and traps where spiders love to nest and dust bunnies congregate.
I keep one crate for painting supplies, one for electrical, and one for plumbing. When a leak happens under the sink, I don’t grab a screwdriver; I grab the plumbing crate and take the whole thing to the house. It’s a grab-and-go system that treats your shed like a distribution center rather than a closet.
Fruit Crate Fiasco
Early in my career, I thought I’d be eco-friendly and use old cedar apple crates for my heavy wrench sets. I stacked them four high. What I didn’t realize is that agricultural crates are designed for apples, not fifty pounds of forged steel. The bottom crate’s stapled joints gave way at 3:00 am, creating a chain-reaction collapse that dented my floor and scattered 400 sockets into the dark corners of the shed. The lesson: if you’re storing heavy metal, build your crates with glue and screws, never staples.
If you install a French Cleat (a 45-degree ripped board) on your shed wall, you can screw the matching cleat to the back of your crates. This allows you to hang your crates at eye level when you’re working, and then move them to a storage rack when you’re done. It’s the fastest way to reconfigure a shop for different tasks, moving from woodworking mode to lawn maintenance mode in under sixty seconds.
Wall of Fame: Utilizing Pegboards for Precision Tooling
The pegboard is the controversial classic of the workshop world. Some guys hate them because the hooks fall out; I love them because they provide infinite visual feedback. A pegboard is not just a storage device; it’s a dashboard for your productivity. When a tool is missing from the board, the empty silhouette screams at you to find it before you lock up for the night.

The challenge is the wobble. If you mount a pegboard directly to the studs without a spacer frame, you can’t get the hooks in. If you use the cheap 1/8-inch hardboard, the holes will blow out within a year of heavy use. The benefit of the pegboard, however, is the granular customization. You can move a hammer three inches to the left to make room for a new set of chisels without drilling a single new hole in your wall.
This is best for high-frequency hand tools: pliers, wrenches, screwdrivers, and measuring tapes. It is not for heavy power tools or bulky items like circular saws. I recommend using the metal pegboard systems (like WallControl) if your budget allows. They are over-engineered for a backyard shed, meaning they won’t warp in the humidity, and the hooks actually lock into place, so they don’t come off when you grab a tool.
If you are using standard brown hardboard pegboard in a shed that isn’t climate-controlled, you must paint both sides before installation. If you don’t, the board will act like a sponge, soaking up summer humidity and delaminate. A quick coat of exterior-grade semi-gloss paint will make the board last twenty years instead of two.
You’ll see expert photos where every single tool is on a pegboard. This is a photography lie. In a real working shed, putting everything on the board leads to clutter paralysis. Only put your top 20 tools on the board. Everything else, the once-a-year tools, belongs in a drawer or a crate. A crowded pegboard is just a vertical junk drawer.
Aloft Strategy: Building Heavy-Duty Overhead Storage
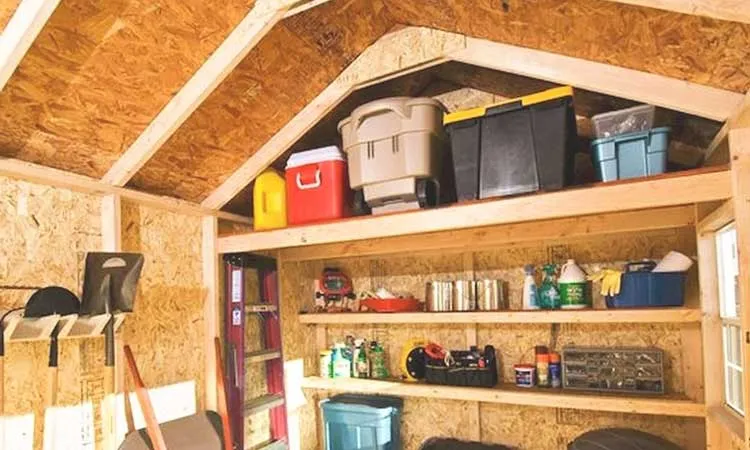
In a shed, the z-axis (the space above your head) is almost always wasted. By building loft joists or overhead shelves that tie into the roof rafters, you can reclaim nearly 30% of your total cubic footage. This is the long-term archive of your shed, the place for items you need only once a year, like holiday deer for the lawn or the big turkey fryer.
If you build the shelves too low, you’ll be ducking for the rest of your life (and I’ve got the scars on my forehead to prove it). If you build them too high, they become unreachable graveyards where stuff goes to die. Now their real benefit is that when the bulky items are in the rafters, the floor stays open for actual work.
This is best for light but bulky items. Think seasonal decorations or extra bundles of shingles. I use a ladder-frame design made of 2x4s and 1/2-inch plywood. The ordering of operations is vital: you must verify that your shed’s top plate and rafters can handle the extra dead load. Most big box pre-fab sheds use 2×3 rafters; if you load those with 500 lbs of gear, you’re going to see a sway-back roof by next spring.
Heat Ceiling
In the summer, the temperature at the peak of a shed roof can hit 140°F (60°C). Stay away from storing anything sensitive up there. I once stored a bulk pack of aerosol spray paint in my overhead loft. The heat caused one of the cans to vent its pressure, and I walked into a shed that smelled like safety orange and regret. No batteries, no chemicals, no heirloom plastics in the loft.
Instead of just nailing boards to the rafters, use threaded rods and large washers to hang your shelves from the ridge beam if the structure allows. This creates a suspended loft that doesn’t put outward thrust on your walls. It’s a more complex build, but it’s the gold standard for structural safety in a small frame building.
A Daily Reset Protocol Allows Zoned Cleaning
You can have the best hooks, shelves, and crates in the world, but without a system of maintenance, your shed will return to chaos in exactly 14 days. That’s why you need the daily reset. It is a non-negotiable five-minute ritual performed at the end of every work session.
When you walk into a messy shed, your brain has to process the visual debt before you can even start your project. By performing a daily reset, you are giving your future self a gift of immediate productivity. This protocol is based on zoned logic; you don’t clean the whole shed, you just reset the zones you touched.
The 3-Step Reset:
- Clear the Action Zone: Wipe the workbench. If it takes less than 30 seconds to put a tool back, do it now.
- Floor Sweep: Sawdust and dirt track moisture and pests. A clean floor is a dry floor.
- The “Stray Item” Bin: If you don’t know where it goes, don’t leave it on the bench. Put it in a dedicated to-be-sorted bin. This keeps the action zone ready for the next day.
Organization is not a project you finish; it is a practice you maintain. The goal isn’t to have a shed that looks like a museum; the goal is to have a shed where you can find a 1/2-inch socket in the dark while it’s raining. If you follow the verticality first rule and respect the daily reset, you’ll never lose a weekend to clutter again.
Shed Floor Space Calculator
Use this method to determine if your current organization is failing or flowing. Grab a tape measure and spend 5 minutes in your shed.
Part A: Density Math
Total Floor Sq. Ft. (Length x Width): _________
Blocked Floor Sq. Ft. (Items sitting on the ground): _________
Your Flow Ratio: Blocked Floor Sq. Ft. divided by Total Floor Sq. Ft.
- 0.0 to 0.2: Master Level. Your floor is clear; your walls are doing the work.
- 0.3 to 0.5: Average. You’re likely tripping over the lawnmower.
- 0.6+: Critical Failure. You are storage-bound. You need to move to Overhead storage immediately.
Part B: High-Frequency Audit
Answer Yes or No to the following:
- Can I reach my most-used screwdriver without moving another object?
- Is my main extension cord free of tangles right now?
- Can I see the back wall of my shed from the doorway?
- Are my small fasteners (screws/nails) in transparent containers?
Score: If you answered no to more than two, start your reorganization at Hooks, as they are the fastest win for the least amount of money.


Read Next
 9 Pro-Tested Shed Ventilation Ideas For DIY Builds
 37 Pro-Tested Tools For Building DIY Sheds That Last
 21 Costly Shed Building Mistakes (& Pro Tips To Avoid Them)
 Shed Rafters vs. Trusses Comparison: Pro-Tested DIY Guide
 Shed Security Tactics That Protect Backyard Storage From Theft
 Shed Foundation Guide: 11 Durable Builds And Traps To Avoid
Framing-to-Finish Roadmap: DIY Guides For Every Step of The Build


