
Shed Rafters vs. Trusses Comparison: Pro-Tested DIY Guide

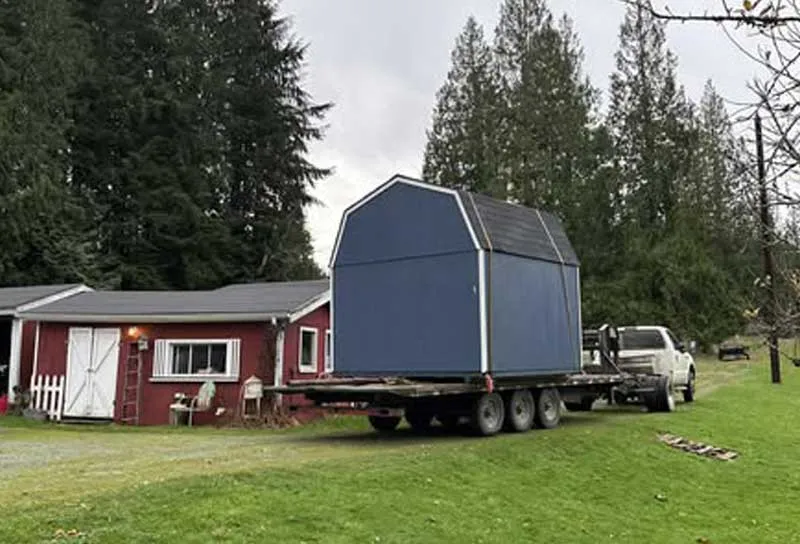
Early in my career, I tried to save a client $400 by hand-cutting rafters for a 16×20 gambrel shed in a torrential downpour. I miscalculated the birdsmouth cuts on the first four pairs because I was rushing to beat the mud. By the time I realized the ridge wasn’t level, I’d already nailed off the gable ends.
I ended up burning three days of labor and a pile of expensive 2x6s just to fix a simple geometry error. It was a humbling lesson. The choice between rafters and trusses is about structural integrity and about whether you want to spend your weekend swinging a hammer or cursing a carpenter’s square.
If you mess up the roof, the doors won’t swing right and eventually, the whole thing will look like a swayed-back mule. Choosing the right framing system for your shed roof is the most critical decision you’ll make after the foundation. You need to know exactly when to labor over individual rafter cuts and when to build your own trusses on the ground like a production line.
Choose Rafters if: You want maximum overhead storage (loft space) and you’re working solo. It’s more labor-intensive but offers the gold standard of aesthetic flexibility.
Choose Trusses if: You want to dry-in the building in a single afternoon and you have a buddy to help hoist the assemblies.
Winner for Most DIYers: Trusses win on speed and structural certainty, but rafters win on soul and utility.
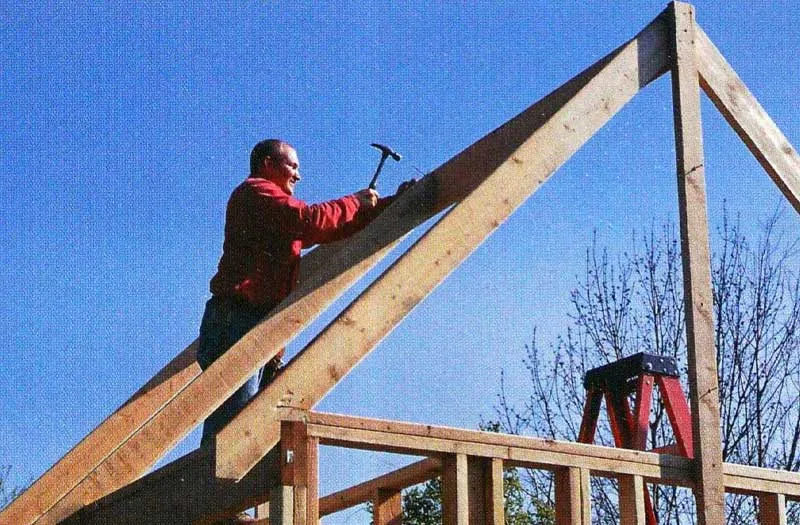
Lone Wolf Loophole: Why Rafters Are Easier For Solo DIYers
When you’re out there by yourself, gravity is your biggest enemy. Trying to hoist a pre-assembled truss (even a small one made of 2x4s) up onto a 7-foot wall while balancing on a stepladder is a recipe for a trip to the ER.
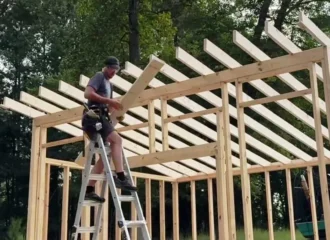
This is where stick-framing (rafters) shines for the lone wolf. With rafters, you are handling one piece of lumber at a time. You cut your ridge board and prop it up with deadman braces. And then simply walk each individual rafter up. It’s a rhythmic, manageable process. You aren’t fighting a giant, floppy wooden triangle that wants to catch the wind like a sail.

Unfortunately, this requires a lot of precision. If the birdsmouth cuts aren’t identical, your ridge will look like a literal roller coaster. You also have the swing factor; until you get at least four rafters up and braced, the whole system is incredibly unstable. I’ve seen solo builders try to nail the first rafter only to have the ridge board kick out and take the gable wall with it.
But on the other hand, you don’t need a 20-foot clear radius on the ground to assembly-line your trusses. You just need some sawhorses and a steady hand. Stick framing is suitable for those tight backyard spots where you don’t have the lay-down space to build 15 trusses on the grass before the install.
The Cheater Block
When solo-framing rafters, nail a small scrap block of 2×4 to the ridge board exactly where the top of the rafter sits. This acts as a shelf so you can rest the rafter in place while you reach for your nail gun. It eliminates the third hand problem that causes most DIY rafter accidents.
A Diagnostic Test For Roof Framers
This test uses a weighted scoring system to determine which roof system actually fits your needs.
Field-Ready Quiz
Answer these 10 questions honestly. Keep a running tally of your score.
Are you flying solo for the install?
- Solo (Me, myself, and a ladder): +3 Rafters
- A helper or two available for the big lift: +3 Trusses
Do you plan on storing kayaks, ladders, or seasonal tires in the roof?
- Yes, I need every inch of attic space: +4 Rafters
- No, the interior will stay open to the ridge: +1 Truss
How wide is the “Box” (the shortest wall-to-wall distance)?
- 8 to 12 feet: +1 Rafter
- Over 14 feet: +4 Trusses
What does the 48-hour forecast look like?
- Blue skies for a week: +1 Rafter
- Rain/Snow moving in tomorrow night: +3 Trusses (for the speed-drop install)
Do you own a high-quality framing square and a sliding miter saw?
- Yes, I’m a measure twice, cut once type: +2 Rafters
- I’ve just got a circular saw and a dream: +2 Trusses
Are you building in a town with strict Code Enforcement?
- Yes, they want to see prescriptive framing: +3 Rafters
- No, I’m in the wild west (Rural/Unincorporated): +1 Truss
How do you feel about spending 6 hours on a ladder?
- I’m a mountain goat; heights don’t bother me: +2 Rafters
- I’d rather do 90% of my work on the ground/floor: +3 Trusses
Are you doing a very steep A-Frame or 12/12 pitch?
- Yes, I want that sharp, aggressive peak: +3 Rafters
- No, I’m sticking to a standard 4/12 utility slope: +2 Trusses
Will this eventually be a heated/cooled office?
- Yes, I want a cathedral ceiling look: +3 Rafters
- No, I’ll just use a flat drop ceiling: +2 Trusses
Is there a 10% chance you’ll move this shed in 5 years?
- Yes, it’s on skids/runners: +3 Trusses (for the rigidity factor)
- No, it’s staying on this concrete pad forever: +1 Rafter
Scoreboard
0–10 Points: Purist Rafter Build. Your project demands the versatility and storage capacity of stick-framing. You are likely working solo or building a high-end workspace. Take the time to cut your birdsmouths perfectly; the cathedral storage you gain is worth the extra two days on the ladder.
11–18 Points: Hybrid Crossroads. You are in the grey zone. Buy higher-grade 2×8 lumber for rafters to get that storage, in case you have the budget. For those who just want the building dried-in before Monday, build your own trusses on the shed floor.
19+ Points: Production-Line Truss Build. Stop overthinking the birdsmouth geometry. Build a jig on your shed floor and assembly-line your trusses. Get a helper to help you flip and brace them. You’ll save 30% on lumber costs and have a roof that can withstand almost any lateral load.
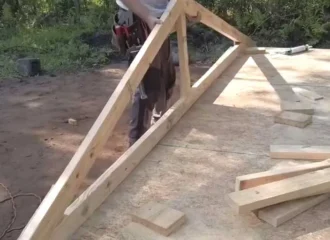
The Skill Gap Between Stick-Framing and DIY Trusses
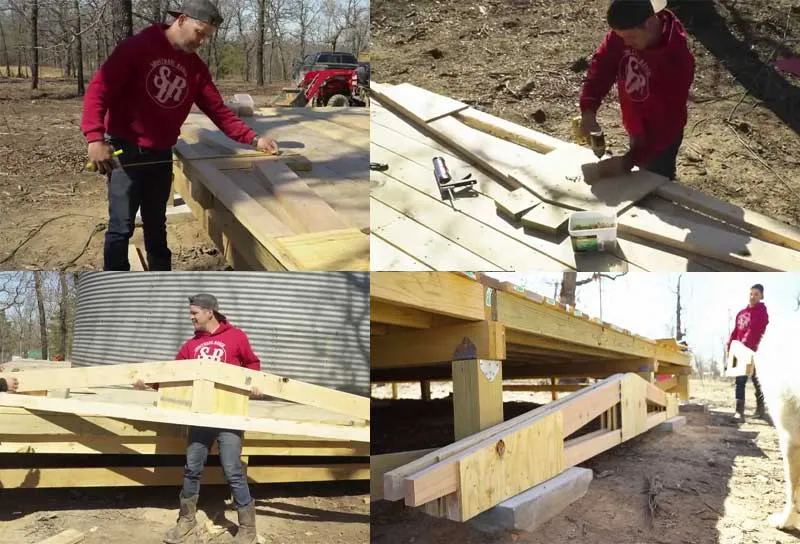
Trusses are ideal for the functional builder who just wants the roof on so they can start painting. Building a DIY truss is essentially a manufacturing job. You create a jig on your shed floor, drop in your pre-cut 2x4s, and bang on plywood gussets. It’s repetitive and requires very little on-the-fly geometry.
Once the jig is set, you can turn your brain off and just produce. This makes trusses the better choice for a beginner who is terrified of the step cut or plumb cut on a rafter. However, the gussets can still give you trouble. If you don’t use enough glue and nails on those plywood plates, or use thin OSB instead of 1/2-inch CDX plywood, the truss will rack (fold) as soon as you stand it up.
Gusset Gap And The Glue Factor
Beginners often leave a 1/4-inch gap between the 2x4s inside a truss, thinking the plywood gusset will hold the weight. Wrong. The wood must be wood-to-wood tight. The gusset only keeps them from pulling apart; the compression strength comes from the timber ends touching.
A site-built truss is only as good as the construction adhesive. Don’t just nail the gussets; butter the back of the plywood with a heavy bead of PL Premium. It turns the entire truss into a single monolithic unit that won’t creak when the wind hits 50 mph.
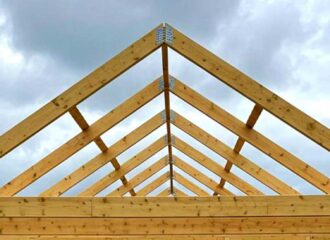
Stick-framing is a higher-tier carpentry skill. You’re dealing with a ridge board and common rafters. A well-framed rafter roof transfers load directly down the walls with minimal fuss, provided you’ve nailed your ceiling joists correctly to prevent wall-spread.
Four-Hour Truss Toss vs. Two-Day Rafter Grind: A Speed Choice
When you want to see a shed go from a wall-box to a dried-in building in a single afternoon, trusses are your only path. You spend a Saturday morning building 10 trusses on the shed floor. After lunch, you and a buddy start at one gable end, flip them up, brace them, and you’re done by 4:00 PM.
It’s an incredibly satisfying big win for a weekend project. A potential drawback is that if the measurement is off by even 1/2 inch on your wall plate layout, the trusses won’t sit right, and you can’t easily trim a truss like you can a rafter.
Rafters are a slow burn. You spend hours measuring and triple-checking your pitch. And you have to hand-cut every birdsmouth. Then you have to install the ceiling joists and the rafters. It’s a multi-day process for a solo builder. If there is rain in the forecast for Sunday, you build your trusses under a tarp on Friday night and pop them on Saturday morning.
Price Of Time
Don’t forget the cost of your time. If a rafter roof takes you 16 hours and a truss roof takes 6, what are those 10 hours worth to you? If you’re a busy professional, the time-cost of rafters might make them the most expensive option you have.
Trading Webbing For Walking Room: How Rafters Open Up An Overhead Storage Loft
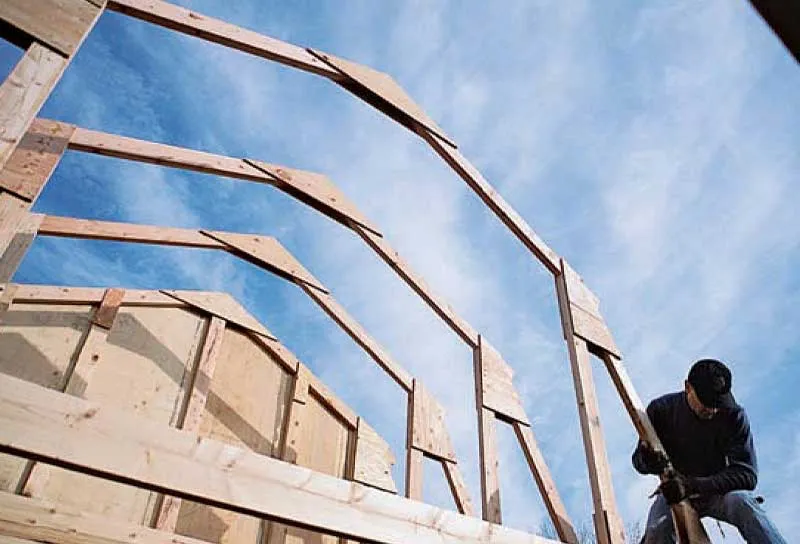
Trusses kill your storage space. Because a truss relies on internal webs (those diagonal 2x4s inside the triangle), the middle of your shed becomes a forest of lumber. You can’t walk through it, and you certainly can’t store a lawnmower or seasonal tires up there.
Rafters, on the other hand, leave the attic wide open. Using a beefy ridge beam or properly placed collar ties in the upper third of the roof creates a massive storage loft that effectively doubles the shed’s square footage.
A Truss Jungle
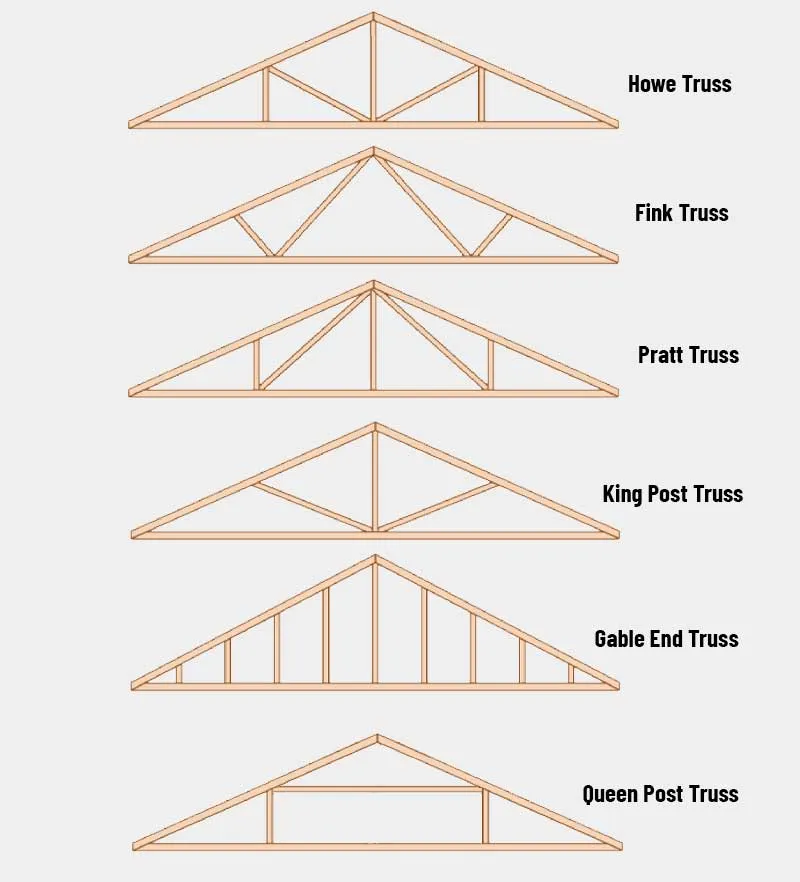
People think they can just cut a few webs out of a truss to make room for a box. Do not do this. A truss is a system. If you cut one web, the whole thing is compromised and will eventually sag or collapse. Avoid standard King-Post trusses when building a loft.
For those who plan on tossing 500 lbs of old car parts up there, your ceiling joists (the floor of your loft) need to be sized for it, usually 2×6 or 2×8 instead of the standard 2×4. Trusses can only be used for simple storage boxes where you just need to keep the rain off them. Rafters are the gold standard for workshops or tiny houses where every cubic inch of vertical air is precious.
Head-Striking Hardware
When going the rafter route for a loft, watch out for hurricane ties and nails poking through the roof decking. I’ve seen many DIYers build a beautiful loft only to scalp themselves on a roofing nail the first time they crawled up there. Always sheathe or trim out the interior if it’s a living or active storage space.
Hidden Costs And The Real-World Math of Pre-Fab Trusses vs. Hand-Cut Rafters
Crunch the numbers on a calculator, and DIY trusses usually win the lumber-per-span metric. Because a truss uses geometry to create strength, you can often build a very sturdy roof using nothing but off-the-shelf 2x4s. The rafters for that same span might require 2×8 or even 2×10 clear grade Douglas Fir to meet code and prevent sagging over a 12-foot run. The price jump from a 2×4 to a 2×10 is significant, especially when you factor in the waste from cutting angles.
However, the hidden costs of trusses are the gussets and the fasteners. You’ll burn through two sheets of 1/2-inch plywood just cutting out triangles, and you’ll need thousands of nails or specialized structural screws. A lower fastener count and zero plywood waste are notable advantages of rafters.
Rafters are best when lumber prices for common 2x4s are spiking but larger timbers remain stable. Trusses are the budget-friendly king for the 10×12 utility shed where cheap and cheerful is the goal.
Spanning the Gap: When A Shed Gets Too Wide for Stick-Framing and Needs Industrial Muscle
When planning a massive Super-Shed or a detached garage, say, 16 to 20 feet wide, rafters start to become a liability. To span 20 feet without a center supporting wall, you’re looking at massive LVL (Laminated Veneer Lumber) rafters or high-grade 2x12s. These are heavy and expensive. They are also a nightmare to install without a crane. Trusses, however, can span these distances with ease. By using a Fink or Howe web pattern, you can bridge a 20-foot gap using standard 2x4s and 2x6s.
Lateral Thrust
On wide-span rafters, the weight of the roof wants to push the bottoms of the rafters outward, which spreads your walls. This is why ceiling joists are non-negotiable on wide rafter builds. They act as a tension tie to hold the walls together. Trusses have this tie built-in as the bottom chord, making them much safer for wide, open-span buildings.
Lateral bracing is a frequent difficulty with trusses on long spans. Long trusses love to tip over like a row of dominoes during a windstorm before the roof sheathing is on. You have to be meticulous about X-bracing the interior webs. Stick-framing is recommended for spans under 12 feet where the lumber is manageable. Once you hit the 14-foot mark, the physics start favoring the truss.
The 1/4-Inch Rule
Measure the distance between your top plates at the front, middle, and back of the shed after the roof is loaded with shingles. If the middle measurement has increased by more than 1/4 inch, your rafters are spreading the walls, and you need to add collar ties immediately.
When Local Building Codes Dictate Roof Framing Choices
Before you drive a single nail, you need to check with your local building department. In many high-wind zones (Florida, coastal Carolinas) or high-snow-load zones (the Rockies, Upstate NY), site-built trusses are actually illegal unless they are stamped by a structural engineer.
Building inspectors often hate DIY trusses because they can’t verify the quality of your glue joints or the clinch-nailing of your gussets. Rafters, however, are usually prescriptive, meaning you just need to follow the span tables in the IRC (International Residential Code), and the inspector will sign off on them without a second glance.
Engineer’s Stamp
When building trusses in a strict county, ask a local engineer to review your jig design. It might cost you $200 for a letter of structural adequacy, but it will save you $2,000 in tear-down costs if the inspector fails you.
Finding the path of least resistance with the city is a major pro of sticking to rafters in a strictly regulated zone. The drawback is that you might be forced to use hurricane ties on every single rafter-to-plate connection, which adds time. If you live in a rural area with no codes, you have the freedom to choose, but freedom doesn’t mean safety. I always recommend building to code even if no one is looking.
When picking lumber for rafters, look for Number 1 or Select Structural grade. Avoid boards with large knots near the birdsmouth. A knot at a stress point is a guaranteed fracture line under a heavy snow load.
Bracing For The Big One: How Snow and Wind Loads Influence Roof Design
I’ve come across more than one pretty shed roof turning into a sagging mess after a single heavy February in the Northeast. This is where the physics of compression and tension really separate the amateurs from the pros. Rafters allow steep pitches (8/12 or higher) where the snow can slide off before it accumulates. Trusses are the workhorse for low-slope roofs where the weight just sits there and cooks.
When you build a truss, you are creating a web that distributes the weight of snow or heavy clay tiles across several points. A truss is essentially a rigid triangle that resists pancaking much better than a standard rafter-and-joist setup, which serves as a significant plus. For folks who live in a high-elevation zone where four feet of snow on a roof is a Tuesday morning reality, a well-built truss with 1/2-inch plywood gussets is your safest bet.
Tension Pull
I once saw a DIYer use 1×4 pine scraps as collar ties on a 12-foot rafter span. During a windstorm, the uplift pressure was so high it literally snapped the pine ties and lifted the entire roof off the walls like a lid. Always use at least 2×4 material for ties, and use structural screws or clinch nails that go all the way through and fold over.
A Reliable Framing Style To Handle Steep Pitches Better
For someone going for that Modern Farmhouse or Classic Gothic look with a 12/12 pitch, a 45-degree angle, stick-framing with rafters is significantly easier to execute. Avoiding a fight with a massive, 8-foot-tall wooden triangle on the ground is a key positive of rafters for steep slopes.
A 12/12 truss is incredibly awkward to build in a horizontal jig; it’s tall, floppy, and hard to flip over without snapping the peak. When you frame rafters, you just cut your angles and lean them into place. It’s a much more natural way to reach for the sky.
The overhang or tail cut is a common hurdle of steep rafters. When the pitch is that steep, your birdsmouth cut has to be very deep to get a good seat on the wall, which can leave the tail of the rafter weak. I often see beginners over-notch a rafter to make it fit a steep pitch, only to have the overhang snap off when they stepped on it during shingling.
Trusses are better for functional pitches like 4/12 or 5/12. Rafters win every time on architectural builds where you want that sharp, aggressive peak that matches your main house.
Attic Trusses: The Secret Middle Ground For Bonus Square Footage

People often think it’s a binary choice: open rafters or webby trusses. But there is a hybrid called the attic truss (or room-in-attic truss). You get the structural speed of a truss but with a rectangular opening in the middle that allows for a walkway or storage. You basically build a box inside your triangle. This is the best of both worlds for a 12×16 or 14×20 shed where you want a bonus room upstairs for a home office or a heavy-duty storage deck.
As you’re removing the diagonal webs in the center, the bottom chord (the floor) and the top chords (the roof) have to be much thicker, usually 2×6 or 2×8, to compensate for the lost geometry. This makes these trusses very heavy. You absolutely cannot install these alone.
Rafters are still easier for a lofted look when you want a vaulted ceiling, but if you want a flat floor upstairs and a fast roof-on day, the attic truss is the choice most DIYers don’t know about. Because they think trusses are always triangles with zig-zags.
Double-Wide Workshop
I consulted on a 20×20 DIY garage where the owner wanted a 10-foot wide clear span upstairs for a woodshop. We built Gambrel-style trusses with 3/4-inch plywood gussets on both sides. It took four guys to hoist them, but it created 200 square feet of free floor space that would have been lost with standard King-Post trusses.
If the roof budget is under $500, stick to standard trusses. If you’ve got $1,000 and two strong friends, go for attic trusses. The return on investment in terms of usable square footage is massive.
Venting Rafter Bays vs. Open Truss Cavities To Relieve Moisture Traps
Many owners don’t vent the rafter bays in their climate-controlled DIY sheds. Within two seasons, the plywood sheathing turns black with mold and water starts dripping onto their expensive tools.
Moisture is the silent killer of sheds. In a rafter-framed roof, each bay (the space between two rafters) is a separate compartment. If you insulate those bays to turn your shed into an office, you must leave a 2-inch air gap between the insulation and the roof sheathing using baffles. Otherwise, condensation will rot your roof from the inside out in three years.
Fire Blocking
In some jurisdictions, when you have a large open truss cavity, you are required to install fire blocking to prevent a flame from racing through the attic. Check your local Residential Code Section R602.8. It’s a small detail that saves lives (and your insurance claim).
Trusses create a massive open attic space. Air can circulate freely across the entire lid of the building. You can just throw a couple of gable vents at each end and a ridge vent, and the stack effect will keep the wood dry. Trusses go well with cold sheds where you aren’t insulating the roof line. Rafters are better for conditioned spaces where you want the insulation right against the ceiling to maximize the vaulted feel.
Longevity Rankings: A Framing System That Resists Sagging Over 20 Years
Most 100-year-old barns are stick-framed with rafters. A 2×8 or 2×10 rafter has a lot of meat to it. It resists warping and sagging because of its sheer thickness. For longevity, the ideal choice is a rafter roof with a structural ridge and hurricane ties. It’s a heavy, dead system that doesn’t move much with the seasons.
A truss is only as strong as the nails in the plywood gussets. Over 20 years of expansion and contraction (wood breathing), those nails can slowly back out or the glue can crystallize and fail. Trusses craft 20-year sheds. Rafters are for the legacy building that you want your grandkids to use as a playhouse. If you choose trusses, use ring-shank nails; they have ridges that grip the wood fibers and refuse to pull out over time.
Fly-Away Factor: Keeping Rafters and Trusses Anchored When the Wind Howls
In high-wind zones, the biggest threat to your shed isn’t the roof falling down; it’s the roof flying away. This is called uplift. In high winds, the bottom chord of trusses provides a massive, flat surface area to tie down to the wall plates. You can use heavy-duty H2.5A hurricane ties that wrap over the top and side of the plate, creating a mechanical lock. Because the truss is a rigid unit, the wind has a harder time peeling the roof off board-by-board.
Internal Brace
On a truss roof, run a continuous 2×4 lateral brace across the middle of all the vertical webs inside the attic. Nail it to every single truss. This prevents the domino effect where one truss failing in a windstorm knocks the rest of them over.
Rafters only touch the wall at the birdsmouth notch. If the wind gets under the eaves, it acts like a crowbar, trying to pry each rafter off the wall one by one. Rafters require blocking (short scraps of wood) between every single rafter to prevent them from rolling over under lateral wind pressure. Rafters are best when they are steep (reducing the wing effect of the wind). Trusses are the top choice for coastal builds where 100 mph gusts are a yearly occurrence.
In many high-wind codes, a toe-nail (driving a nail at an angle) is considered zero structural value for uplift. You must use metal connectors. If a building inspector sees a roof without silver (galvanized steel) at every junction, you’re failing that inspection.
Mobile Framing Secret To Create A "Tow-Away" Shed
If there is a chance you might move your shed to a different part of the yard (or a different house) in the future, you’re building a modular or sled shed. When you pick up a shed with a crane or a mule (a specialized shed forklift), the building twists. A trussed roof acts like a lid that keeps the walls square. Trusses are best for any shed built on skids rather than a concrete pad.
Tow-Truck Talk
When you plan on moving your shed, tell your shed mover ahead of time how you framed the roof. If it’s a rafter roof, they may need to install spreader bars to ensure the straps don’t crush the eaves or pop the ridge board.
Rafters are flexible (in a bad way). If you lift a rafter-framed shed, the ridge can crack or the rafters can shift at the birdsmouth. Rafters rely on the weight of the roof to stay seated. When you start bouncing that building over a lawn, the rafters can literally jump out of their seats. Rafters are best for permanent structures with deep footings or concrete slabs.
Plumb-Bob Test
After moving a portable shed, hang a plumb bob from the center of the ridge to the floor. If it’s more than 1/2 inch off-center, your roof shifted during the move. You’ll need to rack the building back into square before you shingle the gaps.


Read Next
 37 Pro-Tested Tools For Building DIY Sheds That Last
 9 Pro-Tested Shed Ventilation Ideas For DIY Builds
 How To Build Shed Roof Trusses On A DIY Jig In One Weekend
 Shed Roof Guide: How To Frame & Sheathe For Weatherproofing
 Shed Roof Slope: Guide To Find the Right Weather-Proof Pitch
 How To Install Shingles On A Shed Roof: Step-By-Step Guide
Framing-to-Finish Roadmap: DIY Guides For Every Step of The Build


