
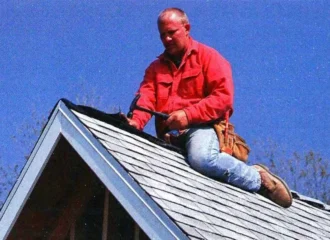
How To Build Shed Roof Trusses On A DIY Jig In One Weekend
I still remember the first set of custom trusses I built back in the late 90s for a 12×16 garden shed. I was cocky and skipped the jig. I figured I could eyeball the repetitive cuts with a circular saw. By the time I got to the seventh truss, the peak was off by nearly two inches compared to the first one. When I tried to sheath the roof, the plywood looked like a topographical map of the Appalachian Mountains.
I ended up ripping the whole thing down and wasting four hundred bucks in lumber. I spent the next two days questioning my career choices. Building a truss is about creating a rigid, engineered triangle that manages forces of nature you can’t see. If you get the geometry or joinery wrong, you aren’t building a roof, you’re building a liability.
- Always build a layout jig on your shed floor. Consistency is more important than speed; if your trusses vary by even 1/4 inch, your roof sheathing will be a nightmare to install.
- Use No. 2 or better Spruce-Pine-Fir (SPF). Avoid stud grade lumber for bottom chords as it often has knots that compromise tension strength.
- 1/2-inch CDX plywood gussets, glued and nailed with 6d ringshank nails, are superior to cheap metal mending plates for DIY applications.
- Stick to 24 inches on center (OC) for most sheds unless you live in a high-snow-load area, where 16 inches OC becomes the insurance policy you need.
Unlike a standard rafter setup that relies on a ridge board and the walls to stay upright, a true truss is a self-contained triangular unit. It handles the thrust (that outward pressure that wants to pancake your shed walls) internally. When you build them right, your shed will outlast your house. If you do it wrong, you’re just building a future pile of kindling. This guide is about to show you the right way to build a roof that will stay dead-level for thirty years.
Getting the Math Right: Truss Building Basics and Load Logic
For a standard DIY shed, you’re usually looking at a King Post truss, which is a simple triangle with a vertical center support. If you’re going wider than 12 feet, you need to start thinking about Fink trusses or adding internal webbing to prevent the chords from deflection (sagging).
The pitch is also a major player here. A shallow 3:12 pitch looks modern, but it holds snow and puts immense pressure on the heel joints. I prefer a 6:12 pitch for most backyards; it sheds water beautifully and gives you enough meat at the joints for solid fastening.
Never, under any circumstances, use pressure-treated lumber for your internal truss members unless they are specifically rated for structural framing and have been KDAT (Kiln Dried After Treatment). Standard wet PT lumber from the big-box store will warp and shrink as it dries, literally pulling your gussets apart and snapping your nails. Stick to #2 grade Douglas Fir or Spruce-Pine-Fir (SPF).
Truss Counter
When calculating how many trusses you need, don’t just divide the length by two. If you have a 12-foot long shed and you’re going 24 inches on-center, you don’t need six trusses, you need seven. You have to account for the zero mark at the start. I’ve seen guys get halfway through a truss-roll only to realize they are one truss short because they didn’t count the gable ends.
Span Illusion
Don’t calculate your span based on the total width including the roof overhangs. Your span is measured from the outside of the wall framing to the outside of the opposite wall framing. I’ve seen guys cut a whole set of trusses 2 feet too wide because they measured their planned roofline instead of their actual footprint. Always measure the actual top plates of your standing walls before you lock in your truss dimensions.
Breaking Down The Triangle Blueprint of A Bulletproof Shed Truss
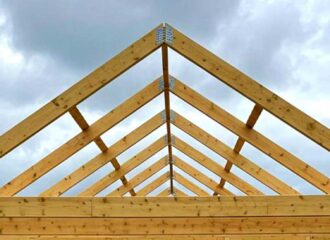
You’ve got four main players in a standard King Post truss. The top chords are the slanted members that form the roofline. The bottom chord (often called the ceiling joist in other contexts) is the horizontal piece that sits on your wall plates. Then you have the webbing, these are the internal braces like the King Post (the vertical one in the center) or struts that transfer the load from the top chords down to the bottom chord.
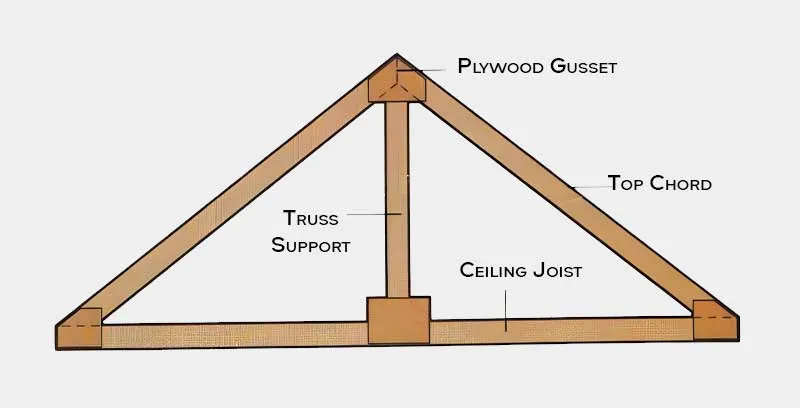
The most critical part of a truss isn’t actually the wood; it’s the gusset. In a factory, they use hydraulic presses to stomp mending plates (those silver prickly metal things) into the wood. You can’t do that effectively with a hammer in your backyard. For us, the gold standard is plywood gussets. They provide a massive surface area for glue and fasteners, which creates a joint that is actually stronger than the wood itself.
Overhang Cheat
Many blueprints tell you to cut your top chords to the exact length of the roof slope. I don’t do that. I cut my top chords long, about 6 inches past the wall line. This allows me to tail the trusses after they are all installed. By snapping a chalk line across the ends of the installed trusses and cutting them in place, I get a perfectly straight sub-fascia line, even if my jig was off by a hair. It hides a multitude of sins.
The most popular style for DIYers is the Common Gable Truss. It’s predictable and easy to build on a flat floor. Some folks go for the Gambrel (the barn look), which gives more headroom but is a total pain because it involves more joints per truss than gable. Stick to a standard gable for your first few builds until you understand how the joints actually seat under pressure.
Gear and Goods Needed For A Pro-Level Build
Don’t even think about using stud-grade lumber for trusses. Studs are meant for vertical loads in walls. For trusses, you need Kiln-Dried (KD) No. 2 Spruce-Pine-Fir (SPF). This grade has fewer knots, and the knots it does have are smaller and less likely to fall out, which would compromise the structural integrity.
For the gussets, I see people using 3/8″ OSB because it’s cheap. Don’t do it. OSB doesn’t handle moisture well at the edges, and trusses live in an environment where condensation is common. Use 1/2-inch CDX plywood. The X stands for exposure, meaning the glue is waterproof.
As for fasteners, skip the standard sinkers. Use 3-inch ring-shank nails for the framing and 6d or 8d galvanized nails for the gussets. The rings on the shank act like little barbs, making it nearly impossible for the wood to back out as it swells and shrinks with the seasons.
For an 8-foot to 10-foot span, 2x4s are the standard for both top and bottom chords. Once you hit a 12-foot span, I strongly recommend stepping up to a 2×6 for the bottom chord, especially if you plan on using the space above for storage. That extra 2 inches of meat provides significantly more resistance to deflection (sagging).
The Grocery List
A High-Torque Circular Saw: You need clean, vertical cuts. A worm drive is my go-to for the extra torque.
A Big Foot or Speed Square: This is your best friend for marking the plumb cuts and seat cuts.
Subfloor Adhesive: This is the secret sauce. Gluing your gussets before nailing makes the joint a monolithic structure.
Pneumatic Framing Nailer: You can do this with a hammer, but after 14 trusses and 400 nails, your arm will be toast, and your accuracy will drop.
Crown Rule
Every piece of lumber has a natural hump or curve along its narrow edge. This is called the crown. When building trusses, the crown of the top chords must always face UP (toward the sky). The weight of the roof will eventually push that hump down, flattening the board. If you put the crown facing down, gravity will just make the sag worse over time. I mark every board with an arrow pointing to the crown before I even bring them to the saw.
If you buy your lumber and it feels heavy and cold to the touch, it’s full of water. If you build your trusses immediately, they will warp. I like to buy my lumber two weeks early, sticker it (stack it with small wood spacers between layers) in the garage, and let it acclimate. A stable board makes a stable truss. If your lumber is at 19% moisture or higher, you’re asking for crown issues later on.
Pre-Flight Check: Key Measurements To Verify Before Making Sawdust
Before you cut a single board, you need the actual width of your shed, not the nominal width. If you’re building a 10-foot shed, your top plates might actually measure 120-1/8 inches once you account for the bow in the wall studs. Measure across the front, middle, and back. If the middle is wider, pull it in with a ratcheting strap before you measure for your trusses.
Beginners often forget that the bottom chord needs to sit fully on the top plates of the walls. If your span is 120 inches (10 feet), your bottom chord lumber needs to be exactly 120 inches. I’ve seen people cut the bottom chord to the inside dimension of the walls, leaving the truss with nothing to sit on. Always double-check that your Out-to-Out measurement matches your bottom chord length.
Calculating the angles is where most DIYers freeze up. You don’t need a trigonometry degree; you just need to understand the Rise and Run. For a 6/12 pitch, the roof rises 6 inches for every 12 inches of horizontal distance. Since your truss spans the whole shed, the run for each side is half the width. On a 10-foot shed, the run is 5 feet. So, 5 feet times 6 inches of rise equals a 30-inch total rise from the top plate to the peak.
To mark your cuts without a calculator, use your Speed Square. Every speed square has a Pivot point and a Common scale. For a 6/12 pitch, you align the pivot on the edge of the board and swing the square until the number 6 on the Common scale hits the same edge. That’s your angle. It’s foolproof, provided you don’t accidentally look at the Hip-Val scale by mistake, a mistake I made on a garage build in ’05 that resulted in a very expensive pile of firewood.
The Master Template
Once you’ve cut the pieces for your first truss and verified they fit perfectly on your shed walls, mark them as the Master. Do not use the second truss to mark the third, or the third to mark the fourth. This leads to measurement creep, where each truss gets slightly larger or smaller than the last. Always go back to the Master pieces for every single truss in the run.
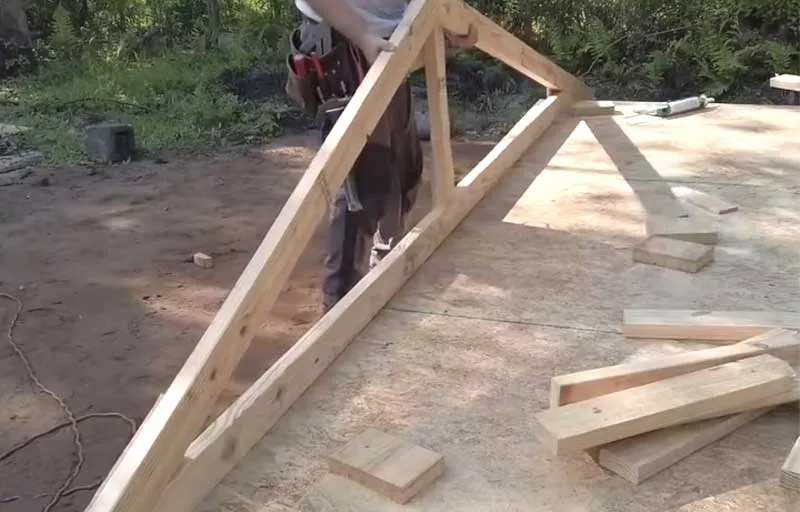
Building a Precision Layout Jig on Your Subfloor
If you try to build each truss individually by measuring and marking, I guarantee your roof will look like a roller coaster. You need a jig. The best place to build it is right on the shed’s wood subfloor before you build the walls. If the walls are already up, you’ll need a dead-flat patch of concrete driveway. The goal is to create a mold where you can drop your lumber in, and it forces every piece into the exact same position every single time.
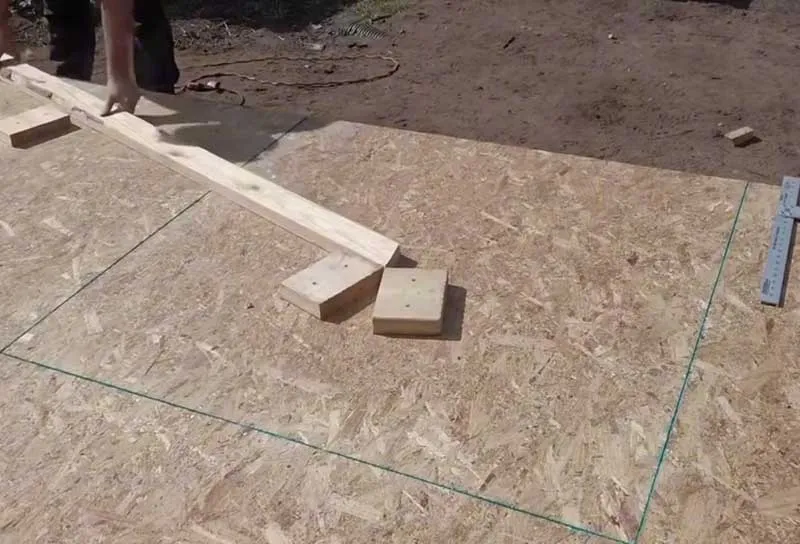
To build a Layout Jig, I lay out my Master truss perfectly on the subfloor. I then check the span (the distance between the outer edges of the bottom chord) and the height of the peak. Once that first one is perfect, I screw 2×4 blocks (about 6 inches long) to the floor around the perimeter of the truss. I place blocks at the peak, at the two bottom corners (the eaves), and along the top chords. These blocks act as fences.
When you drop your next set of cut boards into those blocks, they should fit snugly. If you have to hammer them in, your cut is too long. If there’s a massive gap, your cut is too short.
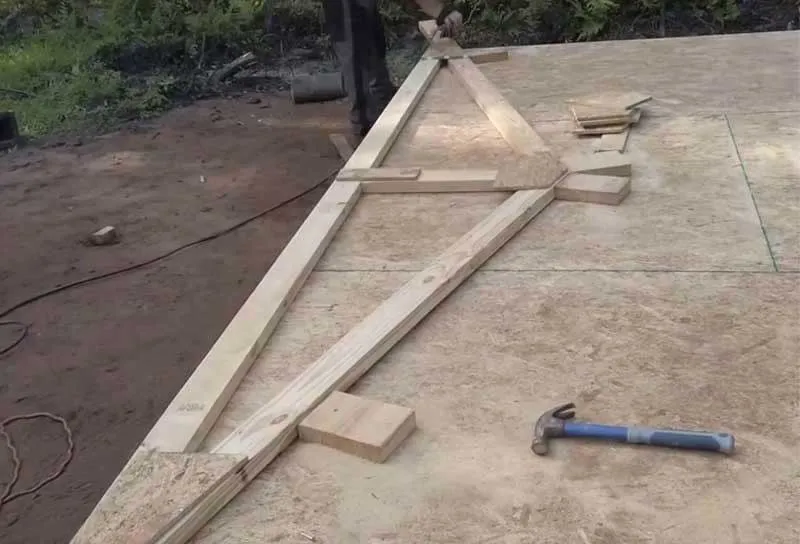
Jig Geometry Essentials
Base Line: Snap a chalk line for the bottom chord. This is your north star. If a truss isn’t sitting on that line, the whole thing is junk.
Center Line: Snap a vertical line from the center of the base line up to the peak. This ensures your truss isn’t leaning to one side.
Eave Blocks: These are the most important. They dictate exactly where the truss will sit on your walls. If these shift by 1/8 of an inch, your roof won’t be square.
Screw-and-Glue Anchor
Don’t just nail your jig blocks down. Use 3-inch deck screws. Nails can vibrate loose as you’re hammering the gussets on your trusses, and before you know it, your jig has grown by half an inch. I also like to put a dab of construction adhesive under the blocks for absolute rigidity. When you’re done with the trusses, you can just pop them off with a pry bar and scrape the floor.
Put two blocks at the heels to pinch the wood in place so it can’t slide left or right. Use a spacer block in the middle of the bottom chord to ensure it stays perfectly straight and doesn’t bow while you’re nailing the webbing. This ensures that when you lift the truss onto the walls, it drops right into place without you having to fight the wood.
Ghost of Illinois 10x12
Years ago, I skipped the jig because I was in a hurry to beat a rainstorm. I thought I could just template off the first truss by laying the second one on top of it. By the time I got to the 8th truss, the stacking error had added up. The last truss was nearly an inch wider than the first.
When I went to sheathe the roof, the OSB wouldn’t land on the center of the rafters. I had to sister extra wood onto every rafter just to have something to nail to. It looked like a mess and took twice as long. Build the jig. It’s the only way.
Starting The Assembly Line: Fabricate Your Trusses on the Jig Step-by-Step
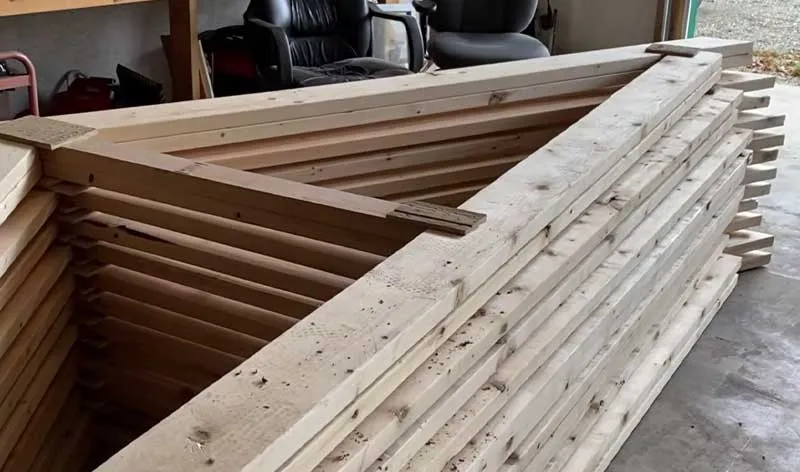
Now that the jig is set, it’s assembly line time. First, cut all your members for the entire run. If you need 10 trusses, cut 20 top chords and 10 bottom chords all at once using your Master templates. This ensures consistency. I usually stack the cut pieces in kits near the jig.
Drop the top chords and the bottom chord into the jig. They should meet at the peak and the eaves with minimal gaps. Now, apply your subfloor adhesive to the joints. Don’t be stingy; you want squeeze-out when you apply the gusset. Lay your plywood gusset over the joint. For a standard 2×4 truss, my gussets are usually 12 inches wide at the peak and 10 inches at the eaves. I nail them in a stitching pattern, roughly every 3 inches, staying about an inch away from the edge of the plywood to prevent splitting.
Cheap Glue Disaster
I once tried to save twenty bucks by using a generic all-purpose white glue on a set of 16-foot trusses. Big mistake. That glue wasn’t rated for the temperature swings of an uninsulated attic. Two years later, the client called because they heard popping sounds in the roof. The glue had become brittle and failed, leaving only the nails to hold the load. Now, I only use PU (Polyurethane) adhesive or high-grade subfloor glue like PL Premium. It stays flexible and is stronger than the wood itself.
Once one side is done, you have to flip the truss. A truss with a gusset on only one side is floppy and dangerous. Be careful flipping it so you don’t rack the joints. Drop it back into the jig (it should still fit!) and repeat the process on the second side. Now that truss is a rigid structural unit.
Factory Workflow
- Place the lumber into the jig blocks.
- Apply adhesive and the first set of gussets.
- Carefully turn the unit over.
- Apply adhesive and the second set of gussets.
- Move the finished truss to a flat area. Never lean them against a wall at a steep angle, or they might bow under their own weight before the glue cures.
More Nails Isn't Always Better
Beginners often think that if 10 nails are good, 50 nails are better. Wrong. If you put too many nails into a small gusset, you’re basically perforating the lumber. You turn the wood into a series of holes, which makes it easier to snap along the grain. Follow a staggered pattern that avoids putting two nails in the same grain line.
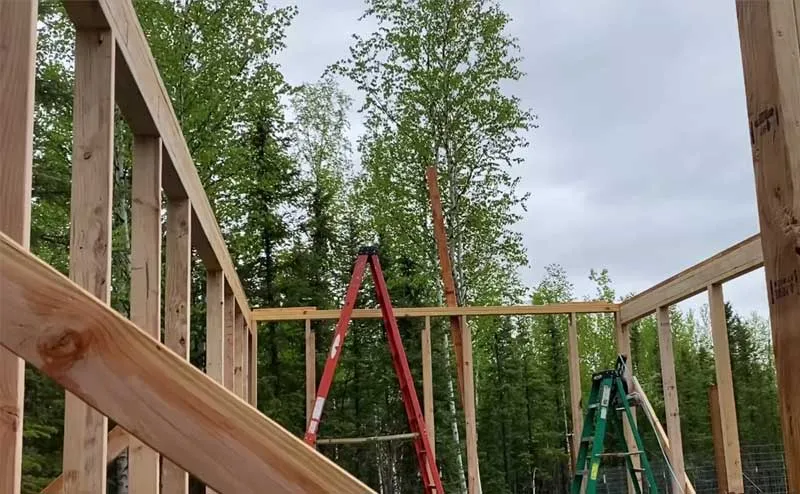
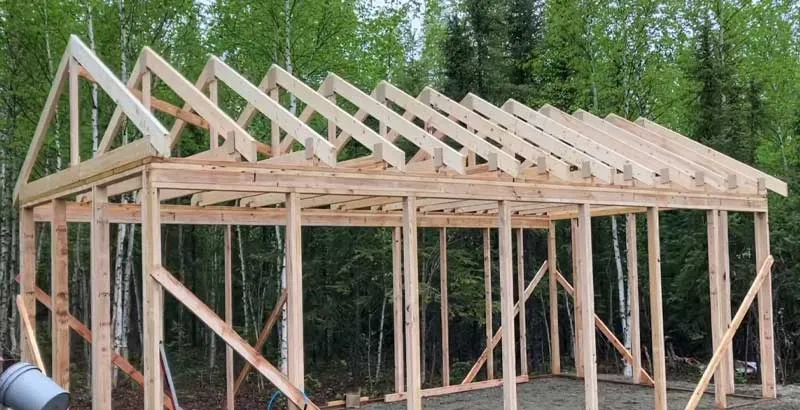
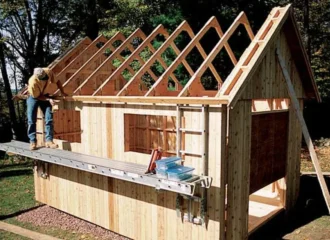
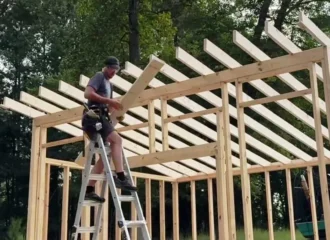
From Pile to Peak: The Rolling Process For Installing & Bracing Trusses
Once you’ve got a stack of identical trusses sitting on your shed floor, the real muscle work begins. Installing trusses is a game of leverage and bracing. If you just try to hoist them up and nail them down one by one, you’ll likely end up with a domino effect, where one truss tips and knocks the rest off the wall like a deck of cards. I’ve seen a 12-foot shed frame collapse in seconds because the builder didn’t use lateral bracing. It’s a terrifying sound, and it usually ends with broken lumber and a bruised ego.
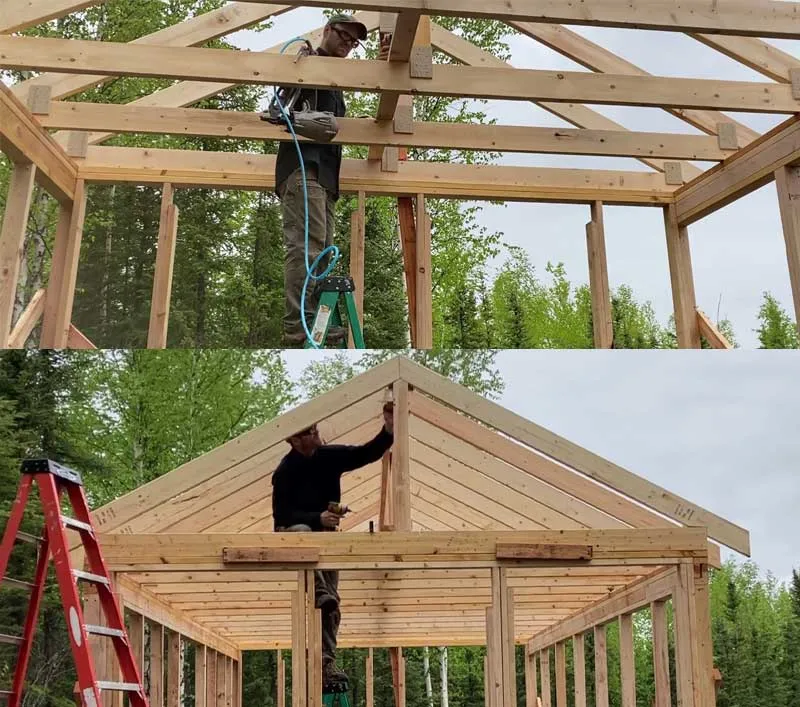
The professional way to do this solo or with one helper is called Rolling the Trusses. You start by marking your top plates. If you’re going 24 inches on center (OC), pull your tape from one end of the wall and mark at 23-1/4 inches, then every 24 inches after that. This ensures that the edge of your truss hits the mark, leaving the center of the truss exactly at the 24-inch point so your 4×8 roof sheathing lands perfectly in the middle of a chord.
Lay all your trusses upside down across the wall plates, with the peaks pointing down into the shed. Space them out roughly where they belong. Start at one gable end. Flip the first truss up (the roll) and plumb it with a level. Now nail it into your marks. Immediately run a long 2×4 brace from the peak of that truss down to a stake in the ground or a block on the shed floor. This is your anchor. Every subsequent truss you roll up gets nailed to a horizontal runner board that connects back to that first anchored truss.
The 3-Point Connection
Never trust a single toe-nail to hold a truss while you’re reaching for a level. Every truss needs a 3-point connection before you let go. Two nails go into the top plates (one on each side) and one temporary sub-brace connecting it to the previous truss. In high-wind areas like the Midwest or coastal regions, you should also use Hurricane Ties (like Simpson Strong-Tie H2.5A). These metal connectors wrap over the truss and nail into the wall plate, ensuring the roof doesn’t fly off during a storm.
As you roll the trusses, you’ll notice they want to weave or lean. This is where Lateral Bracing comes in. Don’t wait until the end to brace them. Every three trusses, nail a 1×4 or a scrap 2×4 across the inside of the top chords. This creates a rigid web that prevents the whole system from racking. Once all trusses are up, you’ll install your permanent purlins or sheathing, but those temporary braces are what keep you alive while you’re walking on the plates.
I see guys fire six or seven 3-inch nails into the heel of a truss where it hits the wall plate. Don’t do that. You’ll split the wood of the top plate or the truss chord, significantly weakening the connection. Two 16d nails or three 10d nails toe-nailed at an angle are plenty for the initial set. Use the metal hurricane ties for the actual structural uplift protection. Splitting the wood is a red flag that an inspector (or a savvy buyer) will spot instantly.
Identifying Weak Links That Cause Common Truss Failures
If you look at an old shed with a swayback roof, where the ridge line dips in the middle like an old horse, you’re looking at a truss failure. Usually, it’s not the wood that snapped; it’s the joints that gave way.
The most common culprit is Inadequate Gussets. Using scraps of 1/4-inch luan or, worse, just scabbing a 2×4 over the joint with a few screws won’t hold the tension. When the snow hits, those small fasteners plow through the wood fibers and the joint opens up. This makes the roof sag.
Another major failure point is wrong fasteners. I cannot stress this enough: do not use gold construction screws for your gussets. They have great pull-out strength, but they have terrible shear strength. If the roof shifts, the head of the screw will simply snap off. Nails, specifically ring-shank nails, are made of a softer steel that can bend slightly without breaking. That bendability is what allows a building to survive wind gusts and temperature fluctuations.
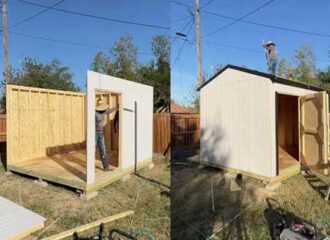
Poor lateral bracing is the silent killer. A truss is incredibly strong vertically, but it’s floppy horizontally. If you don’t brace the trusses to each other, a strong wind hitting the gable end of your shed can push the whole roof over. This is especially true if you haven’t installed the siding yet. The siding and the roof sheathing act as the skin that locks the skeleton in place. Until that skin is on, your trusses are vulnerable.
Lumber grade also plays a role. If you use a Stud Grade 2×4 for a 12-foot bottom chord, and there’s a large knot right in the center of the span, that knot is a hinge. Under tension, the wood will split starting at that knot. Always pick through the pile at the lumber yard. You want straight grain and minimal knots for your truss members. If you see a knot that goes more than halfway across the face of the board, toss it back.
Proper Heel Alignment
Perfection in truss building is when the plumb cut of the top chord aligns exactly with the outside edge of the wall plate. If the truss overshoots or undershoots the wall, you create an eccentric load, meaning the weight isn’t pushing straight down through the wall studs. This puts a twisting force on your top plates. A perfect build has the truss centered over a stud (if you’re 16″ OC) or at least bearing fully on a doubled top plate.
Final Ready-Check Quiz
Use this quiz before you lift your first truss onto the wall. If you answer No to more than two of these, go back and fix your fabrication process!
- Is your layout jig screwed down to a flat, level surface?
- Are you using No. 2 or better SPF (Kiln-Dried) lumber?
- Is there a visible squeeze-out of construction adhesive at every gusset?
- Are you using ring-shank nails (not drywall screws) for the gussets?
- Are all top chords installed with the crown (curve) pointing up?
- Does the top chord meet the bottom chord with a gap of less than 1/8″?
- Are the diagonal measurements from peak to heel within 1/8″ of each other?
- Is the gusset 1/2″ CDX Plywood (not OSB or particle board)?
- Does the bottom chord length match your out-to-out wall width exactly?
Scoring Your Build:
9 Yes: Master Builder status. Your roof will likely outlast the shed.
6-7 Yes: Solid DIY work. Double-check your bracing before you sheathe.
Below 6: Warning. Your roof is at risk of sagging or racking. Re-evaluate your joints now while the trusses are still on the ground.
Pro Tips For Efficiency and Durability
After building hundreds of these things, you pick up a few tricks that aren’t in the manuals. One of my favorites for Weatherproofing is Gusset Priming. If you’re building in a humid climate (like the Midwest or the South), the edges of your plywood gussets are the first things to rot. Before I install the trusses, I hit the edges of the gussets with a quick coat of exterior primer. It takes ten minutes and adds ten years to the life of the joints.
If you’re working solo, build a T-Prop. This is just two 2x4s nailed together in a T shape, exactly the height from your shed floor to the bottom of the peak. When you roll a truss up, you can jam the T-Prop under the peak. It holds the truss upright and at the correct height while you move to the ends to level and nail them. It’s like having a silent, very strong apprentice who doesn’t complain about the heat.
For improving Durability, consider Double Gusseting. Most plans show a gusset on only one side of the truss. On my builds, I always put gussets on both sides. It prevents the truss from cupping or twisting over time. It’s a bit more plywood and a few more nails, but it makes the truss significantly more rigid. If you’re building a shop where you’ll be running a noisy air compressor or heavy machinery, double gussets also help dampen vibrations that can loosen fasteners over time.
Consistency Over Speed
Your roof is only as straight as your worst truss. If you have ten perfect trusses and two close enough ones, those two will be the only ones you see every time you look at your shed. Spend the extra hour on your jig. Pick the best lumber. Glue every joint. You are building more than a roof; you’re building the thing that protects everything else you own.
Flexible Bottom Chord
You might think a rock-solid, stiff-as-a-stone truss is best. But in reality, wood needs to move. If you nail your trusses into the wall plates too rigidly, such as when using massive lag bolts, you can actually cause the walls to crack when the wood expands in the summer. Using the correct nails and hurricane ties allows the structure to breathe just enough to prevent stress fractures in your siding or drywall.


Read Next
 Shed Rafters vs. Trusses Comparison: Pro-Tested DIY Guide
 Cost To Build a Shed: 2026 Price Guide & DIY Budget Checklist
 Shed Roof Guide: How To Frame & Sheathe For Weatherproofing
 Shed Roof Slope: Guide To Find the Right Weather-Proof Pitch
 How To Install Shingles On A Shed Roof: Step-By-Step Guide
 How to Build a Concrete Slab Shed Foundation Correctly
Framing-to-Finish Roadmap: DIY Guides For Every Step of The Build


