
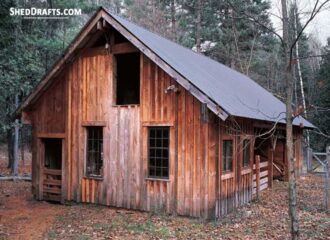
14x20 Post Beam Barn Shed Plans
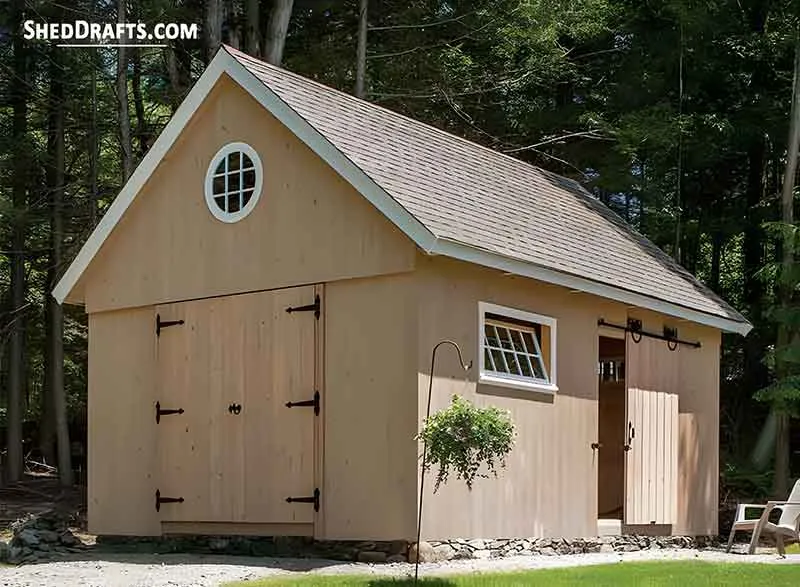
Use our 14×20 timber post beam barn blueprints and install a beautiful garden shed within a short time.
These blueprints treat the shed like a structural residence.
The load-bearing joints are designed for mechanical shear strength.
I’ve seen contractors use these exact prints because they provide the technical receipts that building inspectors actually want to see.
We used a 16-inch on-center joist layout with a specific venting strategy for the subfloor. It’s the key to ensuring the wood stays dry even if you are building in a swampy backyard.
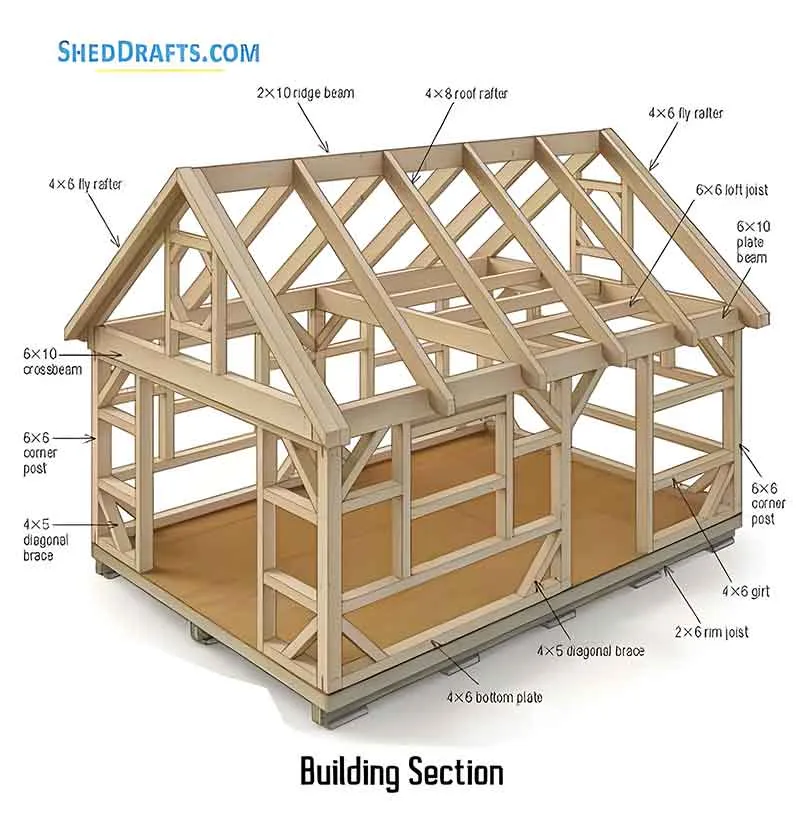
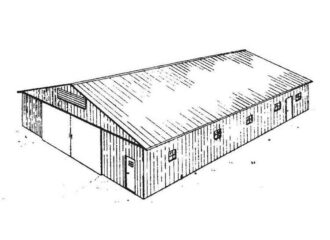
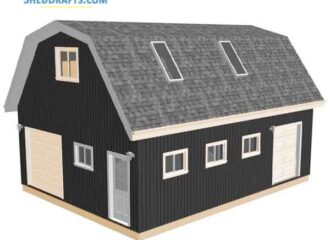
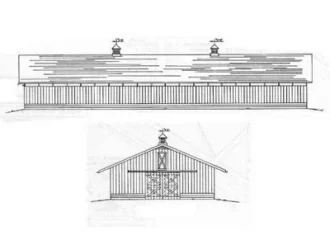
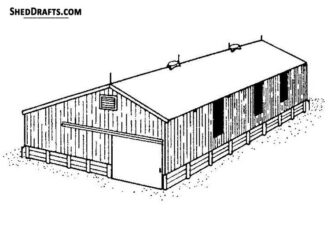
Timber Post & Beam Shed Blueprints With 3D Building Layout
I used the the Roof-Shingle Detail to create a profile that mimics the main house, making the shed look like a deliberate, high-end extension of the property.
When the trim is dialed in and the proportions of that gable roof hit the 14-foot width correctly, the shed actually increases property value rather than being an eyesore the neighbors complain about.
Foundation Schematics And Floor Framework
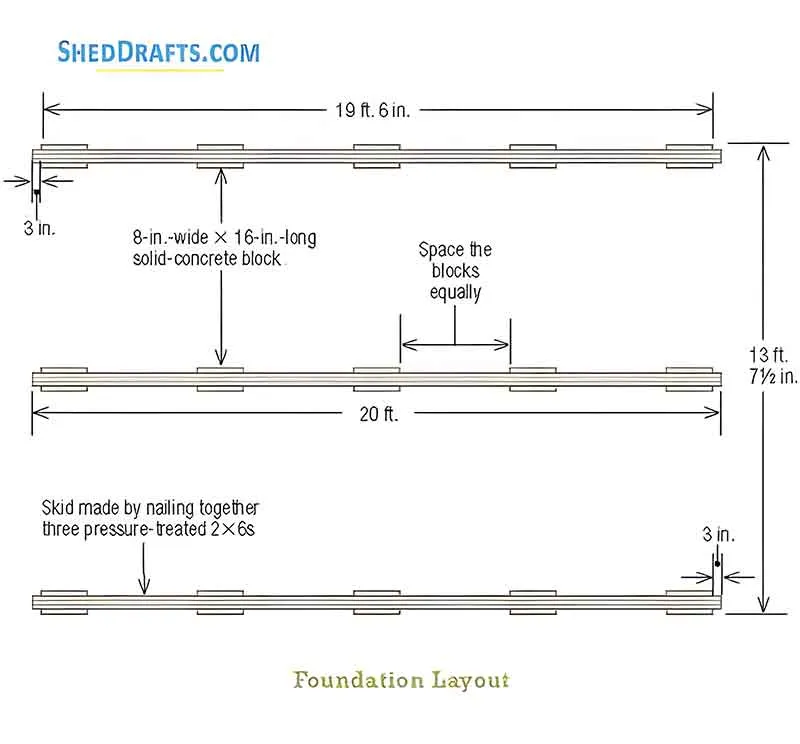
Foundation
Put the solid-concrete blocks into place, then check them for level.
Use a long, straight 2×6 to align each row of five concrete blocks.
Make each 20 feet long skid by screwing together three pressure-treated 2x6s.
Drive the 3 inch screws in from both sides of the skid.
Put the 20 feet long skids into place atop the rows of foundation blocks.
Check each skid for level, adjusting the shims, if necessary.
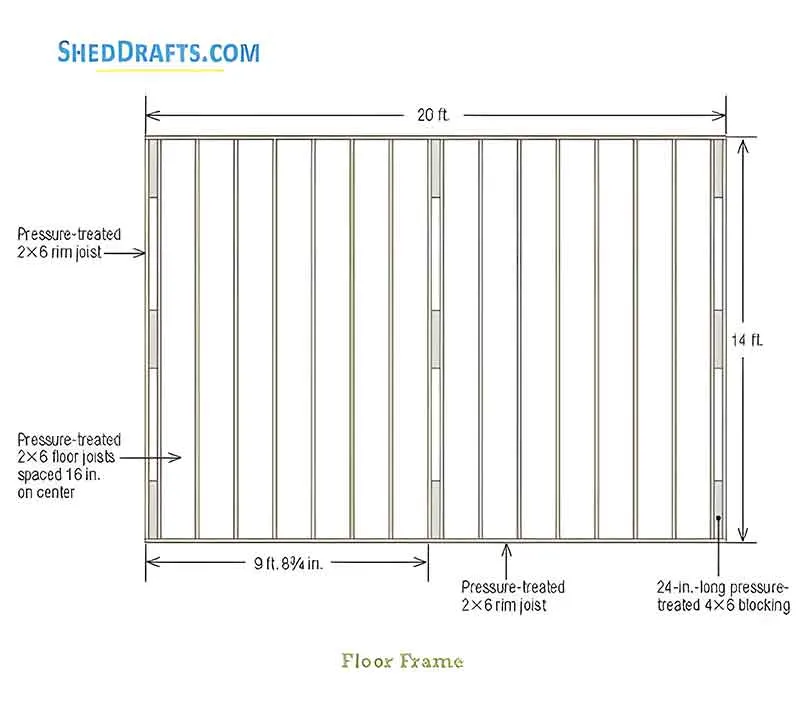
Floor Frame
Set two 2×6 joists at the far end of the skids, then place another pair in the middle.
Cut two more joists for the near end of the skids.
Fasten the 2×6 joist to each of the three skids with a 3 inch long decking screw down at an angle and into the top of the skid below.
Hold a 24 inch long support block of pressure-treated 4×6 against the inside of the joist.
Drive 3 inch screws through the joist and into the block.
Place another 2×6 floor joist against the opposite side of the 4×6 block and secure it with 3 inch long galvanized decking screws.
Slide the remaining 2×6 floor joists into place across the skids and between the double-pair joists.
Space the joists 16 inches on center.
Adjust the floor joists to extend 2.5 inches past the skids.
Fasten each 2×6 joist by driving 3 inch screws down at an angle into the skid.
Nail the 2×6 perimeter rim joist to the ends of the floor joists.
Be sure to keep the rim joist flush with the top edges of the floor joists.
Cover the floor frame with 3⁄4 inch tongue-and-groove plywood.
Fasten the plywood down to the joists with 2.5 inch decking screws.
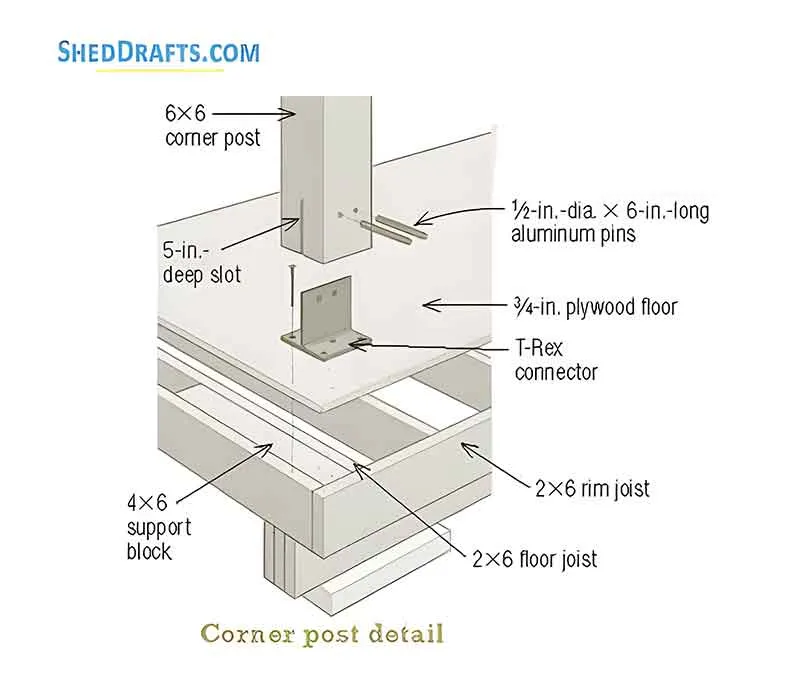
Use a chainsaw attachment on a circular saw to cut 5 inch deep slots into the 6×6 posts.
The plywood jig ensures straight, accurate cuts.
Use a router to chamfer the edges of each slot.
Trimming the edges to 45° will allow the metal connectors to fit tightly into the slots.
Slide the wide flange of the T-Rex connector into the slot.
Temporarily screw the metal connector to the end of the post.
To identify the precise position of the metal connector on the 6×6 post, draw a line across the edge of the connector and onto the post.
Mount a hole-drilling jig to the post with two screws and then drill two 1⁄2 inch dia. holes completely through the 6×6 post and metal connector.
Hold the drill as perfectly vertical as possible.
Fasten the connectors to the floor deck with four 4 inch screws.
Notice that the metal flange is parallel with the long side of the barn floor.
After checking the witness marks to ensure the post is aligned properly, lift the post and set it down over the flange of the connector.
Hammer 1⁄2 inch dia. aluminum pins through the holes to lock the 6×6 post to the connector.
Tap the pins flush with the surface of the post.
Temporarily hold the posts plumb with diagonal 2×4 braces.
Fasten the braces to the floor frame and posts with 3 inch screws.
Installing The Beams
Fasten three metal connectors—one for each post—to the edge of the long 6×10 plate beam.
Secure each connector with six 4 inch screws.
Lift the plate beam above the three posts.
Lower the beam, guiding the metal connectors into the slots cut in the tops of the posts.
Lock the 6×10 plate beam to the 6×6 posts by driving two 1⁄2 inch dia. aluminum pins through the holes at the top of each 6×6 post.
Screw a 24 inch long temporary 2×6 cleat to the posts and then set a metal T-Rex connector on top of the cleat.
Fasten the connector to the 6×10 plate beam with six 4 inch long structural screws.
Put the 6×10 crossbeam between the plate beams.
Fit the metal connectors into the slots, then rest the crossbeam on the 2×6 cleats.
Secure each end of the 6×10 crossbeam with three aluminum pins, driving the 6 inch long pins flush with the surface of the crossbeam.
Screw metal connectors to the crossbeams for each of the three 6×6 joists that will support the floor of the overhead loft.
Fasten a temporary 2×4 cleat to the crossbeam, directly below each metal connector.
Lower the 6×6 joist between the crossbeams.
Slip the connectors into the slots in the joist ends.
Rest the joist onto the cleats and then pin each end.
Brace The Frame
Install 4×6 bottom plates between the vertical 6×6 posts.
Drive 8 inch screws through the plates and plywood deck and into the joists.
Fasten diagonal braces at each post to add strength and rigidity to the timber frame.
Secure each 4×5 brace with four 8 inch screws.
Add 45° diagonal braces to the upper wall sections, too.
Align each brace flush with the outside edge of the post and plate beam.
Frame The Windows
Use 8 inch screws to fasten a 4×6 nailer to the underside of each 6×10 crossbeam.
Hold the nailer flush with the outer surface of the beam.
Frame the sides of the window openings with 4×6 trimmer studs.
Check each 4×6 for plumb with a level before screwing it in place.
Cut a 4×6 rough sill to fit between the vertical trimmer studs.
Then push the sill down onto two 20 inch tall spacer blocks.
Drive a 6 inch screw through the outside of the sill and into the trimmer.
Move the spacer block and drive two screws up from below.
Saw a 4×6 header to fit between the vertical trimmer studs.
Push the header down onto two 25 inch long spacer blocks, then secure with 6 inch screws.
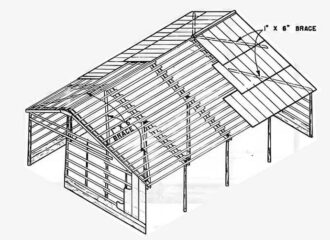
Rafter Template And Roof Drafts
Roof Framing
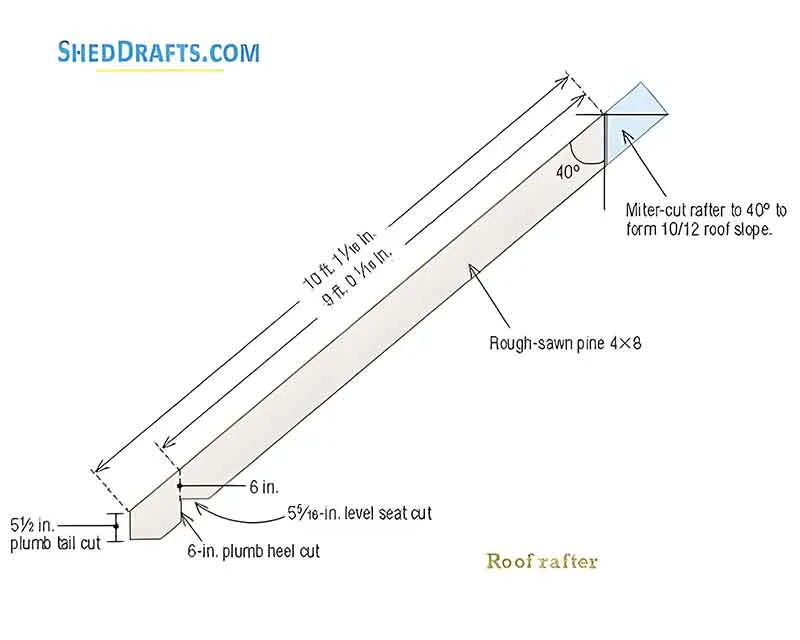
Use a large portable beam saw or 12 inch sliding compound miter saw to miter-cut the ends of the 4×8 rough-sawn roof rafters.
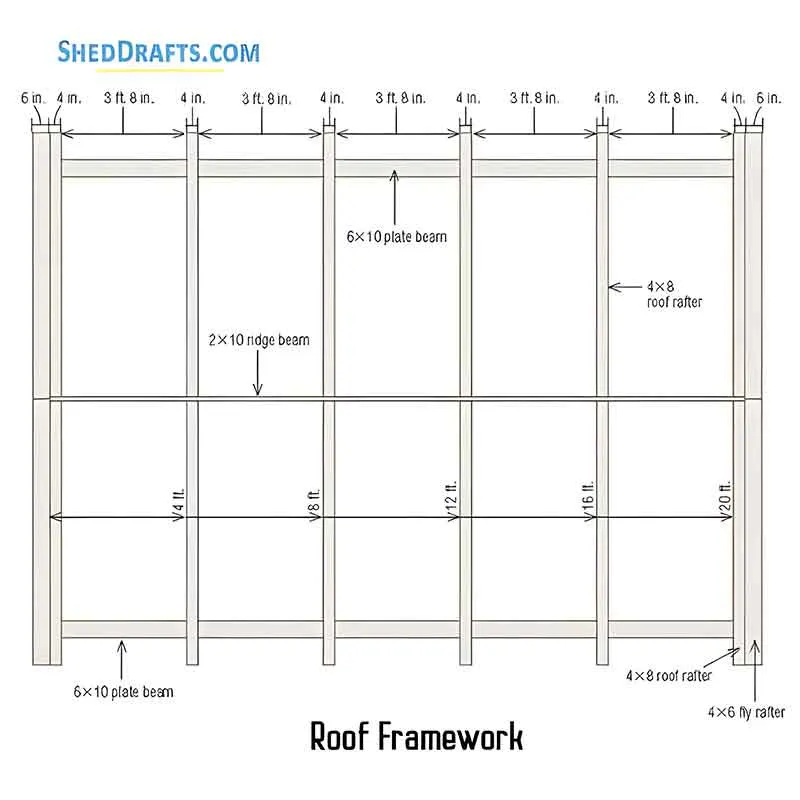
Hold a roof rafter in place and secure its lower end to the top of the 6×10 plate beam with two 10 inch long structural screws.
After installing two pairs of rafters, slide the 2×10 ridge beam between the rafters.
Be sure the ridge is flush with the tops of the rafters and secure each rafter to the ridge with two 6 inch screws.
Create a gable overhang by attaching 4×6 fly rafters to the gable-end rafters.
Fasten the fly rafters with 10 inch screws spaced 12 inches apart.
Cut 4x4s to frame the rough opening for the round windows.
Check the rough sill with a 24 inch level to make sure it’s perfectly level.
Screw one 4×4 brace into each corner of the rough opening.
These diagonal pieces will provide support for fastening the round window.
Install skipped sheathing halfway up the roof, then stop and cover the 1x8s with 1⁄2 inch plywood.
Be sure to nail into the rafters.
Use roof brackets and a scaffold plank to reach the upper half of the roof.
Continue to nail down 1x8s all the way to the roof peak.
Cut the 1×6 rake board longer than needed, then nail it to the fly rafter.
Use a circular saw to trim the rake flush with the fascia board.
Nail 1×2 trim to the 1×6 rake.
This narrow piece of trim isn’t required, but it does create an extra shadow line along the gable ends.
Install Roofing
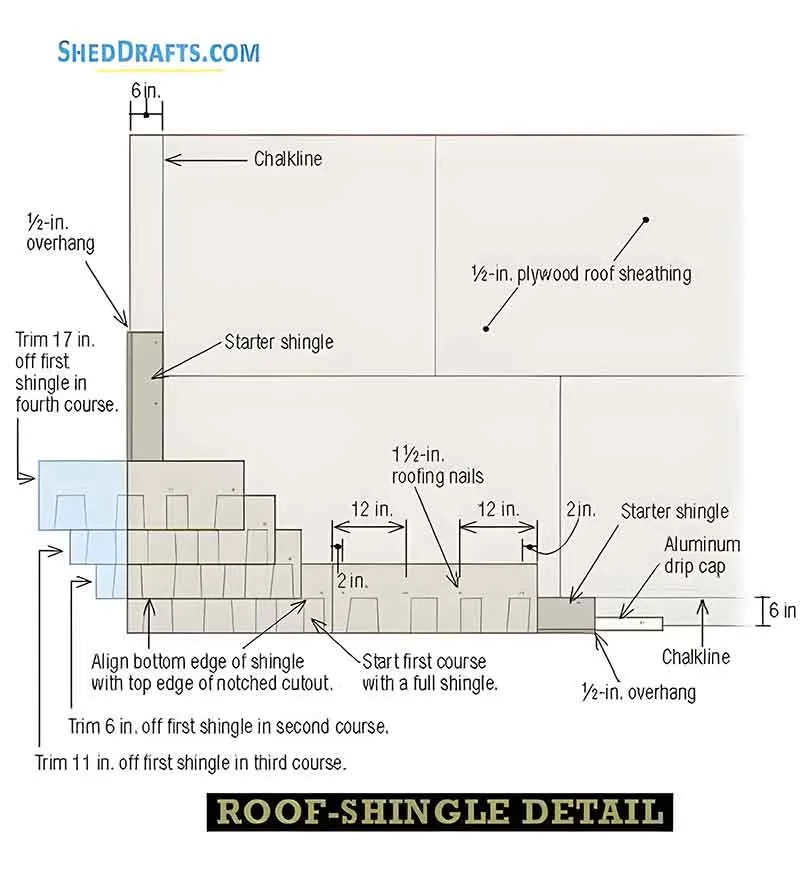
Put the aluminum drip-cap flashing onto the roof edge, positioned so that its wide flange lays flat on the plywood deck.
Secure to the roof with 1.5 inch long nails.
Nail a row of starter shingles along the edge of the roof.
Align the top edge of the shingles with the chalkline snapped across the roof.
Install starter shingles up each end of the roof, making sure they follow the chalkline.
Secure each shingle with 1.5 inch roofing nails.
Using the stair-step method to install roof shingles allows you to complete one section of roofing before moving down to the next.
To work safely on the upper half of the roof, install metal roofing brackets and a long staging plank.
Nail each bracket into a rafter.
Cover the peak of the roof with overlapping ridge shingles.
Be sure to place the nails where they’ll be covered by the subsequent shingles.
Vertical-board Siding
Start installing siding in the middle of the gable end.
Spline together the two center boards, so the tongue edges are facing out.
Snap a chalkline across the jagged ends of the siding.
Then screw a long, straight 2×4 fence to the siding, flush on the chalkline.
Adjust the sawblade to cut 1 1⁄8 inches deep, then guide a circular saw along the 2×4 fence to trim the siding to length.
Unscrew the 2×4.
Drawings For Doors & Windows

Install The Round Windows
After marking the round window opening onto the gable end, use a jigsaw to cut the 30 inch dia. circle through the 1×8 pine siding.
Tilt the round window into the opening, then level it.
Secure the window by driving four 2.5 inch screws through its perimeter flange.
Nail Siding To The Walls
Install 1×8 pine siding across the gable-end wall.
Slip each piece under the siding above and secure with 2.5 inch long galvanized nails.
If a siding piece is bowed and you can’t tighten the joint, pry it closed using a wood chisel hammered into the timber frame.
Use a tablesaw to notch pieces of siding to fit around the rafter tails.
It’s often necessary to re-cut the pine siding to obtain a snug fit.
Stop every now and then and use a long level to check the alignment of the siding pieces above and below the window opening.
At the end of the window opening it’s necessary to notch the siding to fit around the top, side, and bottom of the rough opening.
Nail siding right over the transom-window opening in the rear wall.
Come back later and rout out the siding from within the opening.
Build The Doors
Put the door into the opening in the gable end.
Note that the hinges and 2×4 mounting post are already attached to the door.
Use a cordless impact driver to drive 6 inch screws through the counterbore holes in the 2×4 mounting post and into the timber frame.
Apply waterproof glue to 1 inch dia. hardwood plugs.
Then press the plugs into the counterbore holes to conceal the screw heads.
Hang The Hinged Doors
Fasten five iron stand-off brackets to the barn directly over the doorway opening.
Mount each bracket with a single screw.
Attach the horizontal steel track to each stand-off bracket with a lag screw.
Drive in the lags with a ratcheting socket wrench.
Slide the barn door onto the tracks.
Each roller assembly houses a grooved wheel.
Be sure the grooves fit over the top of the track.
To keep the sliding door from swinging away from the barn, attach a stay roller to the barn near the bottom corner of the door.
Cover the exposed pressure-treated rim joist in front of the sliding door with a pine board.
Attach the board with 2.5 inch galvanized nails.
Install Windows
Turn on the router and then slowly move it in a clockwise direction to cut through the siding around the window’s rough opening.
Install the PVC windowsill to the bottom of the opening.
You could also cut the sill from cedar, redwood, or pressure-treated lumber.
Put the transom window on top of the PVC windowsill.
Press the window flat against the pine siding that protrudes into the opening.
Hold the transom window in the opening by attaching a stop strip to the header above the sash.
Secure the stop with trim-head screws.
Install The Barn Sash
Fasten the sill into the window opening with 2.5 inch trim-head screws.
The horn on each end of the sill extends 3 inches past the opening.
After attaching both side casings, install the head casing across the window top where it, too, will protrude 3⁄4 inches into the opening.
Install the apron under the windowsill, attaching it with 2.5 inch screws.
Conceal all screw heads with white caulk or plastic plugs.
Mount a stop to each side of the windows.
When the sash is open, it’ll rest against the wood dowel protruding from the 2×2 cleats.
Slip the barn sash into place behind the wooden window stops.
Install a barrel bolt at the top of the sash to hold the window closed.
Finish Up The Barn
Build the loft floor from 1.5 inch thick tongue-and-groove pine planks.
Use a rubber mallet to pound the planks tightly together.
Create the look of a traditional rubble-rock foundation by dry-stacking thin stones around the barn.
Put the stones even with the siding.
Use a paintbrush to apply semi-transparent stain to the siding.
Scrub the stain into the wood to ensure good adhesion and even color.
Materials List
Foundation
3 pieces of 20′ long built-up 2×6 pressure-treated skids (each skid made from three 2×6 members fastened together)
12 pieces of 8″ x 16″ solid concrete blocks for pier supports
12 pieces of 4×6 pressure-treated support blocks
0.5 cubic yards compactible gravel base for drainage
Floor Framing
2 pieces of 20′ long 2×6 pressure-treated rim joists
14 pieces of 9′ 10″ long 2×6 pressure-treated floor joists spaced 16″ on center
2 pieces of 14′ long 2×6 pressure-treated rim joists
1 piece of 3/4″ plywood subflooring measuring approximately 280 square feet
6 pieces of 6×6 corner posts with slotted base detail
6 pieces of T-Rex or equivalent metal post base connectors
12 pieces of 1/2″ diameter x 6″ long aluminum or steel anchor pins
Wall Framing
40 pieces of 8′ long 2×6 wall studs spaced 16″ on center
4 pieces of 20′ long 2×6 top plates
4 pieces of 20′ long 2×6 bottom plates
2 pieces of 14′ long 2×6 top plates
2 pieces of 14′ long 2×6 bottom plates
6 pieces of 6×6 vertical support posts
6 pieces of 6×10 plate beams
2 pieces of 2×10 ridge beams
12 pieces of 4×6 diagonal braces
2 pieces of 4×8 header beams for door openings
1 window rough opening framed with 2×6 studs and header
Roof Framing
18 pieces of 10′ long 4×8 rough-sawn rafters with 10/12 pitch
2 pieces of 20′ long 2×10 ridge beam
10 pieces of 6×10 tie beams
4 pieces of 4×6 fly rafters
6 pieces of 6×6 gable posts
12 pieces of 4×6 diagonal roof braces
2 pieces of 20′ long 2×6 fascia boards
Sheathing and Panels
10 sheets of 1/2″ plywood wall sheathing
10 sheets of 1/2″ plywood roof sheathing
280 square feet of 3/4″ plywood subfloor panels
300 square feet of exterior siding panels or boards
300 square feet asphalt roof shingles
1 roll roofing underlayment felt paper
20 linear feet aluminum drip edge
Doors and Windows
2 pieces of 7′ high plank-style doors constructed from 1×6 tongue-and-groove boards
20 pieces of 7′ long 1×6 tongue-and-groove pine boards for doors
6 pieces of 3/4″ diameter threaded rods for door bracing
6 pieces of heavy-duty strap hinges
2 pieces of door handles and latch hardware sets
1 piece of 24″ x 36″ framed window unit
Fasteners and Hardware
10 lbs 3″ galvanized framing nails
5 lbs 2″ galvanized nails
2 lbs 1-1/2″ roofing nails
1 box structural wood screws 3″
12 metal joist hangers for 2×6 framing
6 post base anchors for 6×6 posts
1 box construction adhesive tubes
20 metal hurricane ties for rafters
1 box anchor bolts for foundation connections


Framing-to-Finish Roadmap: DIY Guides For Every Step of The Build


