
Shed Security Guide To Theft-Proof Your Garden Storage
A shed may protect your gear from the weather. But it won’t secure your belongings against cunning thieves.
If your idea of shed security is a flimsy stamped-steel latch, you might as well just leave a “Help Yourself” sign on the lawn.
Three years ago, I walked out to my backyard at 6:00 AM with a steaming mug of coffee, ready to finish a cherry wood cabinet. I found my shed door swinging in the breeze, the heavy-duty hasp literally ripped out of the soft pine trim.
My brand-new DeWalt sliding miter saw and my pneumatic framing nailer were gone.
I’d made the classic amateur mistake. I spent $3,000 on the shed and $15 on a scarecrow padlock from a big-box store. That morning changed how I build.
Security is about buying time. If it takes longer than 3 minutes to break in, 90% of thieves move on. Most sheds fail at the hinges and the door frame, not the lock itself.
Obscurity is better than armor. If they can’t see the $1,200 miter saw through the window, they won’t risk the noise of a break-in.
A Standard Door is The Weakest Point In A Shed's Security
Most shed doors are hung on decorative strap hinges with exposed screw heads.
A thief doesn’t even need to pick your lock; they just need a cordless impact driver or a flat-head screwdriver to remove the entire door from the frame in thirty seconds. I’ve seen burglars peel back the T1-11 siding like an orange because the builder didn’t use enough blocking behind the seams.
We are looking at the structural integrity of the jamb and the stile. If the wood can be splintered with a crowbar, the most expensive lock in the world is just a shiny paperweight attached to kindling.
Vulnerability of Standard Out-Swing Doors
Standard shed doors almost always swing outward to save interior floor space. This exposes the hinge pins. A novice criminal with a hammer and a nail set can tap those pins out and walk right in. I always advocate for Security Studs or NRP (Non-Removable Pin) hinges.
The gap between the double doors on many sheds is a massive red flag. That 1/4-inch space is a perfect landing zone for a wonder bar or a pry tool.
Without an astragal, a vertical strip of wood or metal that covers the gap, the shed is basically begging to be popped open.
Beefing Up the Door for Maximum Resistance
Most DIYers build a simple Z-brace door, which is fine for keeping out rain but useless against a shoulder-charge. I prefer a sandwich construction: a layer of 5/8-inch plywood, a core of structural framing, and a metal kick plate at the bottom. This prevents the kick-in attack.
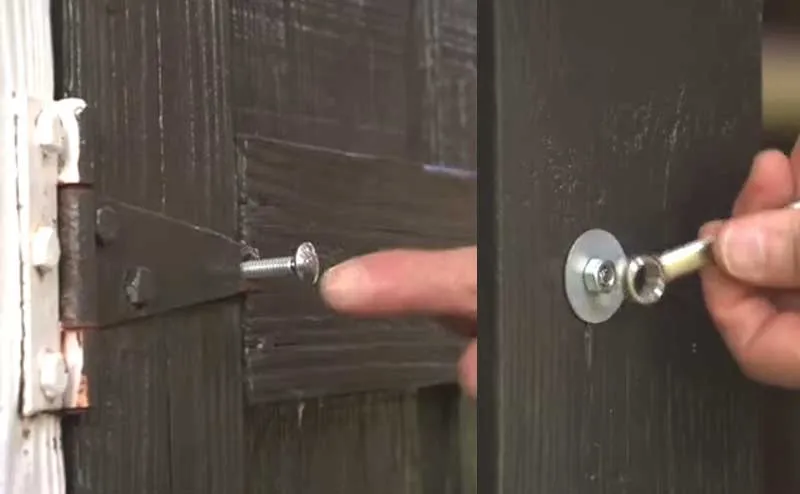
Adding a horizontal lock block (a solid chunk of 2×6 pressure-treated lumber) where the hasp attaches ensures that you aren’t just bolting into thin siding. You want that bolt to bite into something substantial that requires a saw to remove.
Never trust exterior grade screws that come in the bag with your hasp. They are usually brittle zinc and snap under the torque of a pry bar.
Always upgrade to stainless steel carriage bolts that go all the way through the door and are capped with a nut and a large washer on the inside.
The ultimate protection is a steel-clad door hung in a reinforced 2×6 frame with a deadbolt that has a 1-inch throw. If you can’t afford a steel door, skinning the interior of the wooden door with 16-gauge galvanized sheet metal makes it virtually impenetrable to hand tools.
Choosing a Padlock That Makes a Thief Sweat and Reconsider
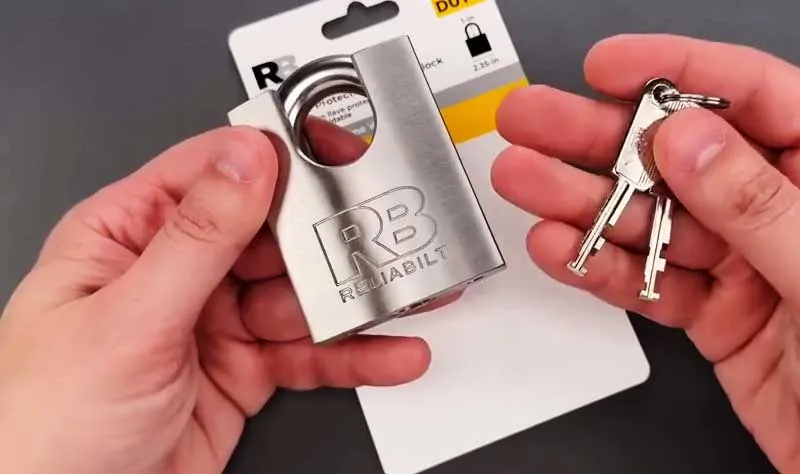
Standard laminated steel padlocks have exposed shackles (the U-shaped part) that succumb to 24-inch bolt cutters in a heartbeat. I’ve seen kids in hoodies snip those like they were cutting butter. If I can see the silver loop of the shackle, the lock is a failure.
You need to look for Shrouded or Closed Shackle locks. These designs wrap the lock body around the shackle, leaving no room for the jaws of a bolt cutter to get a grip.
Beginners often buy a $100 lock but attach it to a $5 hasp. The thief will just bypass the lock by unscrewing the hasp or cutting the thin metal loop of the hasp itself. The security chain is only as strong as the weakest link, which in this case, is usually the mounting hardware.
Understanding the CEN Rating and Shackle Material
When shopping, look for a CEN (Central European Norm) rating. A CEN 4 or 5 is what is needed for high-value gear.
These locks use boron alloy shackles which are significantly harder than hardened steel. While hardened steel sounds tough, it’s often only case-hardened, meaning the core is soft.
Boron alloy is tough all the way through. Look for a lock with a re-keyable cylinder. This allows the owner to match the shed key to the house key, but more importantly, it usually signifies a higher-quality internal mechanism that resists raking or bumping (common lock-picking techniques).
Hidden Dangers of Cheap Disc Locks
Those round discus locks are at every self-storage facility. While they are better than open-shackle locks, the cheap $10 versions have a massive weakness: the keyway is often made of soft brass that can be drilled out in ten seconds with a cobalt bit.
I’ve had to drill out my own locks after losing keys, and the difference between a $15 lock and an $80 Abloy or Mul-T-Lock is staggering. The expensive ones use rotating discs instead of pin tumblers, making them virtually immune to traditional picking.
Many professional thieves use shimming. They take a thin piece of aluminum from a soda can, slide it into the shackle hole, and pop the locking pawl. High-end locks use ball bearing locking which makes shimming physically impossible. Always check the packaging for the phrase Ball Bearing Locking Mechanism.
Dealing With The Window Shopping Problem
Glass windows provide a shopping window for thieves to see exactly what is there, and they offer the easiest point of entry. A quick smash and grab through a window takes less time than a sneeze.
However, I hate working in a dark shed. Natural light is essential for fine woodworking and finding that one specific wrench.
The usual advice is to just paint the windows or put up curtains, but that actually signals something valuable is hidden here to a seasoned criminal.
Polycarbonate Over Standard Greenhouse Glass
If a shed has standard 1/8-inch glass, it needs to go. I replace every shed window with Lexan (polycarbonate). It is 250 times stronger than glass and virtually unbreakable.
Someone can hit it with a baseball bat or a brick, and it will just bounce off. Make sure to back-putty the sheets and use one-way security screws to prevent someone from simply unscrewing the window panes from the outside.
A Privacy Film
Apply a mirror film or frosted privacy film to the interior of the polycarbonate.
It allows 80% of the sunlight in but prevents anyone outside from seeing if there is a Festool or a Freight Harbor drill on the bench.
Integrate Interior Security Bars That Don't Look Like a Prison
You want 1/2-inch steel rebar or professional window guards bolted to the inside of the framing.
By installing them on the inside, a thief has to break the glass first, triggering the alarm, before they even encounter the steel.
I often recommend transom windows, those long, skinny windows placed high up near the roofline. They let in light but are too narrow for a human body to squeeze through.
Ground-Level Defenses and The Foundation As a Security Feature
I once saw a shed in a rural part of Saline County, Illinois that was jacked up. Thieves didn’t break the lock; they used a car jack to lift one corner of the shed, cut a hole through the floorboards, and emptied the place. If a shed is sitting on loose cinder blocks, it’s not secure. It’s mobile. We need to talk about anchoring.
A secure shed should be an extension of the earth. Whether situated on a concrete slab or a skid foundation, the connection to the ground is a primary deterrent against tip-over thefts or heave attacks.
Tactical Advantage of Concrete Pads
You can’t go wrong with a 4-inch thick reinforced concrete pad. When the shed is built, we use L-bolts or Wedge Anchors (like Red Heads) to bolt the pressure-treated bottom plate directly to the concrete.
This prevents a thief from using a truck and a tow chain to simply pull a shed off its foundation.
If building on a timber frame or skids, the builder must use Helix or Auger anchors, these are large metal screws that go 3-4 feet into the ground and cable-tie the shed to the soil.
Before driving 4-foot anchors into the ground, call 811 or the local utility marking service. I’ve seen a security project turn into a gas leak disaster because someone drove a ground stake through a lateral line.
Preventing the Skirting Bypass
Often, builders leave the area under the shed open. This is a mistake. Not only does it invite critters that chew through your wiring, but it provides a blind spot where a thief can work out of sight.
I always install hardware cloth (a heavy-duty metal mesh) around the perimeter, buried 6 inches into the dirt, and then cover it with pressure-treated skirting. This forces a burglar to stand out in the open where they can be seen by neighbors or cameras.
Using High-Lumens Lights as a Defense Weapon
Thieves want to work in the shadows where their mask and gloves keep them anonymous. A well-placed light acts as a psychological barrier. Most people buy dusk-to-dawn lights that stay on all night.
This actually helps the thief by providing a steady light source for them to see what they are doing. You want motion-activated lighting with a sudden-on effect to startle the intruder.
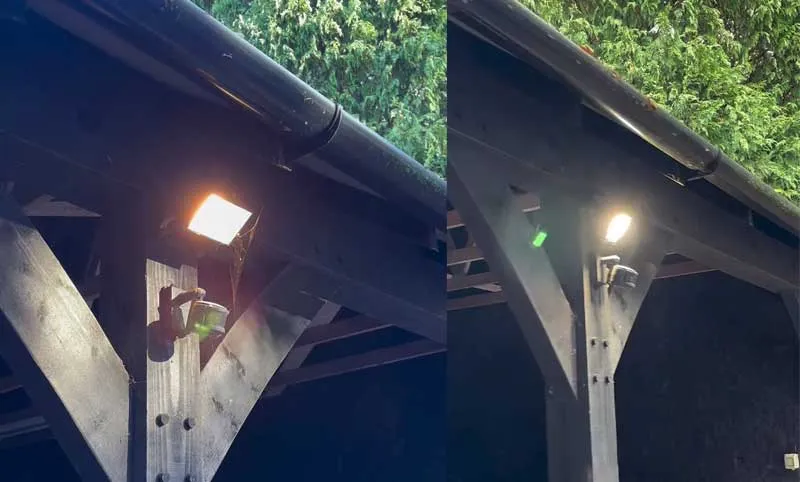
Positioning Floodlights to Avoid Dead Zones
If I can reach up and unscrew the bulb, your lighting system is useless. Mount your LEDs at least 10 to 12 feet high.
You also need to be careful about backlighting. If your light is pointing directly into your security camera lens, the camera will auto-dim, and the thief will appear as a black silhouette.
Aim your lights away from the camera, or use infrared (IR) illuminators that are invisible to the human eye but make the camera see like it’s daytime.
Look for lights with a PIR (Passive Infrared) sensor that has a 180-degree field of view. Cheaper sensors only look straight ahead. You want a sensor that catches movement from the approach angles, which are the sides of the shed where people usually sneak up.
Randomized Internal Lighting
Modern LED systems allow for vacation modes. I like to set up a smart bulb inside the shed that turns on and off at random intervals between 6 PM and 11 PM. This gives the illusion that someone is actually in the shop working.
Pair this with a solar-powered battery backup so that even if a thief cuts your main power line, the sun-charged floodlights will still blast them when they cross the perimeter line.
Many Homeowners Associations (HOAs) have strict rules about visible security.
I’ve had clients get fined for ugly bars on windows or bright floodlights that bleed into a neighbor’s yard. Always check your covenants before mounting a 5000-lumen light.
One Standalone Siren is Better than Three Smart Cameras
I’ve watched footage of thieves wearing masks simply ignoring cameras because they know the police won’t arrive for twenty minutes. A camera is for after-the-fact evidence; an alarm is for right-now intervention.
In my experience, a 120-decibel siren screaming in a confined backyard is the most effective way to make a burglar drop your tools and run.
The psychological shock value of a sudden, piercing noise creates an immediate flight response that passive recording devices simply cannot replicate.
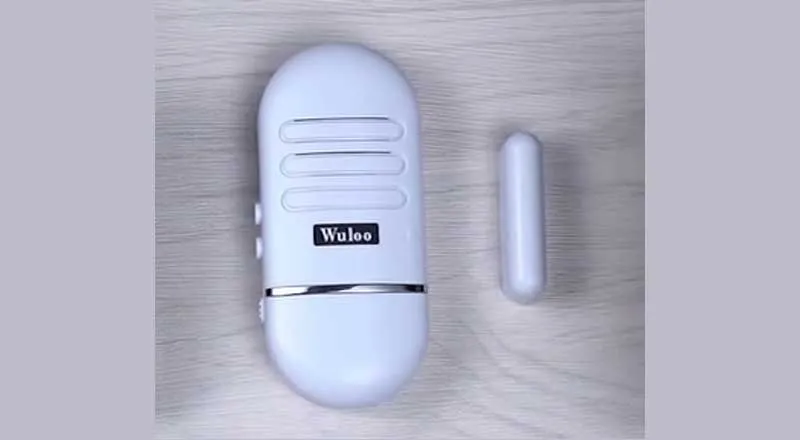
Hardwired vs. Wireless Sensors in High-Vibration Environments
Wireless contact sensors are easy to install, but in a shed, they often fail due to vibration or extreme temperature swings. A heavy gust of wind can rattle a loose shed door just enough to trigger a false alarm at 3:00 AM. I prefer hardwired magnetic reed switches recessed into the door frame.
Because they are physically wired to the control panel, they are much more reliable. If you must go wireless, look for sensors that use Sub-GHz frequencies (like 433MHz) rather than 2.4GHz Wi-Fi; they have much better penetration through walls and distance.
Place a vibration sensor directly on the most expensive tool in your shed, like your cabinet saw or riding mower. If someone tries to move the tool even a few inches, the alarm triggers before they even get it to the door.
If your budget is under $100, buy a standalone battery-operated door alarm with a built-in siren. If your budget is over $500, invest in a monitored system with cellular interconnect and battery backup that lasts at least 24 hours during a power outage.
Defensive Landscaping: Use Nature’s Barbed Wire to Protect the Shed
A pretty backyard is often a vulnerable one. If you have big, leafy bushes right next to your shed windows, you’ve provided a cloak of invisibility for a burglar to work.
I follow the CPTED (Crime Prevention Through Environmental Design) principles.
Don’t put your shed in the dark corner behind the garage. Put it where it is visible from your kitchen window or a neighbor’s second-story bedroom. Eyes on the Street is the best security you can’t buy at a store.
We want natural surveillance, which is the ability for you or your neighbors to see the shed clearly from the house.
Thorny Perimeter Strategy Using Strategic Plant Selection
Instead of a privacy hedge, I plant defensive flora. Think Barberry or Holly. These plants have incredibly sharp thorns.
If a thief tries to crouch under your shed window, they’re going to end up with a face full of needles and leave behind DNA (blood or clothing fibers) for the police. It’s a passive defense system that requires zero electricity.
Don’t let your defensive plants grow too high. If they exceed 3 feet, they stop being a deterrent and start being concealment. Keep your thorny bushes pruned low and away from the shed walls to maintain sight lines.
Audible Ground Cover
One of my favorite old-school tricks is using crunchy landscaping. I replace the mulch around the base of the shed with 3/4-inch clean crushed stone. You cannot walk on crushed stone quietly. It’s like walking on cornflakes.
If someone is prowling around your shed at 2 AM, the crunch-crunch-crunch will alert even a sleeping dog. Contrast this with bark mulch or pine needles, which are stealth surfaces that allow a thief to move like a ninja.
Strengthening the Roof and Siding To Prevent Break-Ins
I once saw a professional break-in where the thief didn’t even touch the door. They used a Sawzall (reciprocating saw) to cut a hole right through the side of the shed.
Standard 3/8-inch SmartSide or T1-11 siding offers about as much resistance as a cardboard box to a power tool. If you are storing high-value items like Hilti tools or high-end mountain bikes, you need to harden the envelope.
Sheathing Upgrade for Puncture-Resistant Walls
In high-risk areas, I don’t just use siding. I install a layer of 1/2-inch OSB (Oriented Strand Board) followed by a layer of plywood, and then the decorative siding. Even better, I sometimes skin the interior with expanded metal lathe behind the drywall or pegboard.
If a thief tries to cut through the wall, their saw blade will bind and kick back when it hits the metal mesh. It turns a ten-second cut-in into a five-minute struggle, which usually leads to them giving up.
Hardening your shed actually increases its service life. Reinforced walls and double-sheathing mean less racking (leaning) over time and better insulation, which protects your tools from the rust-inducing effects of humidity and temperature swings.
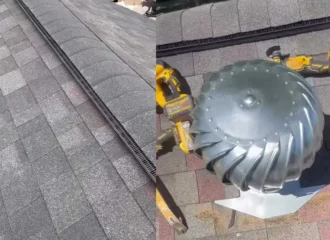
Protect Roof-Vent Entry Points
Many DIY sheds use plastic skydomes or turbine vents that are only held on by a few roofing nails. A thief can climb onto the roof, pop the vent, and drop inside. I always reinforce these with security mesh from the underside. Additionally, make sure your soffit vents are screwed in with tamper-resistant Torx screws.
When building, use hurricane ties or rafter ties (like Simpson Strong-Ties) to connect the roof to the walls. While designed for wind, they also make it nearly impossible for someone to pry the roof off the top plate, which is a technique used by thieves to bypass wall alarms.
An Inside-Out Approach To Securing Tools Inside The Shed
Never make it easy, even after they’re inside.
If a thief manages to breach your door, they want to grab everything and leave in 60 seconds.
When your tools are just sitting out on a workbench, you’re helping them. I treat the inside of my shed like a Russian nesting doll of security. We want to anchor the assets so they can’t be carried away individually.
A Floor Anchor and Heavy-Duty Chain
For my welder and my air compressor, I’ve installed motorcycle floor anchors into the floor joists (or the concrete pad). I use a Grade 80 alloy steel chain, the kind used for overhead lifting, and a high-security padlock to tether my most expensive tools to the floor.
Even if they get the door open, they can’t move the tools without a grinder. And using a grinder inside a wooden shed is loud, sparks fly everywhere, and it takes time they don’t have.
Interior Safe for Hand Tools
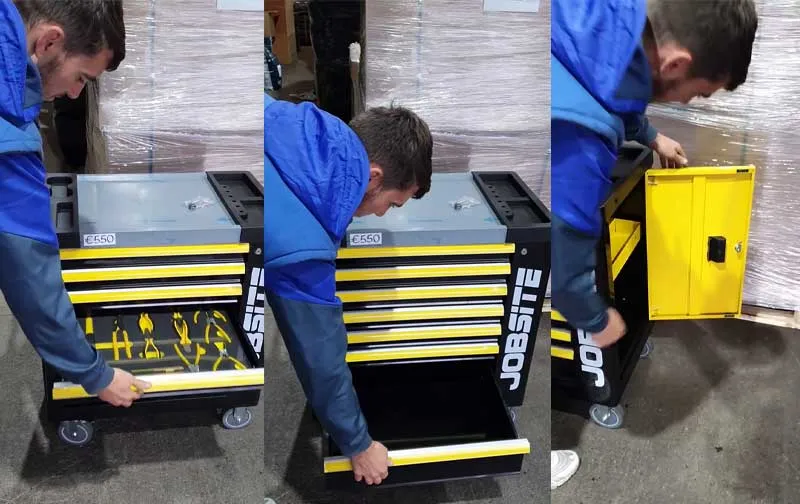
The best place for your $500 drills is in a Jobsite Box. These are heavy-duty steel chests (like those made by Knaack or Ridgid) designed for construction sites.
Bolting one of these to the floor of your shed creates a shed within a shed. A thief might get your $20 shovel, but they aren’t getting your $3,000 collection of L-Boxx or Packout kits.
Don’t leave your bolt cutters or pry bars hanging on the wall inside the shed. I’ve seen burglars break in through a window and use the homeowner’s own tools to break the locks on the interior chests. Keep your breaching tools locked up or in the garage.
Insurance And Inventory Reveal the Hidden Costs of a Breach
Guys spend $5,000 on a shed build and not a single dime on a rider for their homeowner’s insurance. Most policies cover other structures at a measly 10% of your dwelling’s value.
When your house is insured for $300k, you have $30k for the shed, but that usually excludes business-use tools or high-end hobbies like precision woodworking. If you’re running a side-hustle out of that shed, your standard policy might deny a claim entirely if they find a business license at that address.
I learned this the hard way when a pipe burst in my shop and ruined $8,000 of exotic hardwood; the adjuster told me hobby materials aren’t covered for water damage in outbuildings.
Deep Diving Into Asset Documentation and Replacement Value
You need to move from actual cash value (ACV) to replacement cost value (RCV). ACV is a scam for DIYers; it means the insurance company gives you $200 for a five-year-old table saw that costs $1,200 to replace today.
I keep a digital asset vault on a secure cloud. This is a video walkthrough of the shed every six months, zooming in on serial numbers and model plates. If you can’t prove you owned a SawStop, the insurance company will price out a Ryobi and call it even.


Read Next
Framing-to-Finish Roadmap: DIY Guides For Every Step of The Build


