
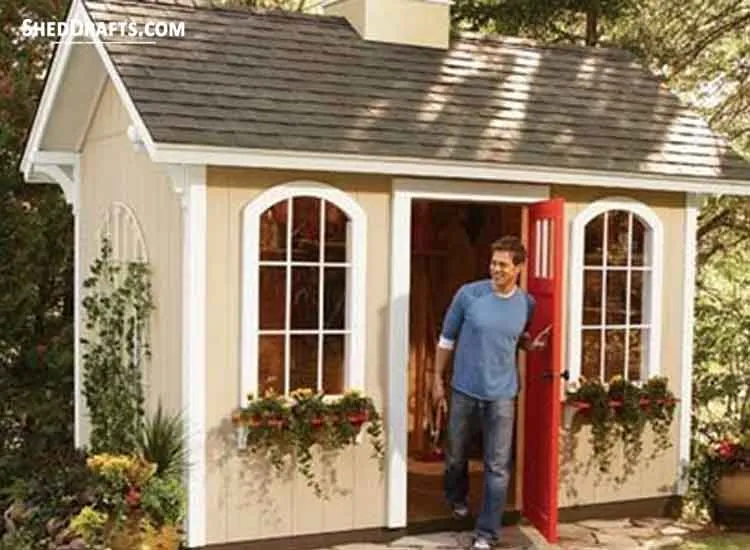
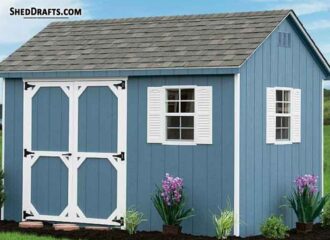
8x12 Storage Shed Plans To Build A Backyard Legacy
Listen, I’ve seen it so many times. A homeowner gets ambitious, buys a stack of premium pressure-treated 2x4s from a big-box store, and starts hacking away in the backyard without a real plan. Three weeks later, I get the call. Their shed looks like a leaning tower of cedar, the doors won’t shut because the foundation settled unevenly, and they’ve spent double their budget on oops trips to the hardware store.
One guy I helped last summer actually built his floor frame upside down because he didn’t understand crown orientation, he basically built a giant wooden bowl that collected rainwater under his subfloor. It was a rotting mess before the roof even went on.
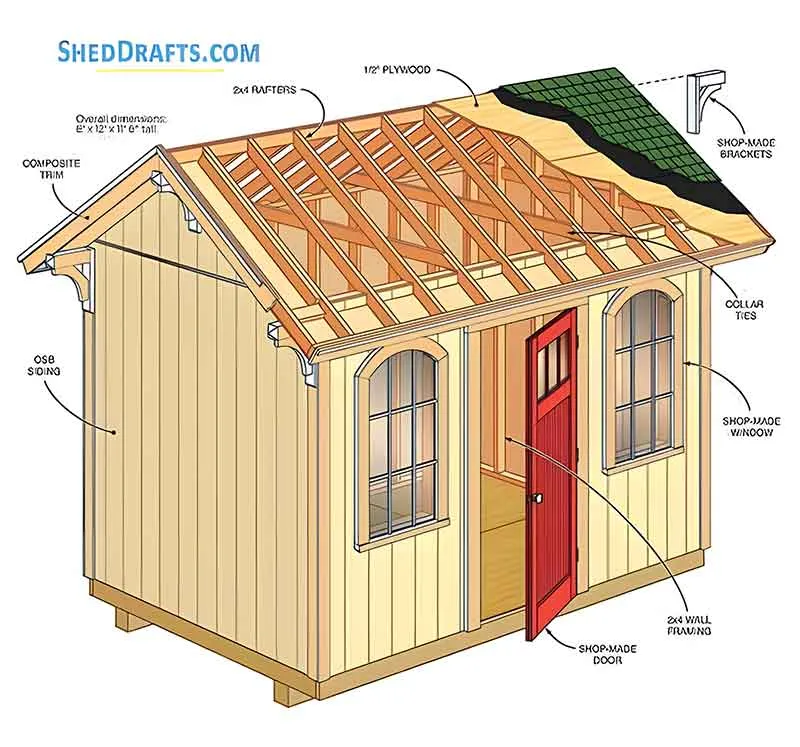
Building an 8×12 gable storage shed is the Goldilocks of backyard projects. It’s large enough to actually hold a riding mower and a workbench, but small enough that you usually don’t need a heavy-duty crane or a structural engineering degree to pull it off.
But if you don’t respect the geometry, especially those rafter cuts and the weight distribution of the skids, you’re just building a very expensive pile of kindling. This guide is the result of two decades of splinters and aha! moments on job sites across the country.
- Difficulty: 7/10 (The roof framing is the boss battle).
- Timeframe: 3 to 5 weekends for a solo builder.
- Cost: Expect $2,800–$3,800 depending on lumber prices and trim choices.
- Permits: Most US townships draw the line at 100 or 120 square feet. At 96 square feet, this 8×12 usually skates by, but always check your local setbacks.
Ground Truth: Why The Foundation May Sink (And How to Stop It)
I’ve lost count of how many sheds I’ve seen walking across a yard because the owner thought four cinder blocks on top of grass was a foundation. It isn’t. Soil moves. It heaves in the winter and softens in the spring. For an 8×12, you are looking at a significant amount of concentrated weight, between the lumber, the shingles, and your heavy gear, you’re easily pushing 3,000+ pounds.
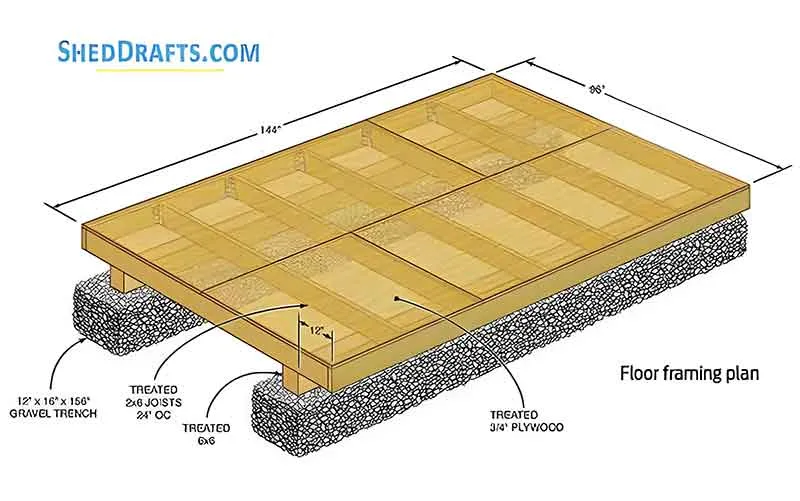
I always advocate for a crushed stone pad over a simple blocks on dirt approach. You want to excavate about 4 to 6 inches down, larger than the 8×12 footprint (go 10×14), and fill it with 3/4-inch clean crushed stone. Why clean stone? Because it doesn’t hold water. Water is the enemy of your pressure-treated skids. If you use crusher run or stone dust, it packs down too tight and traps moisture against the wood.
Floating Block Fallacy
Never, ever stack hollow-core CMU blocks (cinder blocks) on their sides. They are designed to hold weight vertically through their cells. If you lay them flat, they can crack under the point load of the 4×4 skids. I once saw a shed floor snap a block like a cracker because the owner used decorative landscape blocks instead of structural solids. Use 4-inch or 8-inch solid concrete cap blocks if you need to gain height.
When you’re setting your 4×4 or 6×6 pressure-treated skids, don’t just eye it. I use a laser level if I’m feeling fancy, but a 4-foot bubble level on a perfectly straight 10-foot 2×4 works just as well. Your goal is to get those skids perfectly parallel and perfectly level. If the foundation is out of square, the entire shed will rack, and you’ll spend three hours cursing at your door hinges later because they won’t align.
Floor Joists and the Bouncy Floor Syndrome
The blueprints show 2×4 or 2×6 floor joists. If you plan on putting a heavy riding mower or a motorcycle in this 8×12, upgrade to 2x6s at 12-inch centers. Most standard plans call for 16-inch or even 24-inch centers. That’s fine for storing Christmas decorations, but for a real workshop, it’s flimsy.
When you’re laying out your joists, look for the crown. Every piece of lumber has a slight bow. You want that bow facing UP. When the weight of the shed hits it, the joist flattens out. If you put the crown down, you’ve started with a sagging floor on day one. I also swear by using 3-inch hot-dipped galvanized nails or structural screws. Regular gold deck screws are too brittle; they lack the shear strength needed when the wood starts to swell and shrink with the seasons.
Blocking
These are short pieces of 2x joist material nailed between the long joists to prevent them from twisting. Run a line of blocking down the center (the 6-foot mark). It makes the floor feel like concrete.
Use 3/4-inch tongue-and-groove (T&G) pressure-treated plywood for your subfloor. Do not use OSB for the floor. If you ever spill a gallon of gas or a bucket of water on OSB, it will swell up like a sponge and eventually rot out. T&G plywood locks the sheets together so the edges don’t lip, preventing trip hazards.
Wall Framing: The Art of Corners and Headers
One of the biggest mistakes I see in DIY shed builds is over-complicating the corners. People try to nail three or four studs together in a massive block of wood that has no lip for the interior siding or drywall. I prefer the three-stud corner (sometimes called a California Corner). It provides plenty of structural support while leaving a 1.5-inch edge to nail your interior finish to.
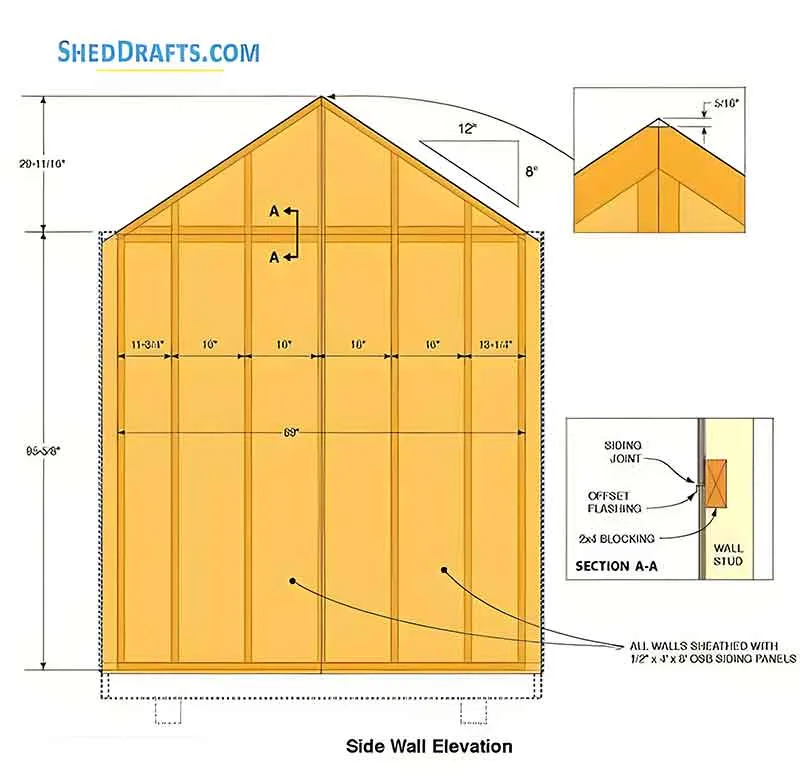
For an 8×12 gable shed, your wall height is usually around 7 feet. This allows you to use standard 92 5/8-inch studs if you’re building a house, but for a shed, you’re often cutting your own. Keep your 16-inch on-center (OC) spacing religious. Why? Because siding panels come in 4-foot widths. If your studs are wonky, your siding seams won’t land on a stud, and you’ll be air-nailing, which leads to warped walls in six months.
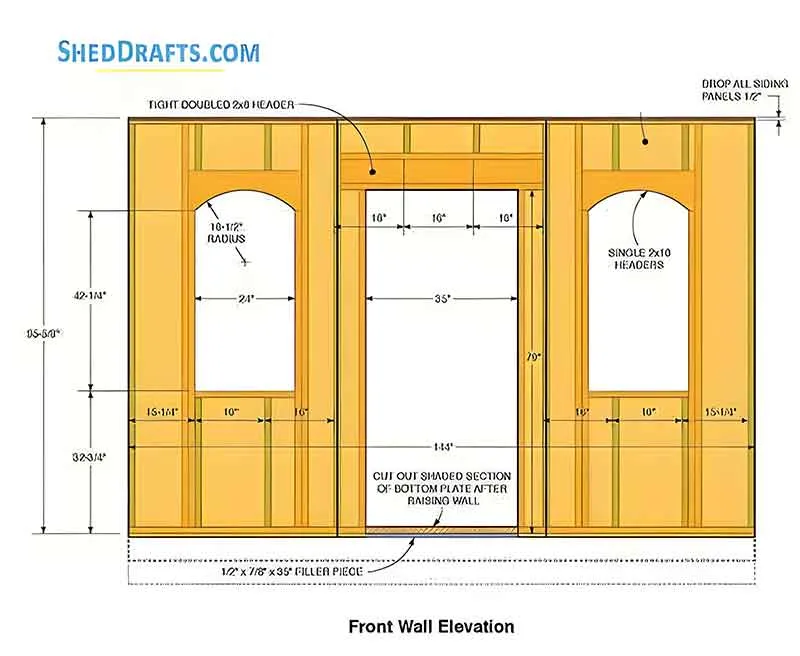
Sandwich Header
I always use a double 2×6 header with a 1/2-inch plywood sandwich (the flitch plate). Why? Because over a 4-foot or 5-foot door opening, 2x4s will eventually sag under the weight of the roof rafters above them. A sagging header means your doors will stick in the summer. It costs five dollars more to use 2x6s. Just do it.
Once I consulted on a shed where the builder forgot to double the top plate. He just had a single 2×4 running across the top of the studs. When he loaded the roof with heavy architectural shingles, the top of the wall started to wave between the studs. We had to go back in with a bottle jack to straighten it out and add the second plate (overlapping the corners) to tie the whole structure together. That second top plate is what makes the shed a building and not just a box.
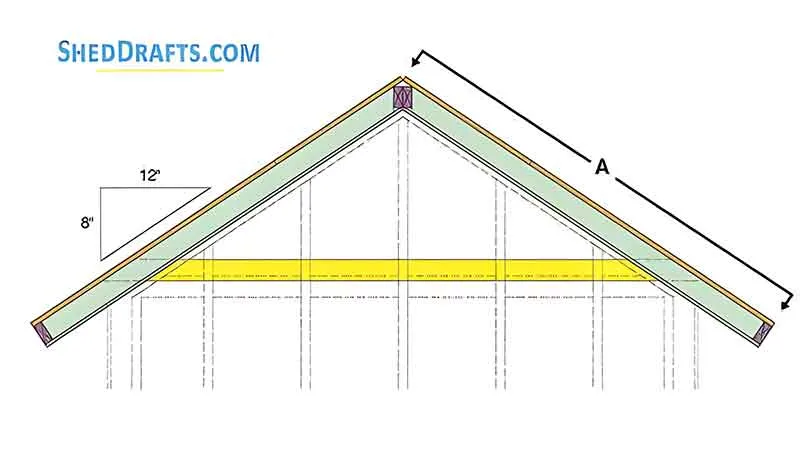
Rafter Geometry Revolves Around The Birdsmouth Cut
This is where the men are separated from the boys (or the masters from the apprentices). The gable roof on an 8×12 usually sits at a 10/12 or 12/12 pitch. That means for every 12 inches of horizontal run, the roof rises 10 or 12 inches. It looks great, sheds snow like a champ, and gives you loft space.
The Birdsmouth cut is the triangular notch in the rafter that allows it to sit flat on the top plate. If you cut this too deep, you weaken the rafter. If it’s too shallow, the rafter sits too high and your ridge board won’t be level.
Most guys try to use a framing square to step off their rafters. If you’re off by 1/16th of an inch on the first step, by the time you reach the ridge, you’re off by nearly an inch.
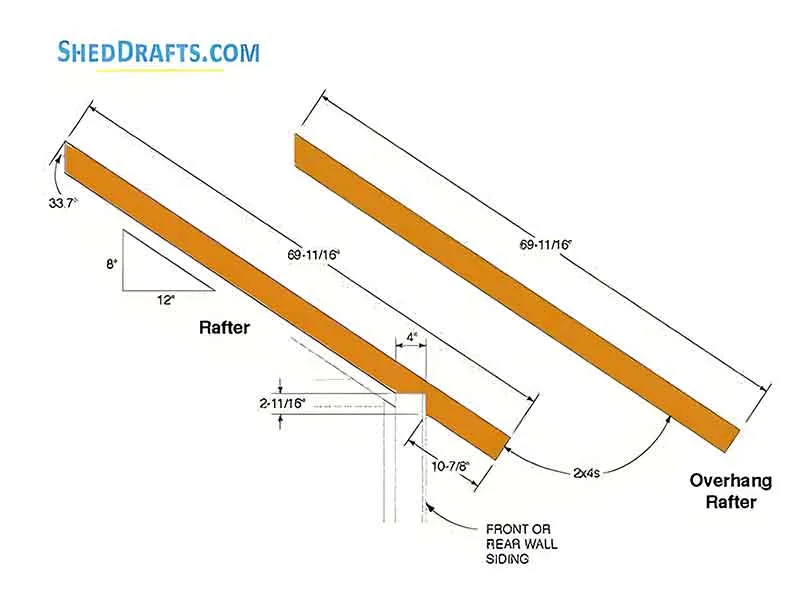
Use a rafter calculator (or a phone app) to get your exact hypotenuse length.
Cut one Master Rafter. Test it. Fit it against the ridge. If it’s perfect, use it as a template to trace all the others. Don’t measure each one individually; human error will creep in.
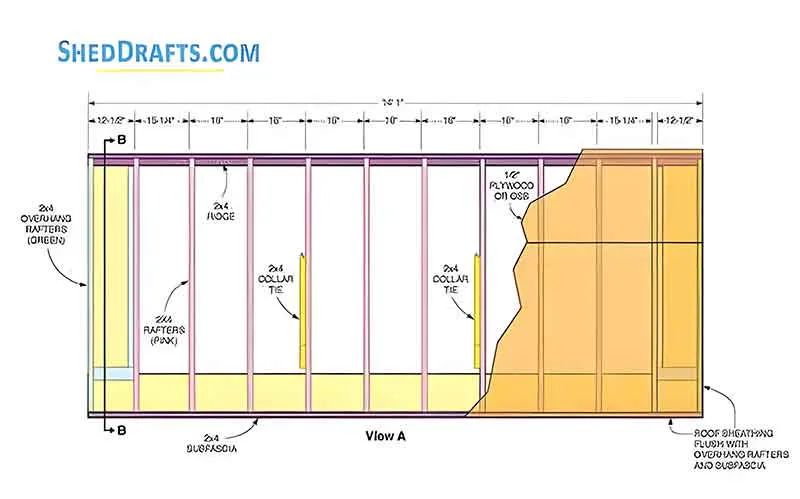
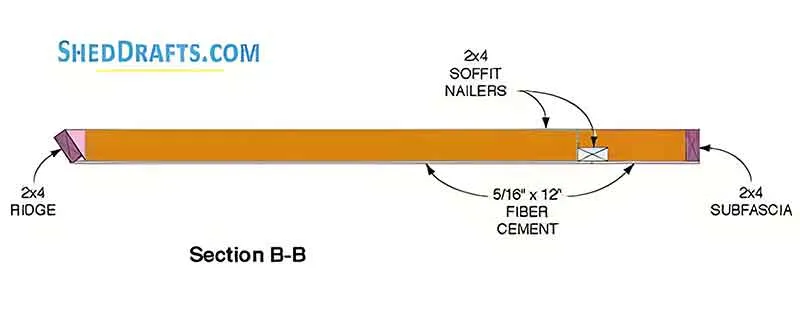
Before you lift a single rafter, nail your frieze blocks (the spacers between rafters) to the top plate. It acts as a guide and holds the rafter in place while you’re balancing on a ladder trying to nail the birdsmouth. It’s like having a third hand.
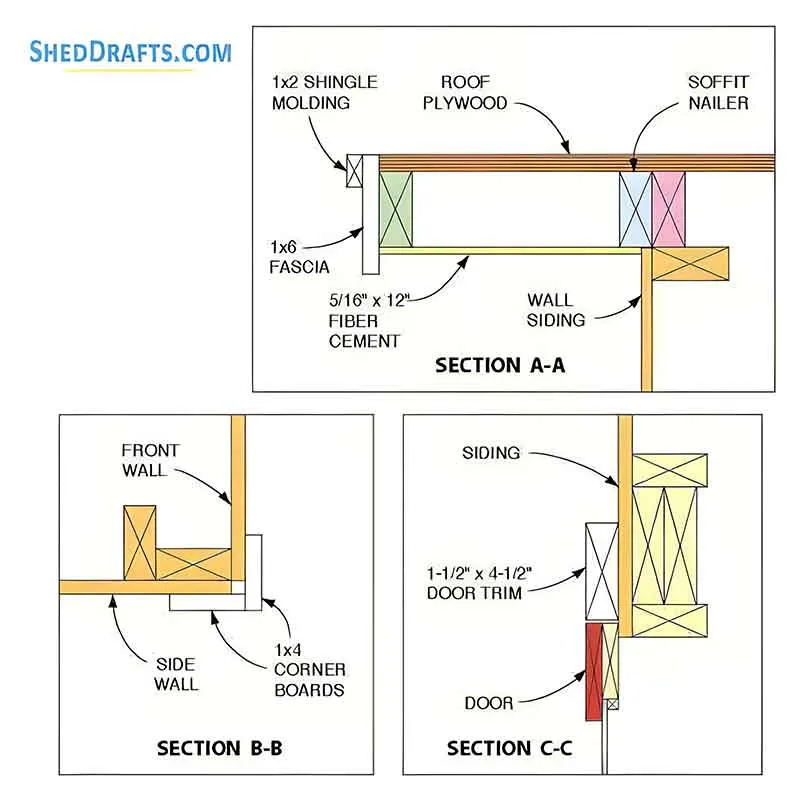
Siding and the Drip Edge Secret
You’ve got your frame up. Now it’s time for the skin. Our plans call for T1-11 or LP SmartSide panels. These are great because they provide structural shear strength, you don’t need diagonal bracing if you use these.
Most people nail their siding too low or too high. If the siding touches the ground, it will wick moisture up into the wood, and the bottom 6 inches of your shed will be mush in five years. You want a minimum 1-inch overlap over the floor frame, but the siding should stay at least 4 to 6 inches away from the actual soil or gravel.
Siding Disaster
Early in my career, I installed T1-11 siding right down to the gravel pad on a garden shed. I thought it looked cleaner. Two years later, the backsplash from the roof (which didn’t have gutters) had rotted the bottom edge so badly I could poke my finger through it. I had to jack up the shed, cut off the bottom 12 inches of siding, and install a skirt of PVC trim. It looked terrible and took two days to fix. Leave a gap.
Z-Flashing
If you are building a tall shed and need to stack siding panels (though on an 8×12 you usually won’t), you must use Z-flashing at the horizontal seam. This metal strip directs water out and away from the joint. Without it, water sits in the seam, freezes, expands, and blows your siding apart.
Even on a standard build, use a high-quality house wrap (like Typar or Tyvek) under your siding. People say sheds don’t need it because they aren’t heated, but house wrap isn’t about heat, it’s about a secondary drainage plane. It keeps your studs dry when the wind drives rain through the siding.
Roofing: Don't Let the "Drip" Win
Once the rafters are up and sheathed with 7/16-inch OSB or plywood, you need to get it dried in fast. I see a lot of DIYers skip the drip edge. They think the shingles hanging over the edge is enough. It isn’t. Water has surface tension, so it will curl back under the shingle and rot your fascia board.
Drip Edge First: Install it on the eaves (bottom edges) first.
Underlayment: Use a synthetic felt. It’s lighter, stronger, and won’t tear like the old-school asphalt paper.
Drip Edge Second: Install it over the felt on the “rakes” (the sloped sides of the gable). This sandwiches the felt and ensures water stays on top of the metal.
Starter Strip
Don’t just start nailing shingles. You need a starter course, which is a shingle with the tabs cut off (or a dedicated starter roll) installed upside down. This provides the glue strip at the very bottom edge of the roof. If you skip this, the first big windstorm will catch the bottom edge of your roof and peel it back like a banana.
The Ridge Vent
Don’t skip ventilation. On a hot July day, the temperature inside a non-vented shed can hit 130°F. That heat bakes your shingles from the inside out and ruins any paint or chemicals you have stored inside. Spend the $40 on a plastic ridge vent. It’s an easy over-the-ridge installation that lets the shed breathe.
Door Dilemma: Building a Gateway That Actually Stays Square
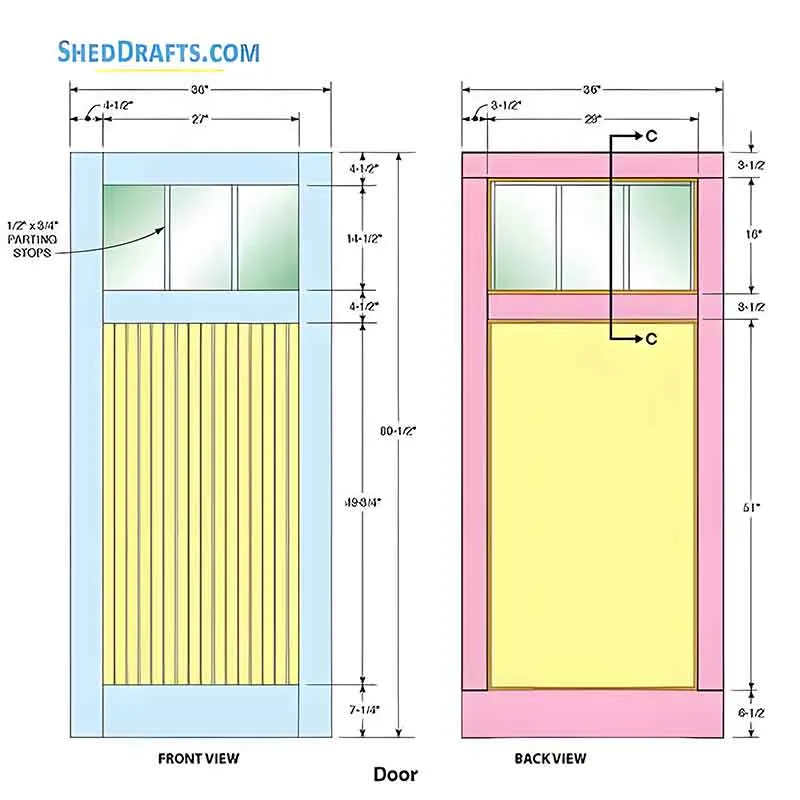
If there is one part of a shed that causes more gray hair than the roof, it’s the door. You’re building a heavy, wooden rectangle and hanging it on a hinge in a world that is constantly shifting. Most stock shed doors you see at the big-box stores are made of 2×4 frames with siding slapped on them. They are heavy, they sag, and they eventually drag on the threshold.
In my shop, we use the Z-Brace method with a critical twist: the diagonal brace must start from the bottom hinge side and go to the top latch side. I once walked onto a job site where a homeowner had the brace going the opposite way, from top hinge to bottom latch. The door was literally pulling itself apart because the brace wasn’t pushing the weight back into the hinges. It was acting as a tension rod, and wood is terrible at tension but great at compression.
Shim-and-Trim
When you’re framing your rough opening for a 48-inch double door or a 36-inch single door, give yourself 1/2 inch of slop on all sides. Beginners try to make the framing tight to the door. Don’t. You need that gap to shim the door frame perfectly plumb (vertical) and level. If your shed settles 1/8 of an inch next spring, and it will, you can adjust the door in the frame without having to rebuild the entire wall.
Don't Use Interior Hinges
I see people buying heavy duty door hinges from the hardware aisle meant for a bedroom door. Stop. A shed door is exposed to the elements. You need heavy-duty strap hinges (at least 6-inch or 8-inch) that are hot-dipped galvanized. These distribute the weight across the face of the door rather than just the edge of the wood. If you use interior butt hinges, the screws will eventually pull out of the end grain of the 2x4s.
Above the door, you must install a Z-shaped metal drip cap. This slides under the siding and over the top of the door trim. Without it, water will sit on top of your door trim, rot the header, and eventually leak inside. It’s a $6 piece of metal that saves a $2,000 shed.
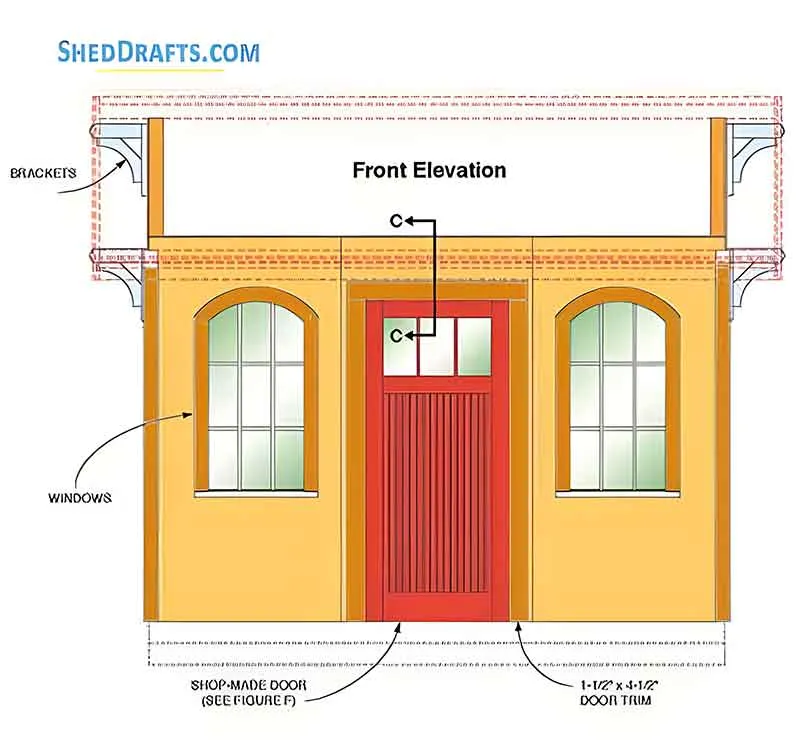
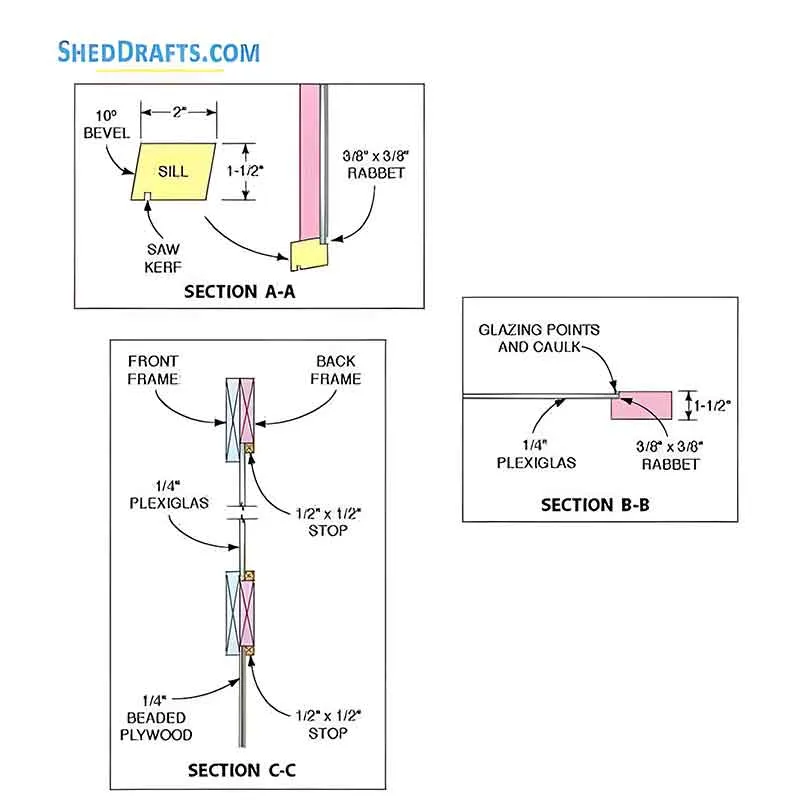
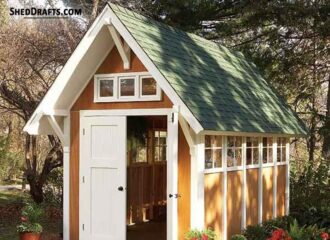
Windows and Natural Light: Avoiding the Dungeon Effect
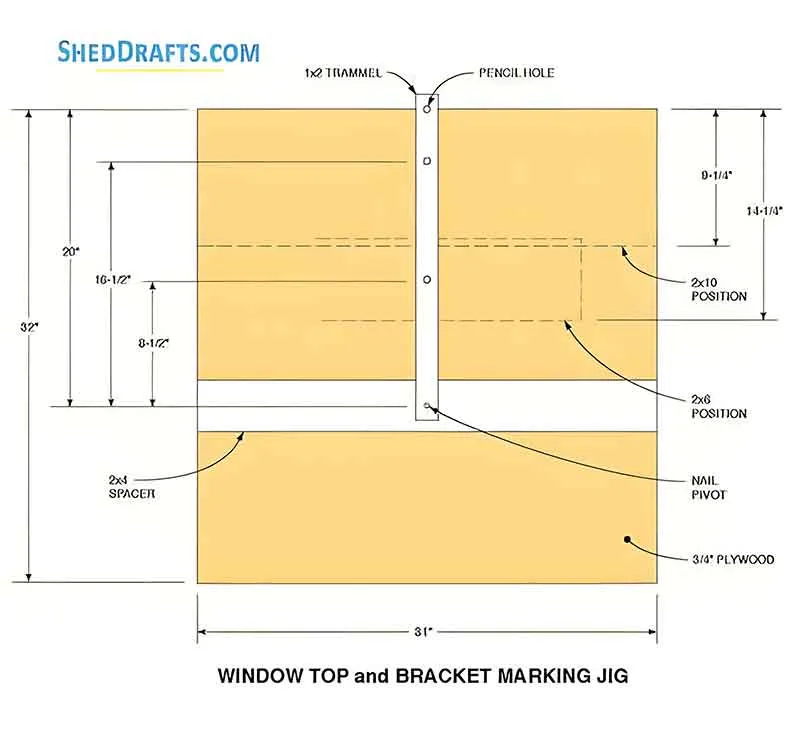
This shed is small enough that it can feel like a dark cave if you don’t plan your lighting. The blueprints show two arched windows. While these look fantastic for curb appeal, they can be a nightmare to trim out if you aren’t comfortable with a jigsaw.
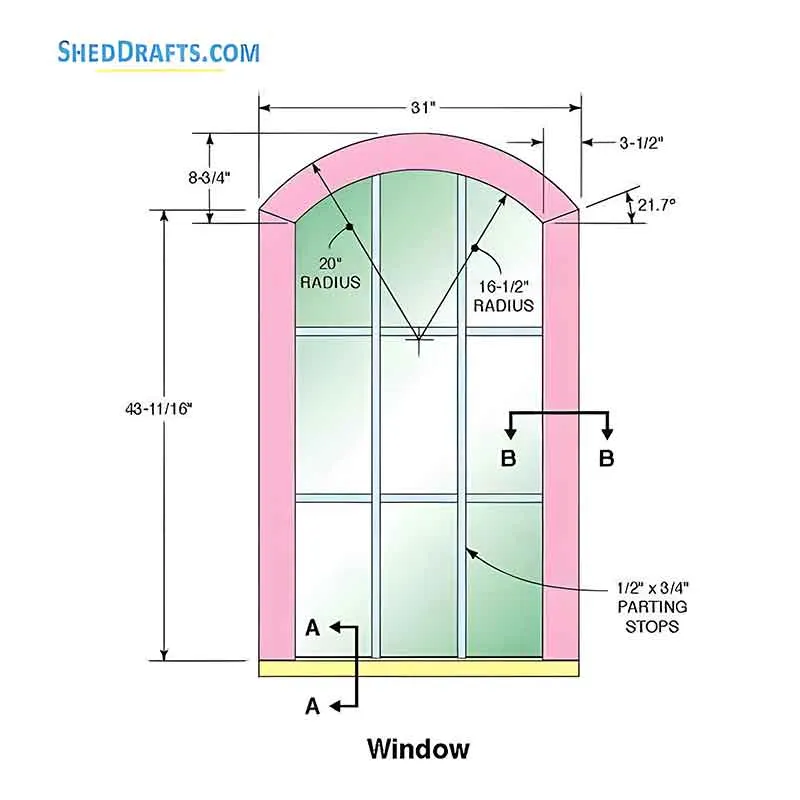
If you’re a first-timer, I recommend pre-hung aluminum shed windows. They come with the flange already attached, so you just cut the hole in the siding, goop it up with high-quality silicone caulk, and screw it in. But here’s the industry secret: Place your windows higher than you think. If you put them at house height, you lose the ability to put a workbench or shelving underneath them. I usually set my windows so the bottom sill is about 40 to 44 inches off the floor.
Glass vs. Polycarbonate
If your shed is near a gravel driveway or where kids play baseball, go with polycarbonate windows (Lexan). It’s 250 times stronger than glass. I once had a client whose mower threw a rock right through a glass shed window. It didn’t just break, it showered his expensive table saw in shards that were a nightmare to clean up.
If you don’t want to install a powered fan, try to get windows that actually open (single-hung). One window on each side creates a cross-breeze that prevents the musty shed smell, which is actually just mold growing in the humidity.
If you want to go green, look for reclaimed windows at a local architectural salvage yard. Just be prepared to spend twice as much time framing the rough opening since old windows are rarely a standard size.
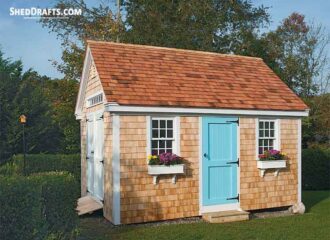
Trim Work: The "Suit and Tie" of Your Shed
Trim is what separates a utility shack from a backyard feature. I always use PVC trim or LP SmartSide trim. Avoid pine 1x4s from the lumber yard. They look great for two months, then they twist, warp, and the knots start bleeding through your white paint.
When you’re installing your corner trim, use the Lap Joint method. One piece of trim should overlap the edge of the other. Always put the lap on the side of the shed that is less visible from the house. This hides the seam from your primary line of sight.
Nailing Too Deep
If you are using a pneumatic nail gun, adjust the depth. You want the head of the nail to be flush with the surface of the trim. If you countersink it deep into the wood or PVC, you’ve created a tiny cup that holds water. Over time, that water will freeze and pop the paint off the nail head.
“Pre-Paint” Strategy
I never paint trim while it’s on the shed. I lay the boards out on sawhorses, give them two coats of high-quality exterior latex, and then install them. This ensures the back of the trim is somewhat sealed and you don’t get those annoying unpainted stripes when the wood shrinks in the winter. You just have to do a few minutes of touch-up on the nail holes later.
Painting and Weatherproofing: The Final Defense
I’ve seen $5,000 sheds rot in five years because the owner used cheap $20-a-gallon paint. For a shed, you want 100% Acrylic Exterior Paint. It’s flexible. Wood moves, and acrylic paint stretches with it. Oil-based paints get brittle and crack, which lets moisture in behind the shell.
Truth About Caulk
Caulk is not a filler for bad carpentry. If you have a 1/2-inch gap, don’t just fill it with caulk; it will fail. Caulk is for the tiny seams where the trim meets the siding. Use a high-quality elastomeric sealant (like Big Stretch or Lexel). Standard painter’s caulk is for baseboards inside your house, as it will crumble outside in the sun.
How do you know if you’ve weather-sealed correctly? After the first big rainstorm, go into the shed with a single sheet of white printer paper. Rub it against the inside of the door frame, the window sills, and the corners. If the paper comes back damp or stained, you have a micro-leak that will turn into rot in three years. Fix it now.
Regulatory Note And The Angry Neighbor Factor
Before you drive the first stake into the ground, call your local building department. In many US jurisdictions, an 8×12 (96 sq. ft.) is the magic number that doesn’t require a building permit, but it still requires a zoning permit.
Setbacks are the killer. Your town might say the shed has to be 5 feet from the property line. If you build it 4 feet away, and your neighbor complains, the town can legally force you to move it. Moving a finished 8×12 shed is a $1,000 job involving a mule machine and a flatbed trailer.
Talk to your neighbors before you build. Tell them you’re building a high-end garden structure (don’t call it a shed, because “shed” sounds like a rusted tin box). Show them the blueprints. If they know it’s going to look nice, they’re 90% less likely to call the city on you.
Build-Ready List Of Materials
Foundation & Floor
4×4 Pressure-Treated Skids (12′ long): 3 pieces
2×6 Pressure-Treated Rim Joists (12′ long): 2 pieces
2×6 Pressure-Treated Floor Joists (8′ long): 10 pieces (for 16″ on-center spacing)
3/4″ Tongue & Groove Plywood Sheets (4×8): 3 sheets
Gravel/Crushed Stone: Approx. 2 cubic yards (for the base)
Concrete Deck Blocks: 9 to 12 blocks (optional, depending on your site)
Wall & Roof Framing (Standard Lumber)
2×4 Lumber (8′ studs): 45 pieces (includes studs, plates, and blocking)
2×4 Lumber (12′ plates): 6 pieces (for top/bottom plates on the long walls)
2×4 Lumber (for Rafters): 20 pieces (cut to approx. 6′ – 7′ lengths)
2×6 Lumber (12′ long): 1 piece (for the Roof Ridge Board)
2×6 or 2×8 Lumber (8′ long): 2 pieces (to build headers for the door and windows)
Exterior Sheathing & Trim
4×8 Siding Panels (T1-11 or LP SmartSide): 11 sheets
1/2″ OSB or Plywood Roof Sheathing (4×8): 6 sheets
1×4 Trim Boards (8′ long): 12 pieces (for corners and door/window casing)
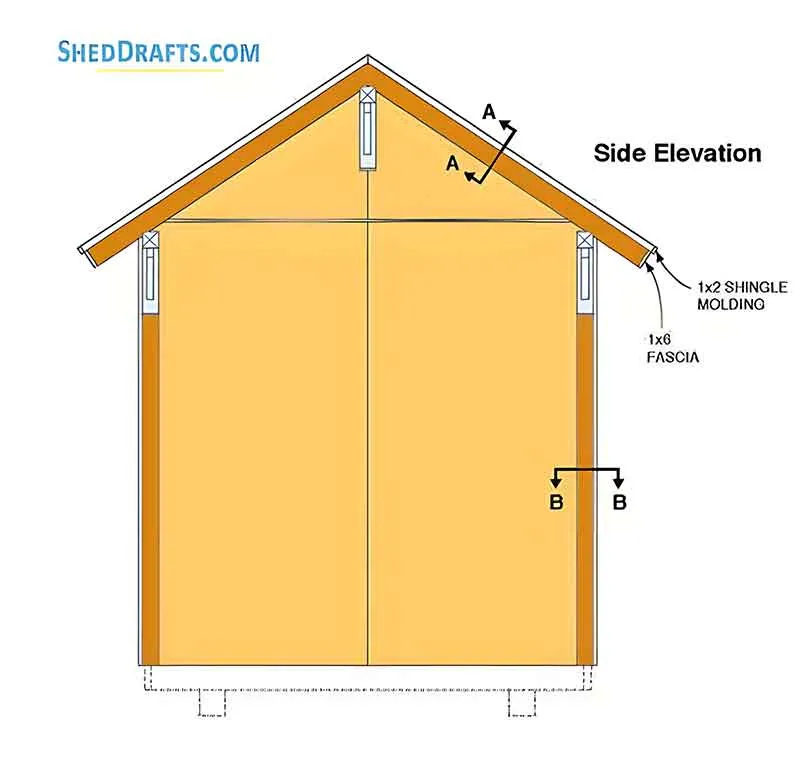
1×6 Fascia Boards (12′ and 8′ lengths): 4 pieces total
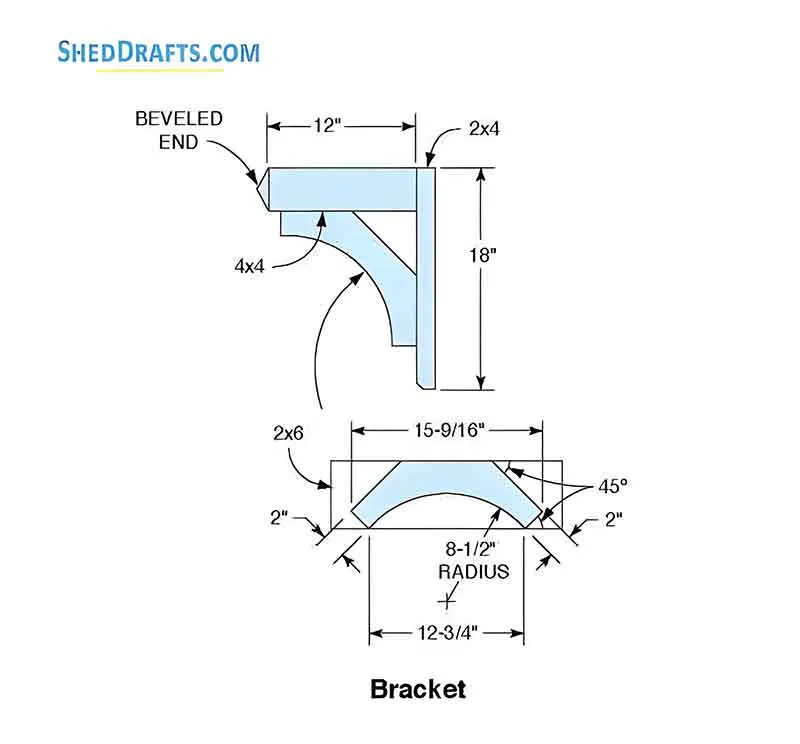
2×10 or 2×12 Scraps: For the custom scroll-cut brackets
Roofing, Windows & Doors
Arched Top Windows: 2 units (custom or DIY framed)
Center Door: 1 unit (32″ or 36″ width recommended)
Drip Edge: 40 linear feet
Roofing Underlayment: 1 roll
Asphalt Shingles: 5 bundles
Heavy-Duty Door Hinges: 3 pieces
Locking Door Handle/Latch: 1 set
Hardware & Fasteners
3.5″ Framing Nails: 1 box (10 lbs)
2″ Siding/Finish Nails: 1 box (5 lbs)
1.25″ Galvanized Roofing Nails: 1 box (5 lbs)
Hurricane Ties (RT20 or similar): 20 pieces (to secure rafters to walls)
Exterior Caulk: 3-4 tubes
Exterior Paint/Stain: 2 gallons


Framing-to-Finish Roadmap: DIY Guides For Every Step of The Build


