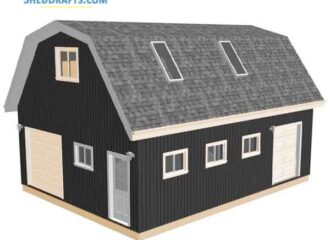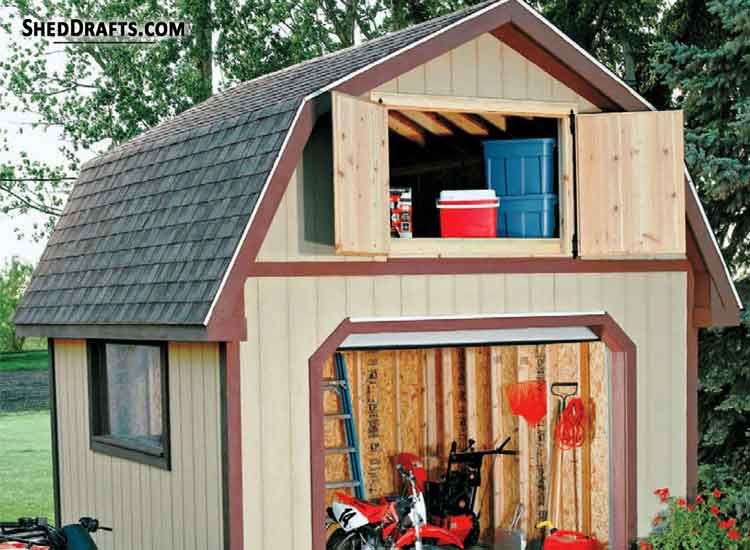
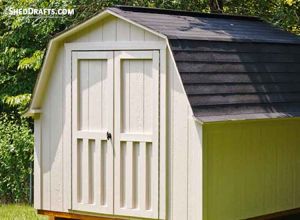
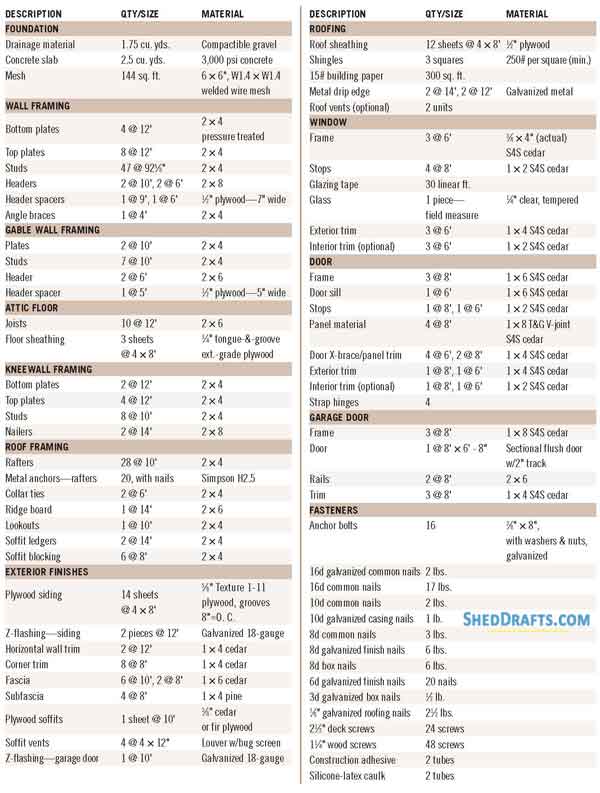
Here are the plans for crafting a classic 12 x 12-foot gambrel barn-style storage shed with a loft.
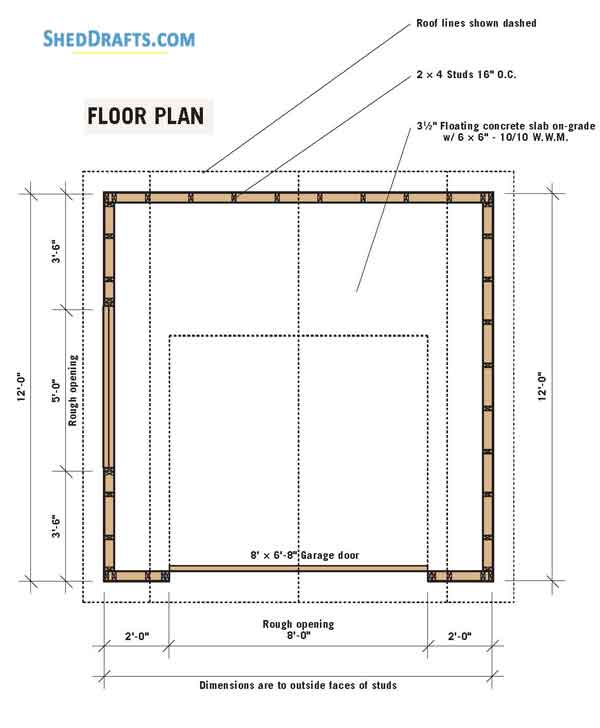
The building has a poured concrete slab base to support the weight of heavy equipment or vehicles that may be stored inside.
The attic beneath the rafters provides additional space, and the overhead door allows natural lighting.
Ensure the structure will accommodate inside the land section you’ve picked and also a 12 inch clearance around the shed.
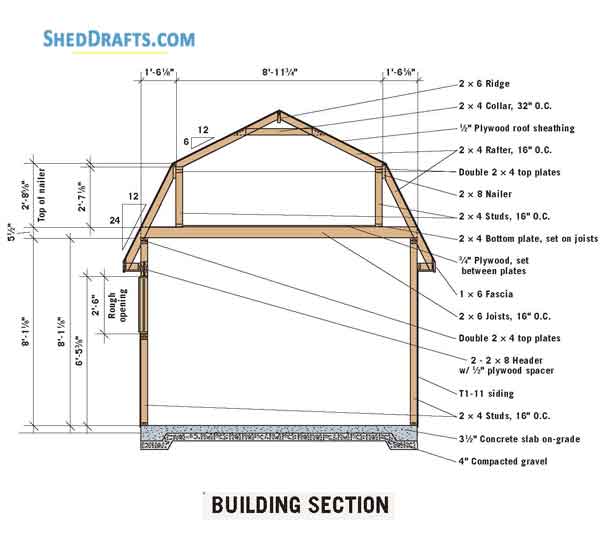
12×12 Timber Gambrel Shed Architecture Plans Explaining Elevations And Building Section

Floor And Walls
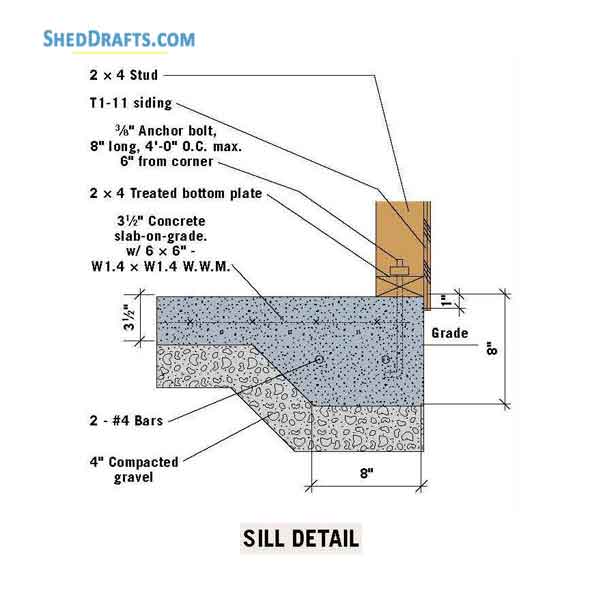
- Construct a 12-foot by 12-foot concrete slab foundation as per our guide.
- Next, we install J bolts that stick 2.5 inches out of the concrete at a distance of 1.5 inches from the outer perimeter.
- Four bolts will be installed at the four corners and one at every 2 feet interval along the edges.
- Cure the concrete slab for at least 72 hours before starting work on the shed.
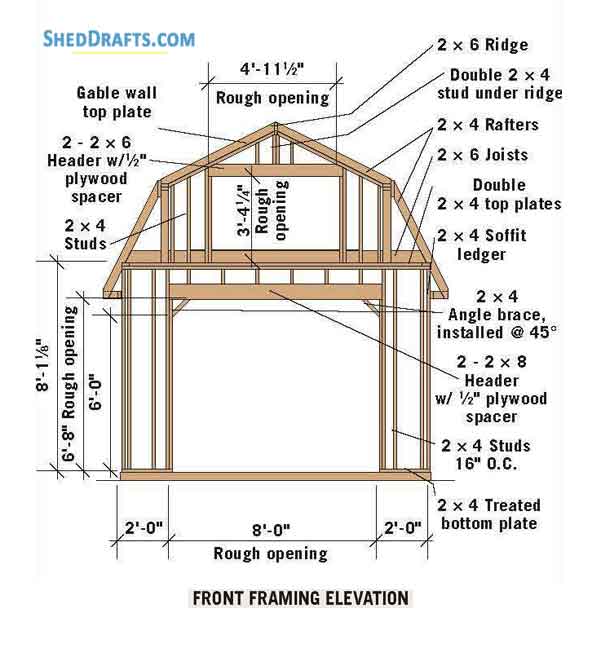
- Craft headers using 2×8 stock for the door and window.
- Build and install the walls as shown in elevation diagrams.
- Fasten the bottom of the wall plates to the concrete floor by securing nuts and washers to the J-bolts.
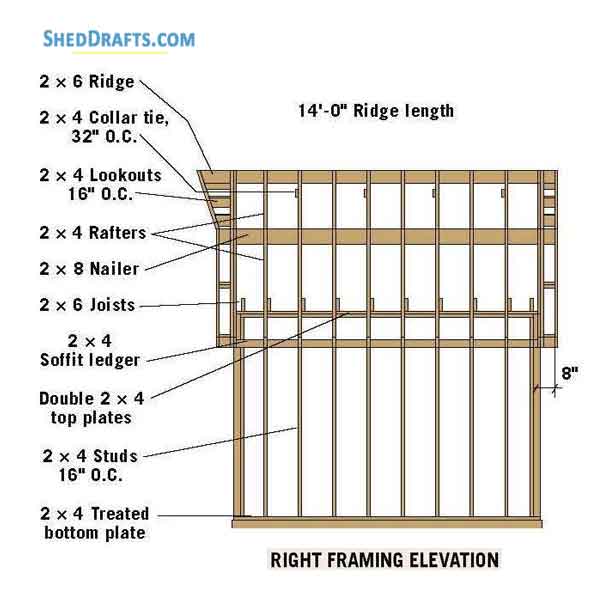
- Fasten two plates on the upper part of each wall during framing.
Barn-Style Shed Framing Blueprints Showing Foundation Design And Floor Framing
12×12 Storage Shed Crafting Diagrams For Erecting Wall Frame

Recommended:
8×8 Gambrel Roof Shed Diagrams Schematics
Attic Floor And Knee Walls
- To craft the floor for the attic, we will use 10 joists.
- Construct the floor joist using 12-foot-long 2×6 lumber.
- Cut the upper corner of each joist at a 45-degree angle, as shown in the framing schematic.
- Secure the attic joists to the walls with galvanized nails, keeping a 3.5-inch space for the wall studs.
- Build the knee walls for the attic using 11.5-foot-long bottom plates and 12-foot-long top plates.
- Craft 4 end studs and 20 long studs to frame the walls.
- Install the plates such that the joists of the attic are directly beneath the studs.
- Brace the joists temporarily, then install plywood sheeting over the attic floor.
- The sheets should be flush with the outermost joists and at right angles to other joists.
- Use 8d galvanized nails to secure the plywood floor at 6-inch intervals over the joists.
Yard Shed With Loft Building Schematics To Assemble Roof Frame And Rafter Pattern
Installing Rafters And Soffit Ledgers
- Trace the layout of the rafter over the upper and outer sides of the nailers, as seen in the framing diagrams.
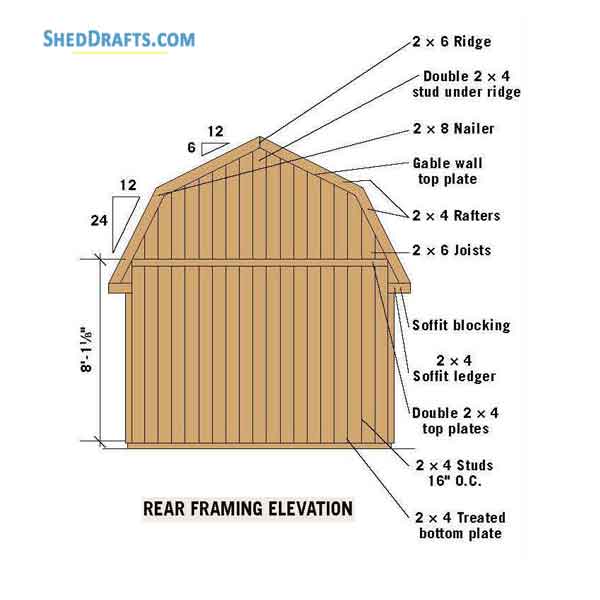
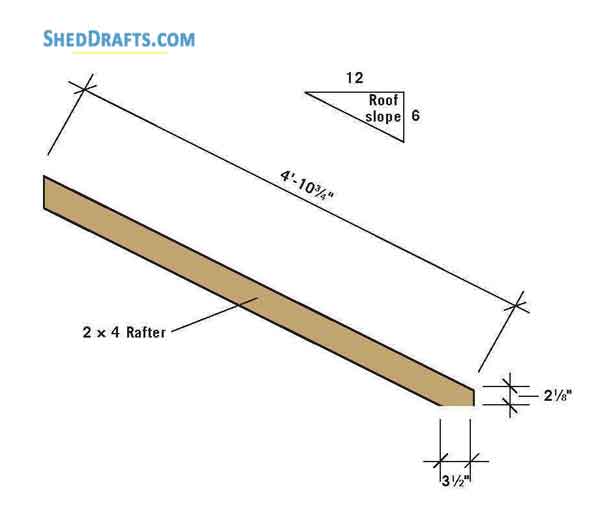
- Create a 14-foot-long ridge board using 2×6 stock.
- Miter it at a 16-degree angle in the front and trace the positions of the rafters over the ridge board using a pencil.
- Common rafters will be set at eight inches from the back of the ridge and sixteen inches from the front.
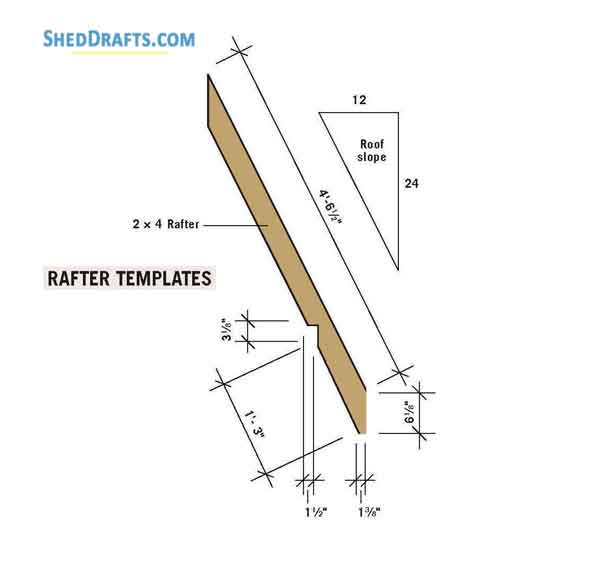
- Build two template rafters first for crafting the upper and lower rafters.
- After double-checking the measurements, construct 20 upper and lower rafters using the templates.
- Six upper and eight lower rafters will be needed to install the gable overhangs.
- Attach the rafters and secure the joints with framing connectors.
- Reinforce the attic joists by nailing to the sides of the rafters.
- Build four 34-inch long collar ties from 2×4 stock.
- Miter their ends and attach them amongst the top rafters, as shown in the blueprints.
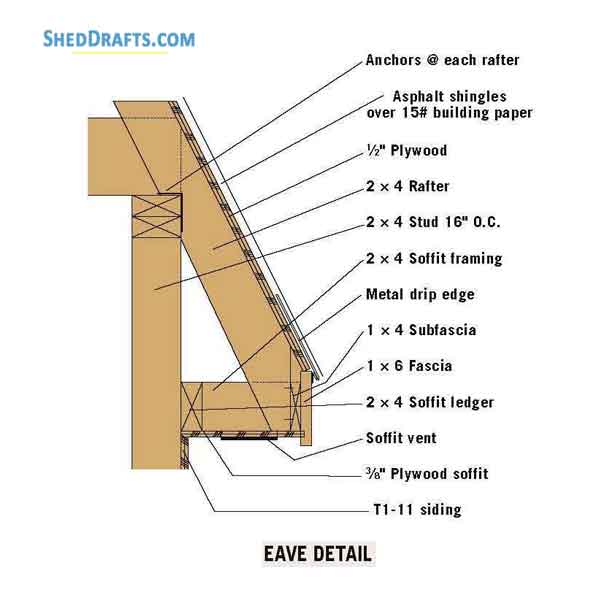
- Trace a line with chalk, keeping it level with the rafter ends over the studs of the sidewall.
- Build 13′ 4″ long soffit ledgers from 2×4 stock and install them over these lines.
- Ledger ends should overhang the wall by about 8 inches.
- Install blocks made from 2×4 wood between the rafter end and ledger by referring to the detailed eave drawing.
Gable Overhangs, Gable Walls And Attic Door Frame
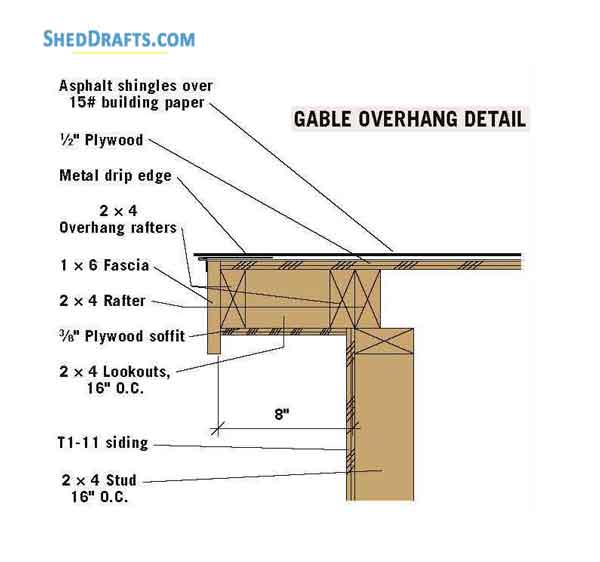
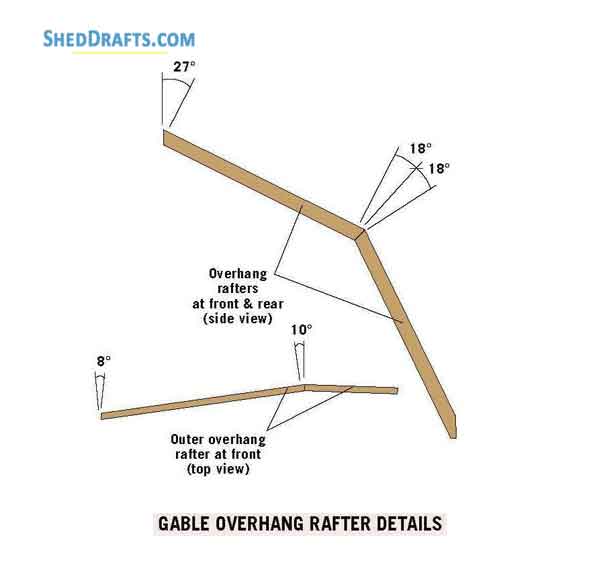
- Use 2×4 stock to create twelve 5-inch long lookouts for attaching to the rafters that overhang.
- Fasten the common rafter to the overhang rafters with 10d nails.
- Build and attach two angled rafters and lookouts for each rafter, as shown in the gable overhang blueprint.
- Next, make top plates for the gable walls and secure them perfectly flat with the outer rafters between the knee walls and ridge.
- Trace the layout for studs over the gable walls and then craft and install the studs.
- Jack studs for the door are 40 inches long.
- The door header will be 62.5 inches long and made with 2×6 lumber.
- Frame the door opening with the header and studs.
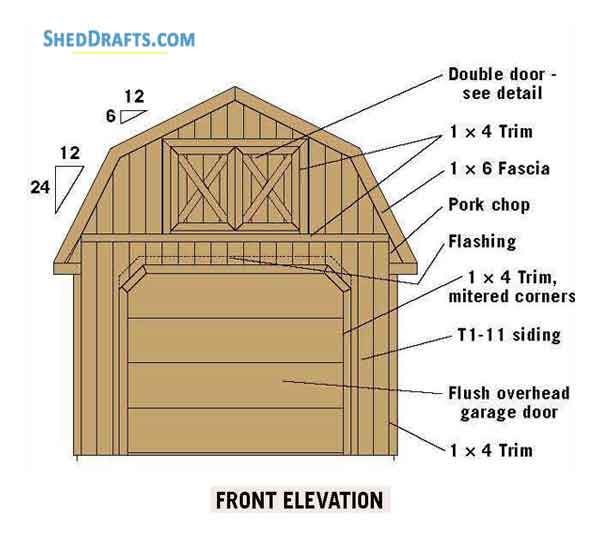
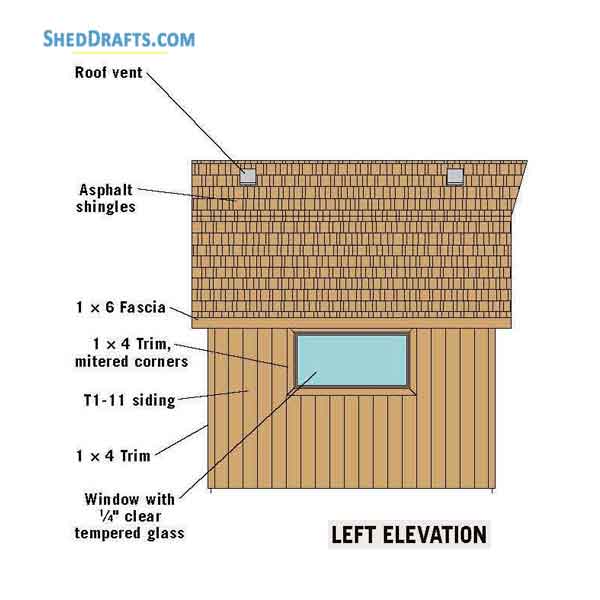
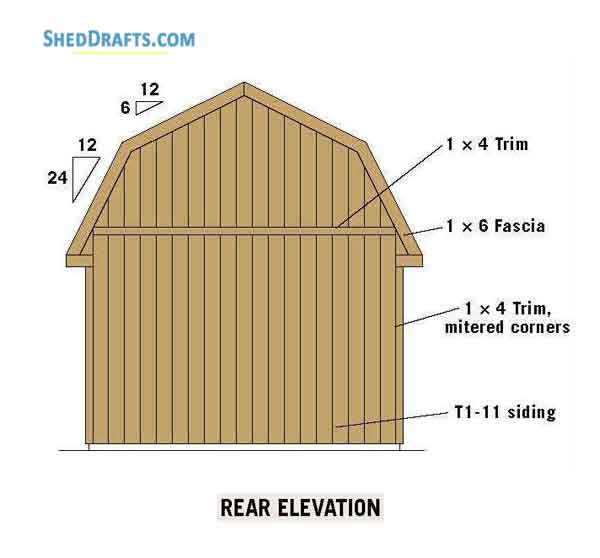
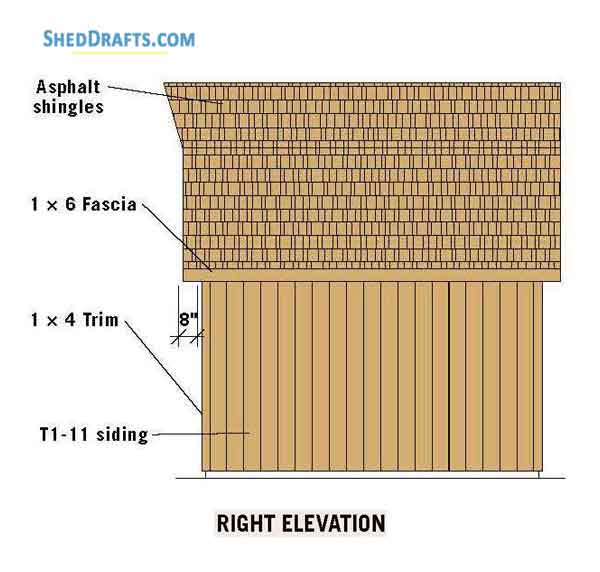
Siding And Fascia
- Cover the walls with siding and add flashing along the upper edges.
- Attach subfascia long the eaves made from 1×4 stock.
- Secure fascia level with the roof sheathing along the gable ends.
- Nail soffit panels between the walls and fascia.
- Next, install the soffit vents.
- Now, fasten the roof sheathing starting at the lower end.
- Attach drip edges over the gable ends and eaves.
- Attach trim made from 1×4 lumber to cover the back wall’s Z-flashing.
- Cover the corners of the walls with trim.
12 Feet By 12 Feet Wooden Shed Creation Drafts For Erecting Doors And Windows
Garage Door and Window
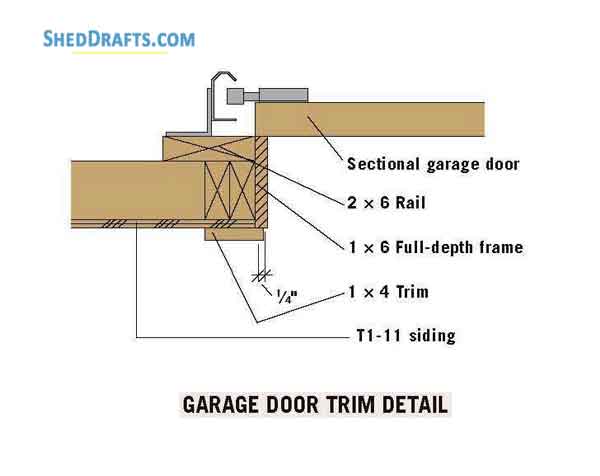
- Attach 2×6 rails for the garage door.
- Build trim with 1×8 stock to cover the siding and rails for the garage door.
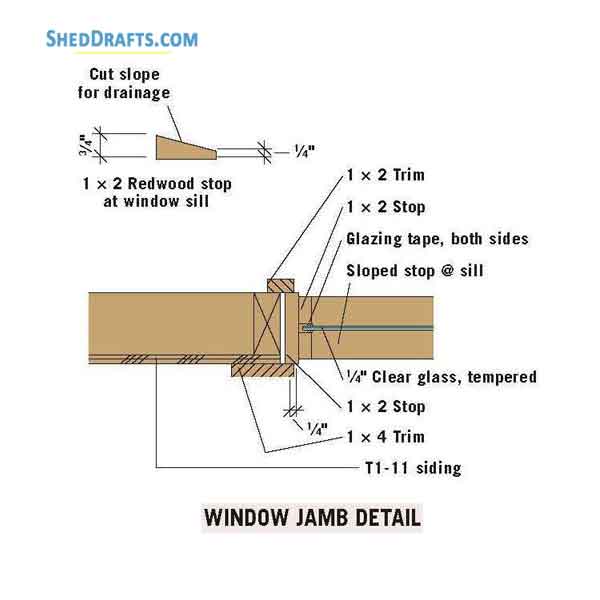
- Construct the window frame half an inch smaller than the opening in the wall.
- Fasten the frame using galvanized nails.
- Then, install the glass or plastic panel for the window.
- Make stop pieces using 1×2 wood to secure the frame.
- Seal the frame perimeter with glazing and make it waterproof.
- Lastly, attach the window trim.
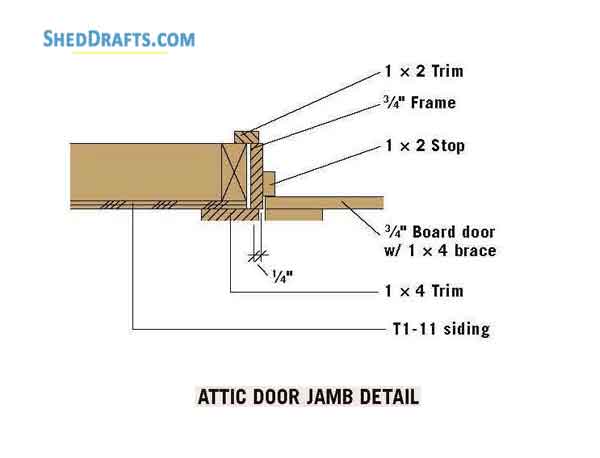
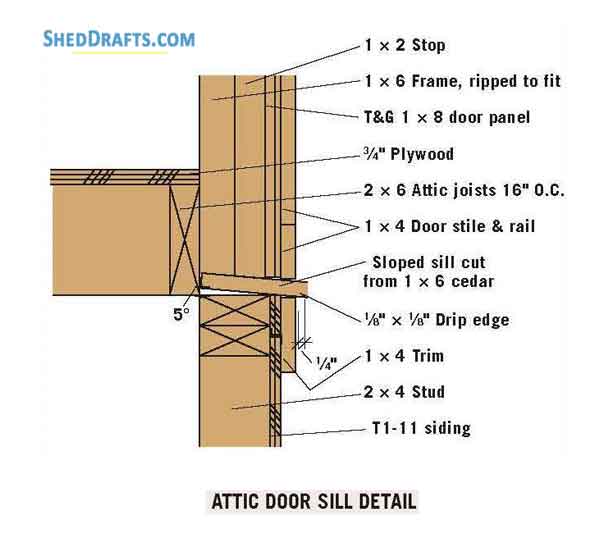
- Build side and head jambs for the attic door frame using 1×6 lumber.
- Create the sill and fasten it to the head and side jambs.
- Now, install the door frame into the rough opening with casing nails and shims made from wood pieces or shingles for support.
- Attach stops into the upper part and sides of the frame.
- Each attic door is built from 1×8 panels cut to fit the frame.
- Two hinges are fastened to each door, and then the trim is attached around the frame.
- Paint the shed and doors in your favorite colors.