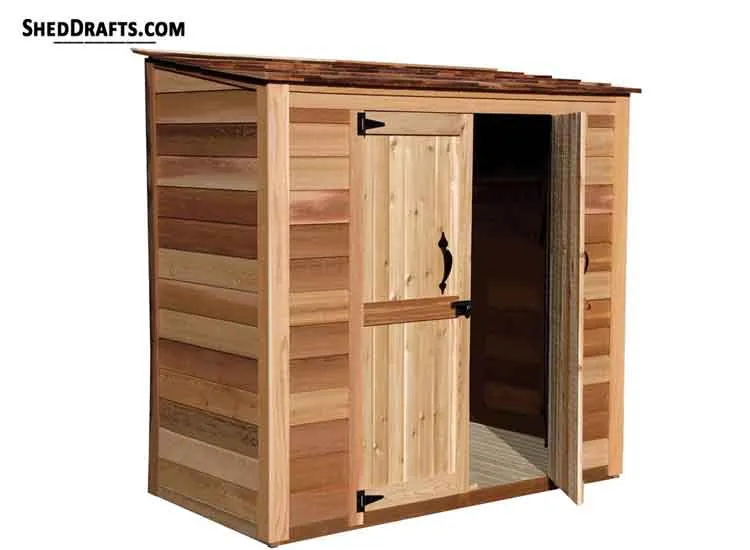
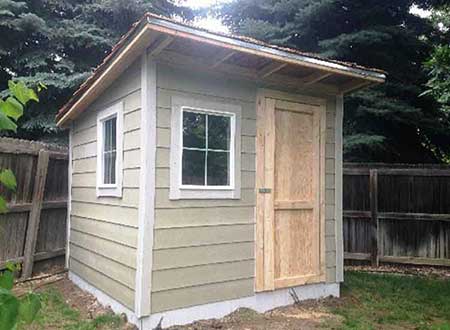
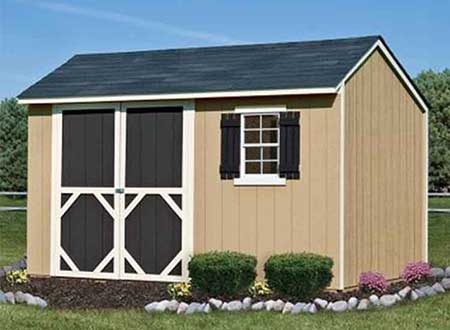
4x8 Lean To Shed Plans With Building Guide & Material List
Most people start looking for 4×8 plans because they have a narrow strip of dead space between their house and the fence. It’s the classic suburban dilemma.
Unlike a gable roof that requires a ridge board and perfectly mirrored rafters, the lean-to is a single-slope system. It uses less lumber and sheds water in one predictable direction.
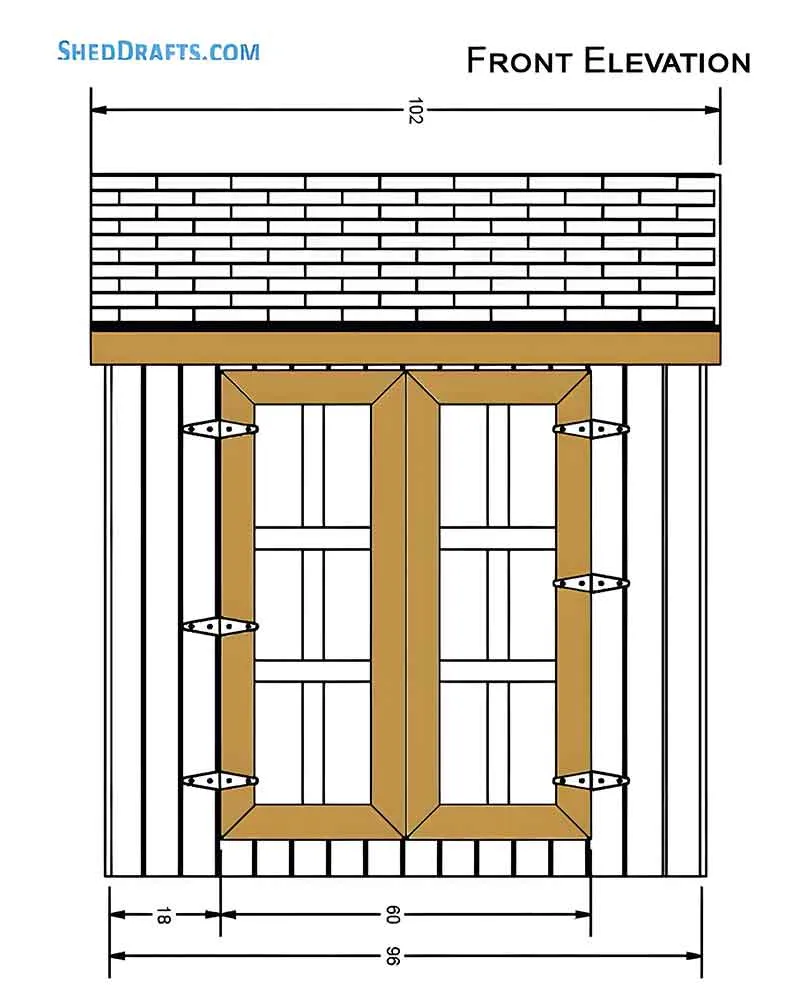
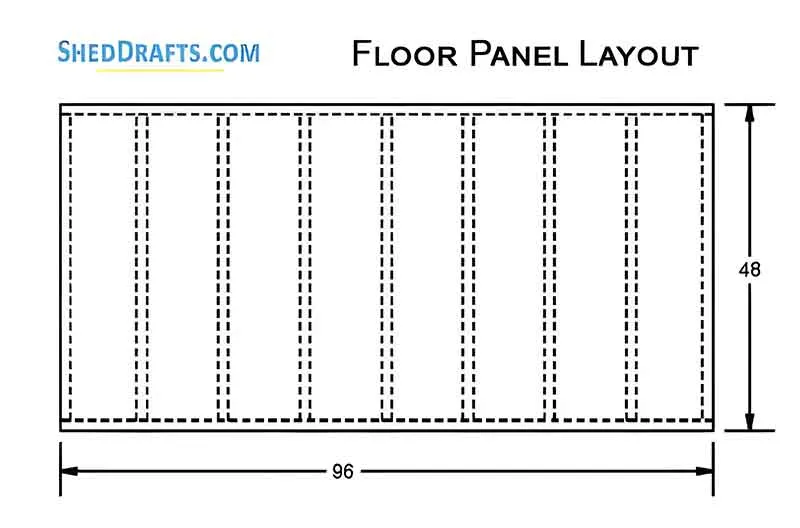
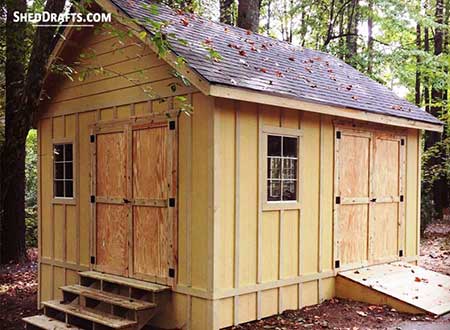
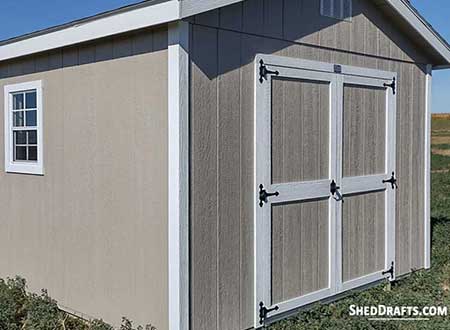
The beauty of the 4×8 is that it fits standard sheet goods perfectly. Plywood comes in 4×8 sheets. Siding comes in 4×8 sheets. If you’re smart about your layout, you can minimize waste to almost zero. In this design, we’re looking at a 90-inch high-side wall with a 60-inch wide door opening. This isn’t just a box; it’s a calculated piece of backyard engineering.
Difficulty: Intermediate (due to roof compound cuts and leveling).
Timeframe: 2–3 weekends for a solo builder; 1 long weekend with a savvy helper.
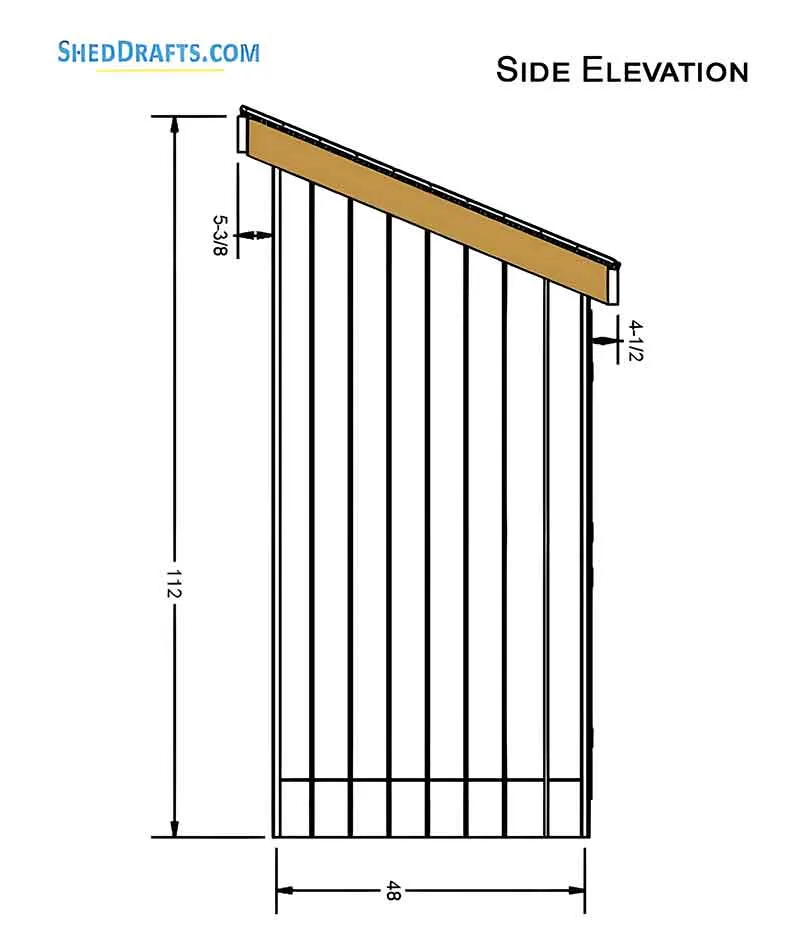
Key Specs: 32 sq. ft. footprint, 42-inch deep interior, 90-inch front height tapering to ~78 inches.
Primary Material: Pressure-treated 2×4 framing, 4×4 skids, and T1-11 or LP SmartSide siding.
I remember my first pro shed build. I tried to over-engineer a 4×8 with a complex saltbox roof because I thought it looked cooler. I spent three hours just trying to get the birdsmouth cuts to sit flush on a wall that was slightly out of plumb. By the time I finished, I had wasted four rafters and a gallon of sweat. I realized then that for a footprint this size, the lean-to is king. It’s honest. It doesn’t pretend to be a miniature house; it’s a high-functioning locker for your mower and those bags of mulch you’ve been meaning to spread since last April.
A 4×8 shed is actually quite small once you put 2×4 walls in it. Your actual interior floor space is closer to 3’ 5” by 7’ 5”. If you plan on storing a riding mower, measure it three times before you saw a single board. I’ve seen guys finish a beautiful build only to realize their mower deck is 48 inches wide and the door opening, after trim, is 46 inches.
Site Prep: The Sins of the Foundation are Visited Upon the Roof
I’ve seen more sheds fail because of ground heave than because of poor carpentry. You cannot just throw some pressure-treated wood on the grass and call it a day. Even ground-contact rated lumber will eventually succumb to the rot if it’s sitting in a swamp.
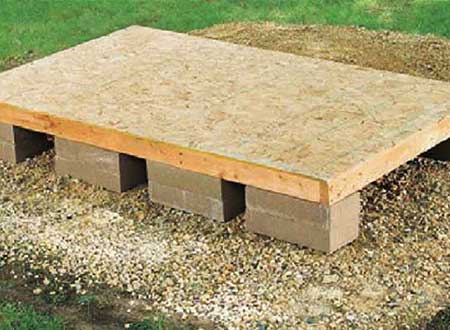
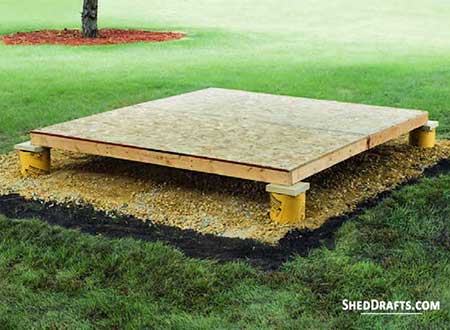
For a 4×8, you have three real options: a concrete pad (overkill for most), a gravel bed with pressure-treated skids (the gold standard), or deck blocks. I’m a gravel bed man myself. I dig out 4 to 6 inches of topsoil, frame the area with 4×4 timbers, and fill it with ¾-inch crushed stone (not pea gravel, pea gravel moves like marbles; you want crushed stone that locks).
When you lay your 4×4 skids down on that gravel, use a 6-foot level or a laser level.
I once rushed a foundation for a client in Seattle. I thought, “Eh, it’s an inch off, I’ll shim the floor joists.” Halfway through the siding, I realized the whole structure was racked. The doors would swing open on their own like a ghost lived there, and the roof shingles looked like a topographical map. I had to jack up the entire shed, mid-build, to shove extra gravel under the skids. It was dangerous, embarrassing, and took twice as long as just doing it right the first time.
Also, do NOT use untreated 4×4s for your skids, even if you plan on painting them with water sealer. Water sealer is a joke compared to the chemical infusion of pressure-treating. Within three years, the bottom of your shed will have the structural integrity of a wet biscuit. And stay away from deck blocks if you live in an area with high frost heave unless you’re digging down to the frost line. A floating gravel bed is much more forgiving.
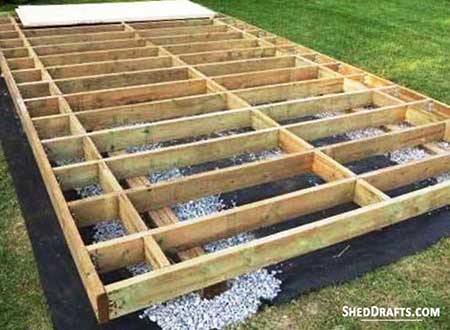
Framing the Floor As A Concrete-Feel Platform
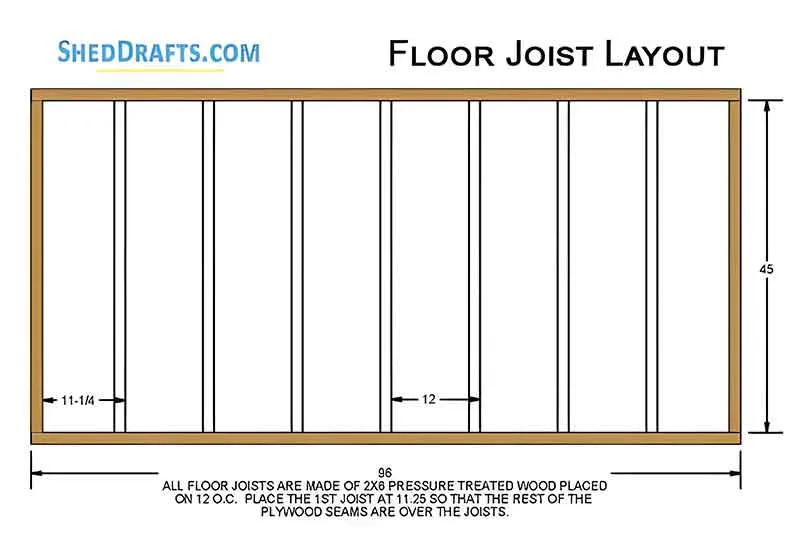
The blueprints show a floor joist layout with 16-inch on-center (OC) spacing. For a 4×8, some people argue for 24-inch spacing to save twenty bucks. Don’t do it. 16-inch OC gives the floor a stiff feel. When you’re walking in there with a heavy snowblower or a stack of firewood, you don’t want the plywood flexing under your boots.
We use 2×4 pressure-treated joists. You’ll have two rim joists at 96 inches and your interior joists cut to 45 inches (assuming a 48-inch total depth minus the 3-inch thickness of the two rim joists).
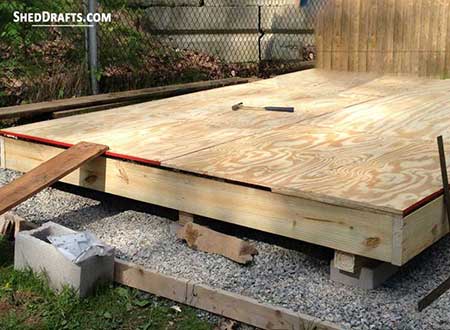
Square the floor frame by measuring the diagonals. If the distance from the back-left corner to the front-right corner is exactly the same as the back-right to the front-left, you’re golden. If they’re off by even half an inch, kick the corners until they match. Once it’s square, nail your ¾-inch pressure-treated plywood down.
Drip Edge Secret
When you install your floor plywood, let it overhang the framing by about 1/8th of an inch on all sides. Why? It prevents water from wicking back under the plywood and sitting on top of your floor joists. It’s a tiny detail that adds five years to the life of the floor.
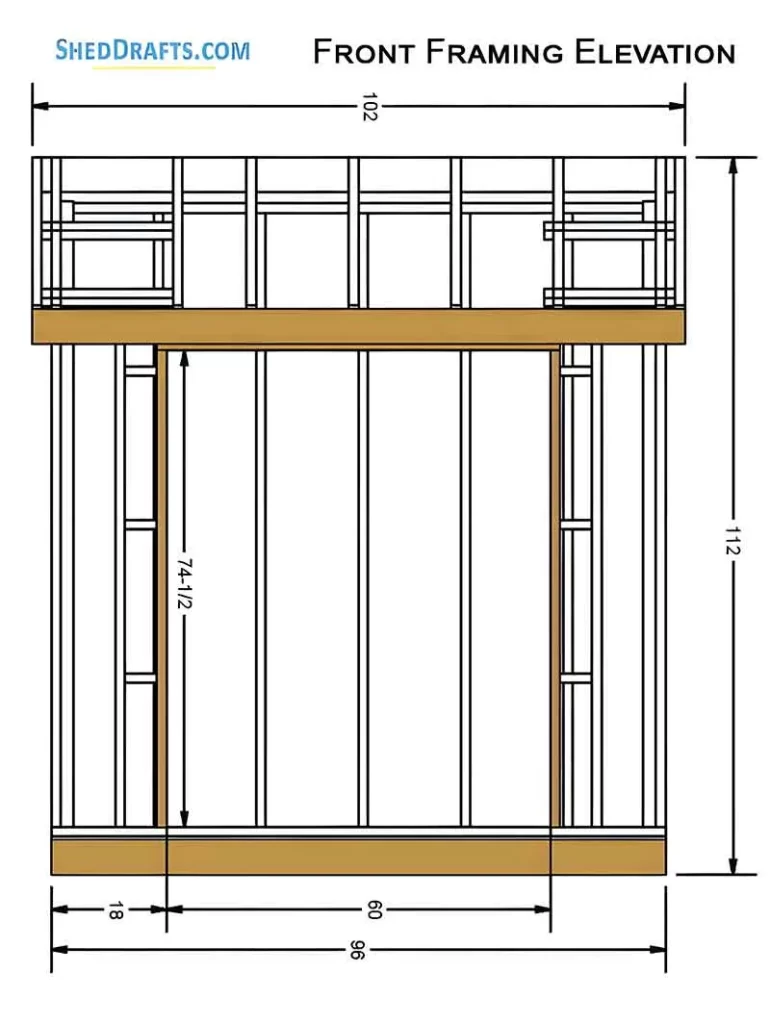
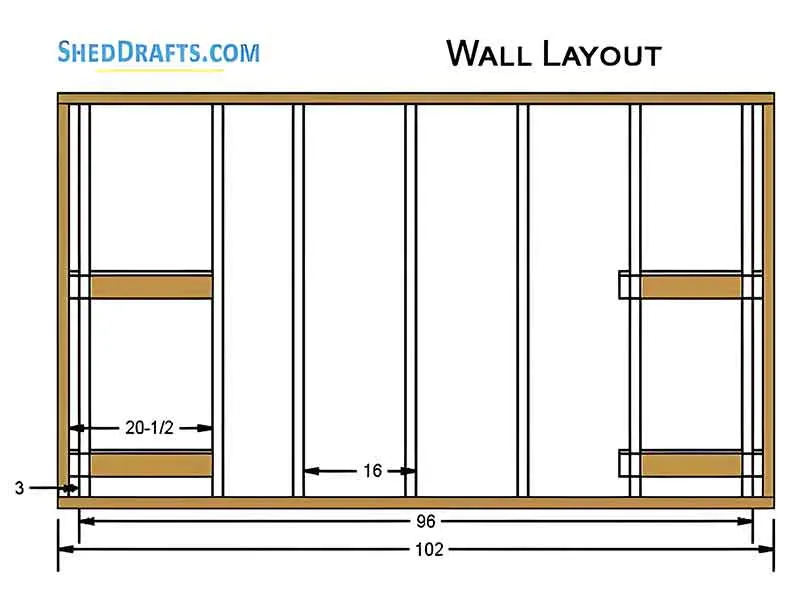
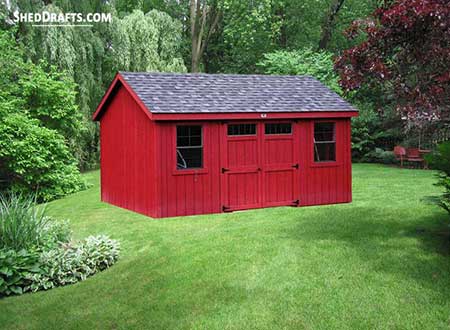
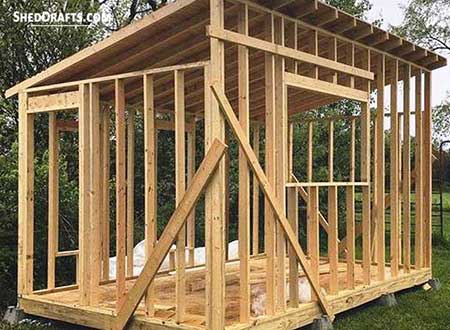
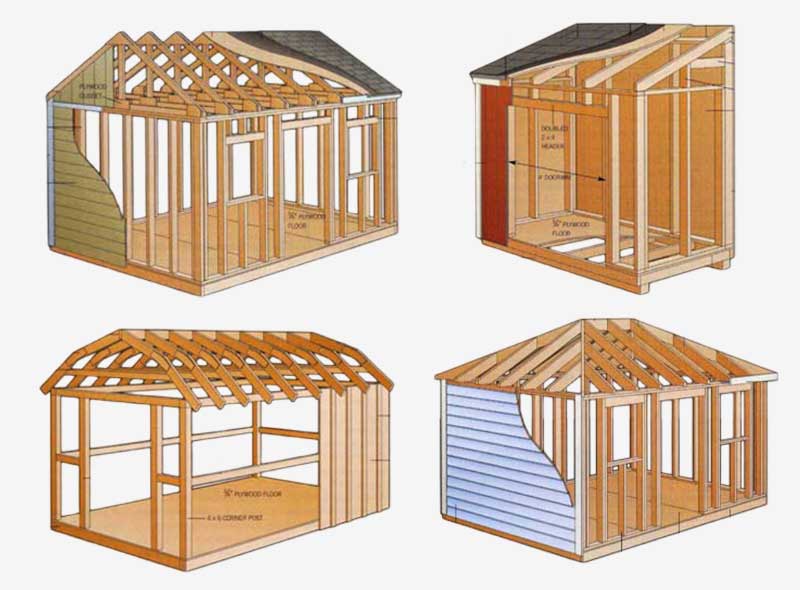
Wall Framing To Manage the Lean-To Slope
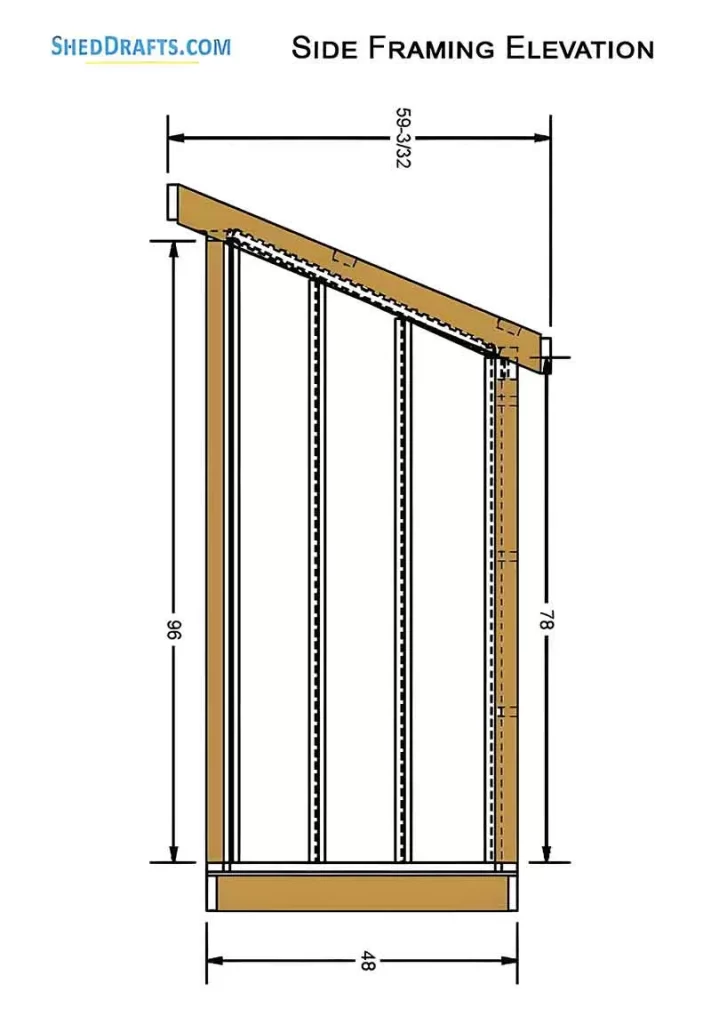
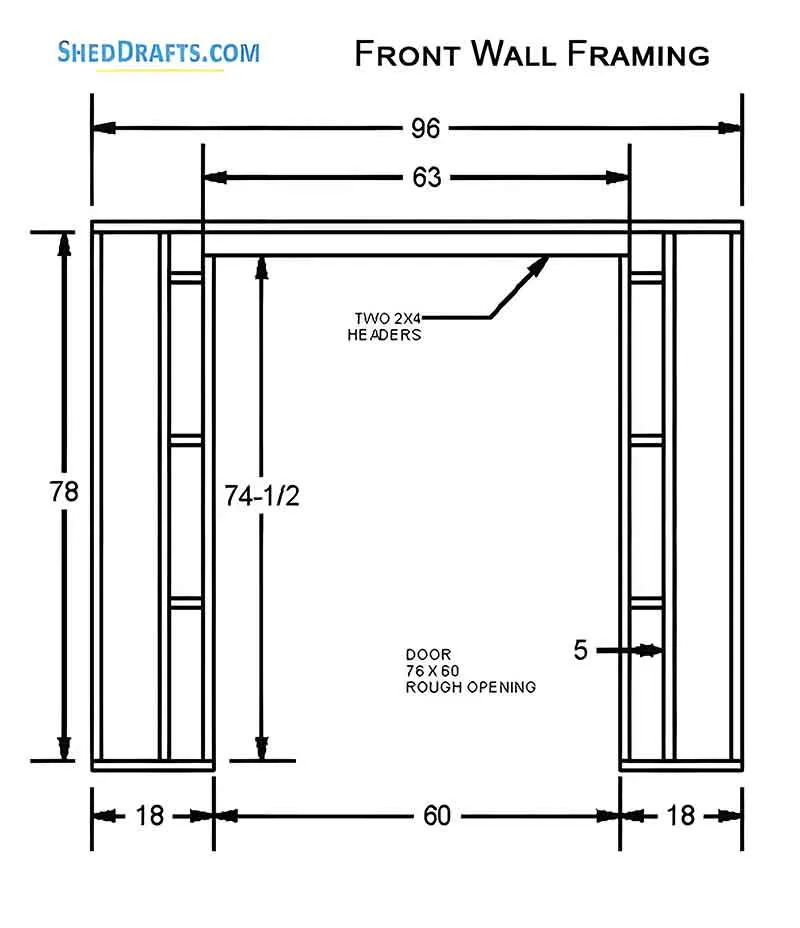
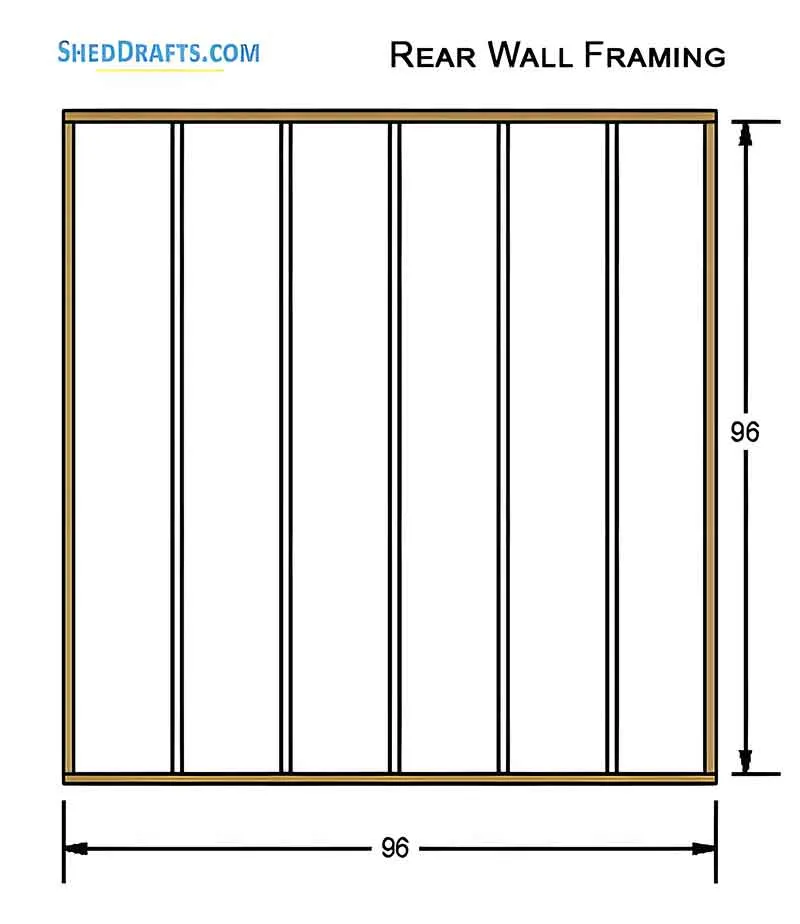
Looking at the Front Wall Framing and Rear Wall Framing elevations in the blueprints, you’ll notice the height differential. The back wall is typically shorter (around 78 inches) and the front wall is taller (90 inches). This creates that signature lean-to pitch.
The front wall is the most complex because it houses the door header. Since this isn’t a load-bearing wall in the traditional sense (the rafters carry the load to the front and back), people get lazy with the header. Use a double 2×4 or 2×6 header anyway. It prevents the door frame from sagging over time. If that header sags even 1/4 inch, your double doors will start sticking in the middle.
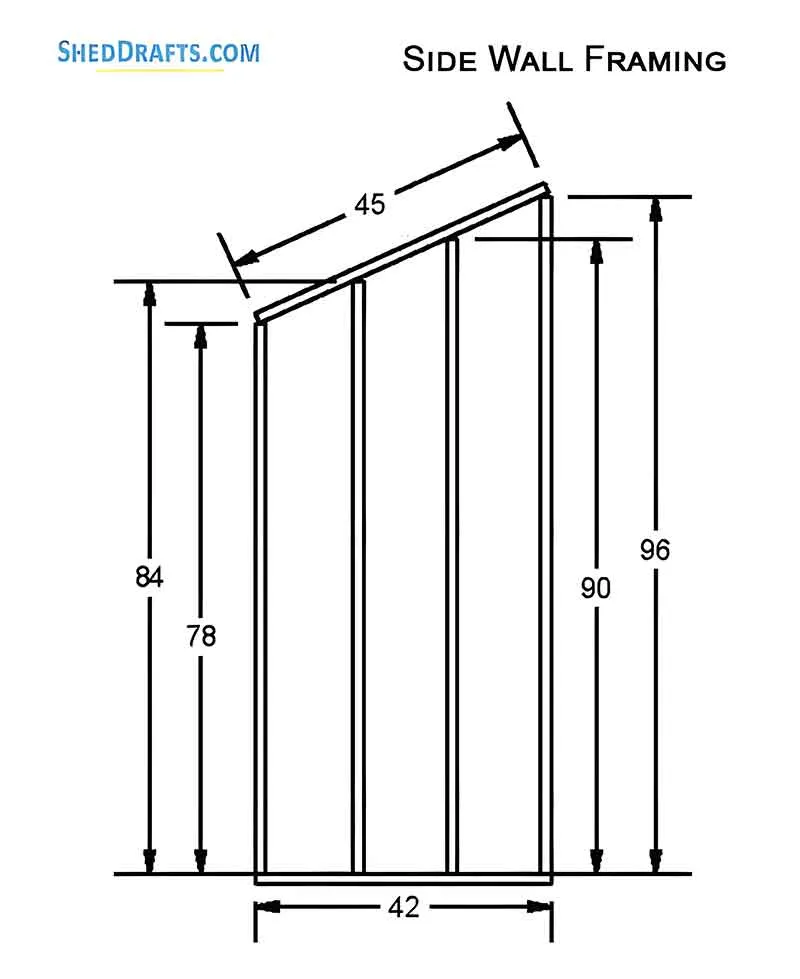
For the side walls, you’re looking at angled top plates or stepped studs. The Side Wall Framing detail shows where the studs are cut at different heights to follow the roofline.
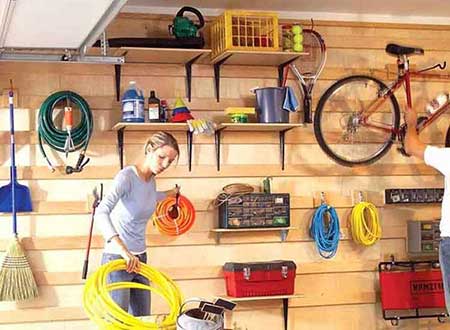
In shed building, we often use a California Corner (or a three-stud corner). This allows you to have a solid nailing surface for your interior finish (if you ever add pegboard) while still giving you a rock-solid connection for your exterior siding. It’s a mark of a builder who isn’t just slapping things together.
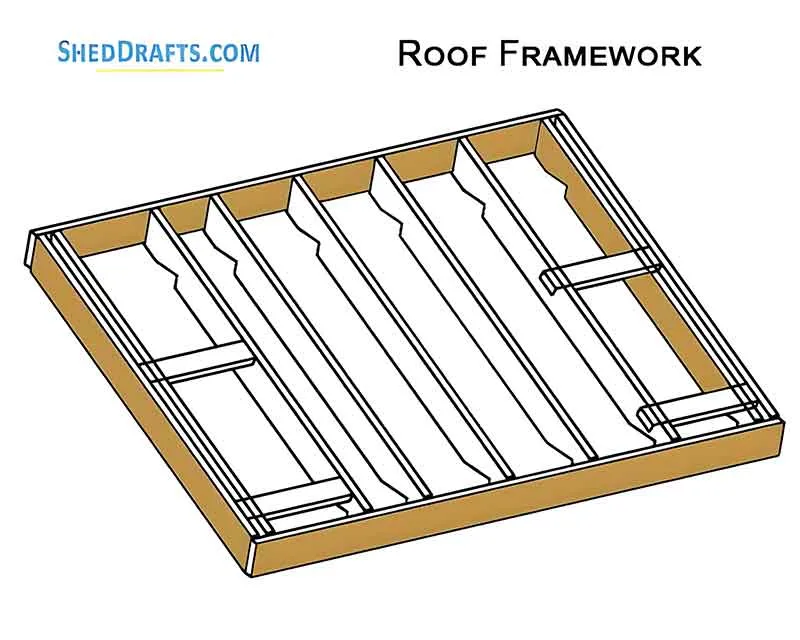
Rafters and the Birdsmouth Mystery
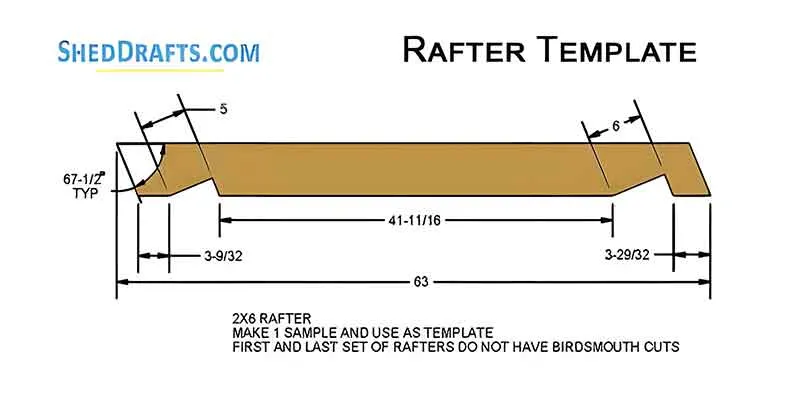
The Rafter Template is the soul of the shed. A rafter isn’t just a board laid across the top; it needs a birdsmouth cut, a triangular notch that allows the rafter to sit flat on the top plates of the walls.
If you just lay a 2×4 across the walls, you’re only touching a tiny corner of the wood. A birdsmouth cut increases the surface area of the connection, making the roof much more stable against wind uplift.
How to calculate the pitch: For a 4-foot span with a 12-inch drop, you’re looking at a 3/12 pitch. This is standard and allows for asphalt shingles or metal roofing.
The “Ghost” Rafter
Beginners often forget to account for the thickness of the siding when cutting rafters. If your rafters are exactly 48 inches long, you’ll have zero overhang. You want at least a 6-inch eave or overhang on the front and back. This keeps water from running directly down your siding and rotting out your door trim. I always aim for a tail on my rafters.
Siding and Sheathing: The Protective Skin
For a 4×8 lean-to, T1-11 (textured plywood with vertical grooves) is the classic choice. It’s structural, meaning it acts as both the skin and the bracing. If you use T1-11, you don’t necessarily need diagonal bracing in your walls.
However, if you want this shed to last 30 years, look into LP SmartSide. It’s an engineered wood product that is treated with zinc borate to resist termites and fungal decay. It comes pre-primed and holds paint significantly better than raw T1-11.
Lateral Shear
Why do we nail siding every 6 inches on the edges and 12 inches in the field (middle)? It’s for lateral shear. Your shed is essentially a series of rectangles. Rectangles like to turn into parallelograms (racking). The siding acts as a giant gusset plate that locks the shed into a square state. Without proper nailing, a heavy wind load can literally tilt your shed over.
Start your siding at the bottom, overlapping the floor framing by about 1 inch. This creates a drip so water doesn’t seep into the joint where the wall meets the floor.
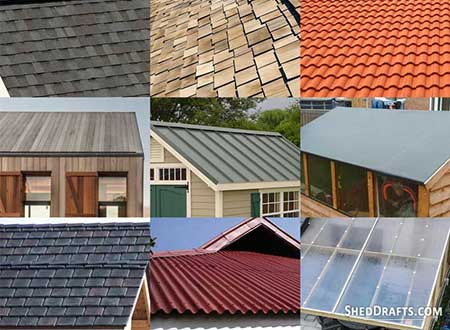
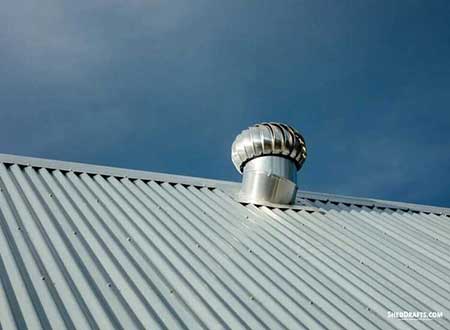
The Roof: Shingles vs. Metal
You’ve got your rafters up and your OSB or plywood roof decking nailed down. Now, do you go with traditional asphalt shingles or a metal roof?
Asphalt Shingles: Cheap, easy to install, but they hold heat and can be heavy. They require underlayment (felt paper or synthetic).
Metal Roofing: Slightly more expensive, but it lasts forever and sheds snow instantly. On a lean-to, metal is often easier because you can buy 6-foot panels and be done in an hour.
Regardless of what you choose, drip edge is non-negotiable. This is the L-shaped metal flashing that goes on the edges of the roof.
Ice Dam Hazard
Because a 4×8 lean-to has a relatively low-slope roof, it is prone to ice damming in cold climates. Water melts near the top (where heat might escape) and refreezes at the cold eave, backing water up under the shingles. If you live in a snowy state, spend the extra $40 on ice and water shield membrane for the first 3 feet of your roof. It’s a self-adhering barrier that seals around nail holes.
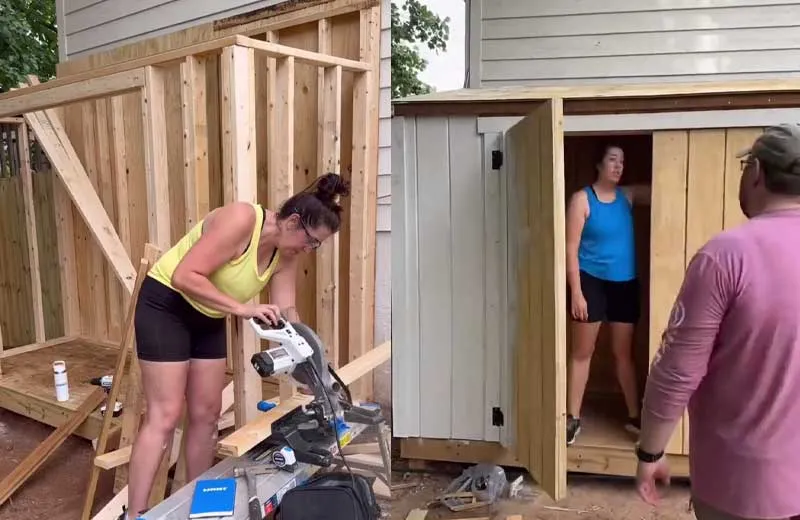
Doors Are The Builder’s Final Exam
Double doors are great for a 4×8 because they give you full access to the interior. If you have a single 32-inch door, you’ll always be digging for stuff in the corners.
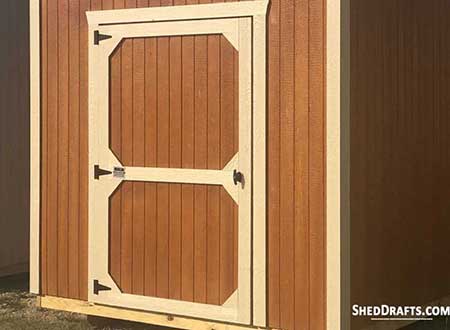
Building the doors: Build them on the ground. Use the same siding you used for the walls. Frame the back of the door with a Z-brace. The diagonal part of the Z should point down toward the bottom hinge. This transfers the weight of the door to the hinges and prevents sagging.
Over-Sized Door Trick
Install your siding right over the door opening as if there was no door. Then, nail your door frames (the 2×4 bracing) onto the siding from the inside. Once everything is secure, use a circular saw to cut the door out of the wall. This ensures your door pattern (the grooves in the siding) matches the wall perfectly, and the door fits the hole with 100% accuracy. It’s much easier than building a door separately and trying to make it fit a hole that might be slightly out of square.
Hardware and Finishing Touches
Don’t buy cheap gate hinges from a big-box store. A 4×8 shed door is heavy. You want heavy-duty strap hinges. For a 7-foot tall door, use three hinges per door.
For the latch, I recommend a cane bolt for the passive door (the one you keep closed most of the time) and a locking T-handle for the active door.
Paint your shed within 30 days of building. Even if the siding says pre-primed, the cut edges are vulnerable. Pay special attention to the end grain at the bottom of the siding and the corners. Use a high-quality 100% acrylic latex paint. It remains flexible, allowing the wood to expand and contract without cracking the finish.
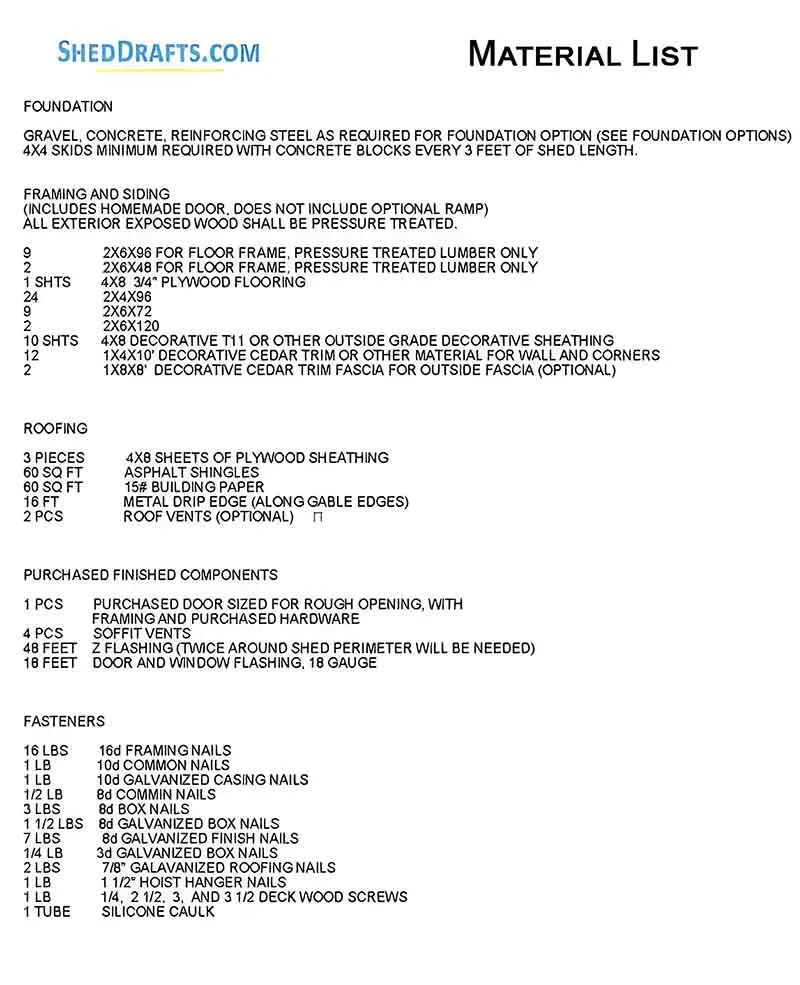
Deciphering the Material List: Procurement Strategy
The material list is your shopping manifesto. However, I’ve learned that standard shopping lists often lead to three extra trips to the hardware store because they don’t account for waste or the crooked board tax.
When you look at the lumber section of the blueprint, it calls for specific quantities of 2×4s and 4×4s. My rule of thumb is the plus two rule: Buy two extra of every length. Why? Because you will inevitably find a banana board that is too warped to use as a plate, or you’ll mis-cut a rafter birdsmouth. Having those spares on hand keeps the momentum alive.
Fastener Black Hole
For the Frame: Use 3-inch and 3-1/2-inch hot-dipped galvanized nails or ACQ-rated screws.
For the Siding: Use 2-inch stainless steel or galvanized siding nails.
The Hidden Cost: Don’t forget the tension tie or hurricane ties (H2.5A) where the rafters meet the high-wall plate. In a high-wind event, they are the only things keeping your roof from becoming a kite.
Hand-Picking Your Bunches
When you’re at the lumber yard, don’t just let the forklift driver drop a bundle in your truck. Hand-pick your 2×4s. Sight down the edge of the board like you’re aiming a rifle. If it bows more than 1/4 inch over 8 feet, put it back. For the side wall framing, where you have those specific vertical transitions (78″, 84″, 90″, 96″), you want the straightest grain possible to prevent the wall from twisting as it dries.