
How To Build A Durable Shed: Complete Step By Step Guide
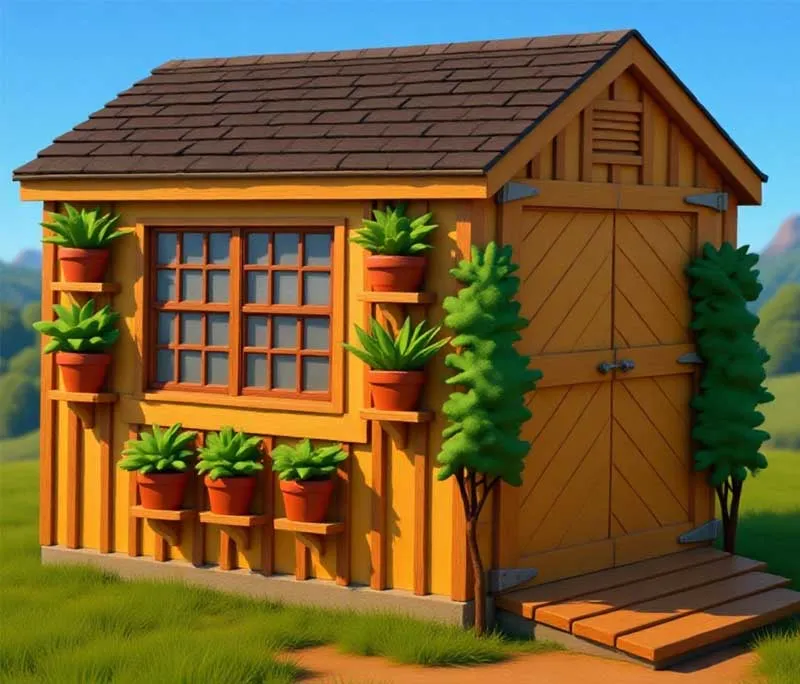
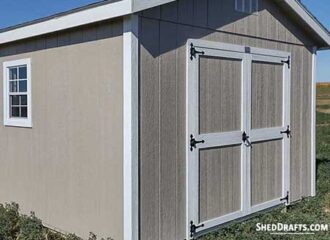
In this deep-dive, I’m breaking down a rock-solid 10×12 utility build. We’re talking classic stud-wall framing wrapped in a board-and-batten exterior that looks as sharp as it is durable. I’ve spec’d this one out with a massive 6-foot double-door (because trying to squeeze a riding mower through a standard door is a fool’s errand) and a 5×6 window to kill that “dark cave” vibe most sheds have.
Core Specs
- Start by securing local permits and choosing a level, well-drained site.
- Use pressure-treated skids on a gravel pad for longevity.
- Frame with 16-inch on-center (OC) spacing for structural integrity.
- Don’t skimp on the roof drip edge or Z-flashing over the doors because water is your shed’s biggest enemy.
The beauty of a standard stud-frame is its versatility. Once you’ve got the skeleton up, you can skin it in anything from cedar shingles to fiber cement to match your house. If you can swing a hammer and read a tape measure without getting a headache, you can build this.
I’ve got a whole library of blueprints if you want a different footprint, but the Master Rules of carpentry never change. Whether you’re building an 8×8 tool box or a 12×20 dream shop, the physics of gravity and moisture stay the same. Before we sawdust the lawn, let’s get real about what you’re actually going to use this space for, because your intent dictates your integrity.
1. Hidden Cost Of Unclear Purpose
Before you start swinging a hammer, you need to sit down with a cold drink and be brutally honest about what this shed is actually going to do for you. I’ve seen too many guys build a “lawnmower shed” only to realize two years later they’ve taken up woodworking and now they’re trying to run a 3HP table saw in a space the size of a phone booth. It doesn’t work.
What’s going in there? Are we talking about a graveyard for holiday decorations and a couple of weed-wackers, or are you pulling a 600-pound zero-turn mower in every Saturday? A shed you visit daily for garden spades needs a different “flow” and floor-toughness than a storage box you only crack open once a quarter to grab the snowblower.
If you’ve got a riding mower, don’t even look at a standard 36-inch door. You want a 6-foot double-door opening so you aren’t threading a needle every time you finish cutting the grass. You also need to think about the “thump” factor. If you’re storing heavy equipment, a 2×4 floor frame on 24-inch centers is going to sag like a wet cardboard box. You’ll want 2x6s on 12-inch centers to handle that dead weight.
Whatever size you think you need right now, add 25%. I’ve never once in 20 years had a client call me up and say, “Man, I wish this shed was smaller.” But I’ve had dozens ask me how much it would cost to build an “addition” because they ran out of wall space in six months. Build for the gear you’re going to own 10 years from now, not just the shovel you’ve got today.
Don’t build a shed you need today, build one you are going to need 10 years from now.
2. Right Plot For A Shed (Location is Everything)
If you pick the wrong spot, the earth will eventually reclaim your shed. I’m not being dramatic, I’ve watched $5,000 builds turned into rotting mushrooms because they were tucked into a swampy “dead zone” in the backyard. You’re looking for high ground. If you see standing water after a light rain, keep walking. You want a site where water migrates away from the structure, not one that acts as a catch-basin for your neighbor’s runoff.
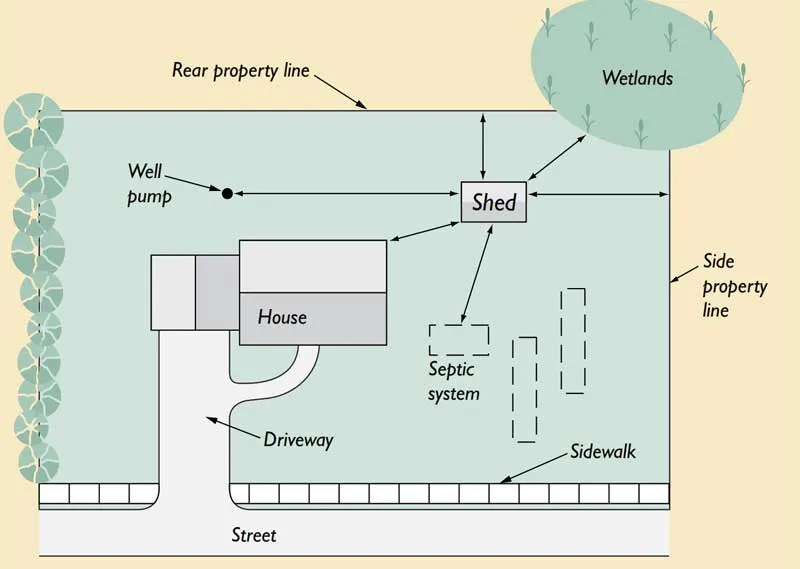
Don’t forget the “Serviceability Gap.” I always tell people to leave at least 3 feet of breathing room between the shed and any fence or treeline. If you jam it right against a cedar hedge, you’ll never be able to paint the back wall, and trapped moisture will rot your siding before the warranty is up. Also, pay attention to the wind. If you live in a high-gust area, don’t orient your big double doors to face the prevailing winds, unless you want them ripped off their hinges the first time you forget to latch them during a storm.
Watch out for the sun. A shed baking in direct afternoon light without a single shade tree or a ridge vent becomes a literal kiln. If you’re planning on storing paints, chemicals, or an expensive lithium-ion battery collection for your power tools, heat is your silent enemy.
3. Don’t Mess With The Law (Permits and Karens)
Before you spend a dime at the lumberyard, you need to play ball with the local bureaucrats. I see guys finish a beautiful build only to have the city make them tear it down because it was six inches over a “setback” line. Most towns let you slide on anything under 120 or 200 square feet, but don’t take my word for it, call your local building department.
If you’re in an HOA, God help you. Check their bylaws twice. They’ll have opinions on everything from your shingle color to the “cladding” material. And for the love of all things holy, call 811 to have your lines marked. Digging into a high-voltage line or a fiber-optic cable is a fast way to turn a “cheap” DIY project into a five-figure nightmare.
If you’re running power for a workshop, you’re almost certainly going to need an electrical permit. Don’t “cowboy” this. Insurance companies love to deny claims for shed fires caused by unpermitted, DIY wiring.
4. Why "Cheap" Sheds Are Expensive
Building a shed is like a trip to the grocery store: you think you’re spending fifty bucks and you walk out at two hundred. You’ve got your big-ticket items, the pressure-treated 4x4s, the 3/4″ T&G plywood, and the siding, but it’s the hardware creep that kills you. We’re talking $150 in structural screws, $80 in drip edges, and another $200 in high-quality architectural shingles.
Once I tried to save $40 by using interior-rated screws on a garden shed. Within two seasons, the salt in the pressure-treated lumber ate the zinc right off, leaving ugly black rust streaks down the siding and boards that literally popped off the frame during a windstorm. Use hot-dipped galvanized or stainless fasteners.
Also, I always tell my clients to add a 15% “Waste and Oops” buffer to their budget. You’re going to mis-cut a rafter or drop a gallon of stain at some point. It happens to the best of us. Also, don’t skimp on the fasteners. Using cheap interior screws on an exterior project is a recipe for “black streak” rust stains and structural failure. Use hot-dipped galvanized nails or stainless steel if you’re near the coast.
5. Time To Gather Gear and Lumber
Before you drive to the big-box store and start throwing warped 2x4s into a cart, you need a battle plan. Many guys spend half their build time just driving back and forth to the hardware store because they forgot a box of 10d nails or a single drip edge. My advice? Get it all delivered in one shot. It saves your back and your sanity.
When you’re picking lumber, don’t just grab the top board on the pile. Take the time to “sight” your studs. If a board looks like a hockey stick or a piece of dry pasta, put it back. You can’t build a square wall with a crooked stick.
Materials Required
Foundation: 4×4 pressure-treated skids (rated for Ground Contact) and 2×8 joists. Don’t go 2×6 if you want a “forever” floor.
Decking: Four sheets of 3/4″ T&G plywood. This is the stage where you decide if your floor will feel like a trampoline or a tank.
Walls: A small forest of 2x4s. You’ll need around 48 studs for an 8-foot ceiling, plus your plates and blocking.
Siding: About 325 square feet. Whether it’s LP SmartSide or T1-11, make sure you have enough to cover the “waste” from window and door cutouts.
Rafters: 2x6s are the gold standard here. 2x4s might pass code in some places, but they sag under heavy snow or a roofer’s weight.
Sheathing: 1/2″ plywood (not OSB, if you can afford the upgrade).
Finishings: 2.5 “squares” of shingles (a square is 100 sq. ft.), felt paper, and that glorious metal drip edge I keep nagging you about.
Tools Required
You need the basics: a 25-foot tape, a framing square (your new best friend), and a circular saw with a fresh blade. If you’re still using a hammer for the whole build, I salute your grit, but rent a framing nailer. It’ll turn a three-day framing job into a four-hour breeze.
If you’re storing your lumber on-site, keep it off the grass. Stack it on some sacrificial 4x4s and cover it with a breathable tarp. I left a stack of “premium” plywood uncovered once over a rainy weekend in Ohio. By Monday, the sheets had delaminated and looked like a deck of wet playing cards. $400 straight into the trash.
Organize your “hardware station” before you start. Get some plastic bins for your 16d sinkers (for framing), 8d nails (for siding), and 10d nails (for joists). Searching through cardboard boxes for the right nail while you’re balancing on a ladder is a great way to lose a finger, or at least your temper.
6. Set A Foundation That Won’t Sink
If you screw up the foundation, the rest of this project is just an expensive pile of firewood. You can have the straightest walls and the prettiest trim in the county, but if your base shifts or sinks, those doors are going to jam, and the roof is going to buckle.
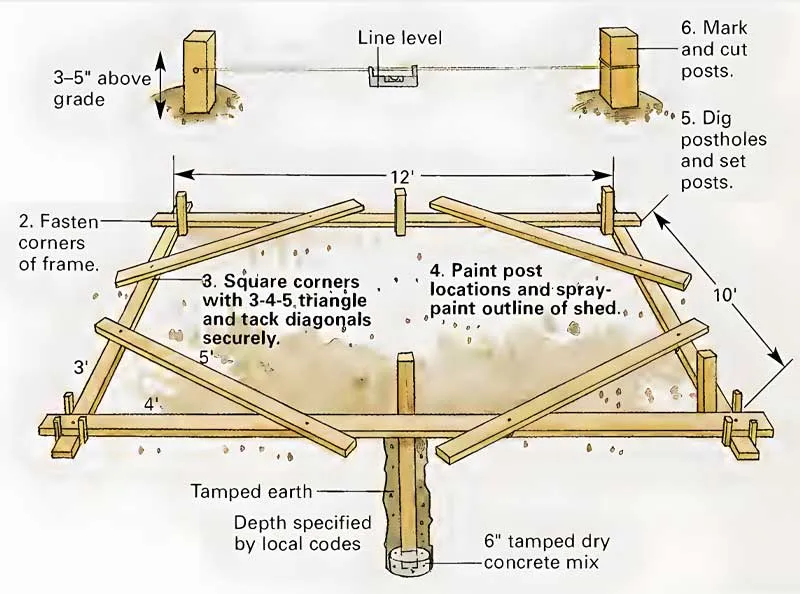
I start by building a “dummy frame” out of 2x6s and staking it into the dirt. This isn’t your floor, it’s your guide. Drive your stakes, pull your tape, and use the 3-4-5 rule. If one side is 3 feet and the other is 4 feet, that diagonal must be 5 feet. Scale it up to 6-8-10 for better accuracy on a 10×12.
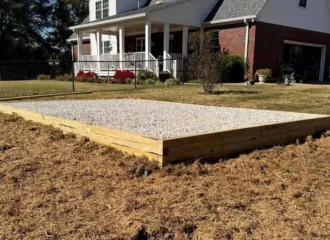
Once you’ve painted your outline, move the frame and start digging. You want to pull out at least 4 inches of topsoil, 6 inches if you’re dealing with that heavy, nasty clay that holds water like a sponge.
Lay down heavy-duty landscape fabric. Don’t buy the cheap stuff that looks like a trash bag; get the woven gear. Overlap your seams by a foot. This keeps the weeds out and, more importantly, keeps your gravel from sinking into the mud over time. Fill that pit with 3/4-inch crushed stone (clean, no “fines”) and pack it down until it feels like a highway shoulder.
Install Posts and An Air Gap
Now, set your posts. Use a level on two sides of every post to make sure they’re dead-nuts vertical. I like to cut my posts so the floor frame sits at least 3 inches off the gravel. That air gap is the “lung” of your shed. It allows moisture to evaporate instead of soaking into your floor joists.
In my early days, I “eyeballed” a gravel pad level without a transit or a long spirit level. The shed looked fine until I went to hang the doors; the whole frame was racked 3/4 of an inch. I had to spend a miserable afternoon jacking up a finished 3,000-pound shed and shoving shims under the skids to get the doors to actually latch. Level it twice before the first joist goes down.
A gravel pad foundation is superior to “cinder blocks on grass” because it distributes the weight of the shed across the entire footprint. It also prevents “splash-back” rot on your siding because the rain hits the stones and disappears instead of hitting dirt and bouncing mud onto your wood.
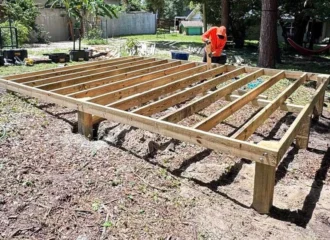
7. Forge A Bounce-Free Floor Frame
Think of the floor frame as the shed’s spine. If it’s crooked, the whole body will follow. I start by cutting the rim joists to length and, here’s a pro move, clamping them together so the ends are dead-flush. While they’re locked tight, I mark the 16-inch on-center (OC) layout across both boards simultaneously. This is the only way to guarantee your joists will be perfectly parallel once the frame is stood up.
I’m a firm believer in using metal joist hangers. Center them on your marks and mount them before you start wrestling with the joists; it keeps your spacing honest and speeds up the “grunt work.” Once the perimeter is assembled, hoist it onto your posts and tack it down temporarily.
Grab your tape and check those diagonals. If they aren’t identical, your shed is a trapezoid. Nudge it until it’s perfect, then anchor the perimeter to the posts using hot-dipped galvanized nails. Slide your joists into the hangers, nail them home, and make sure they’re sitting fully seated and level.
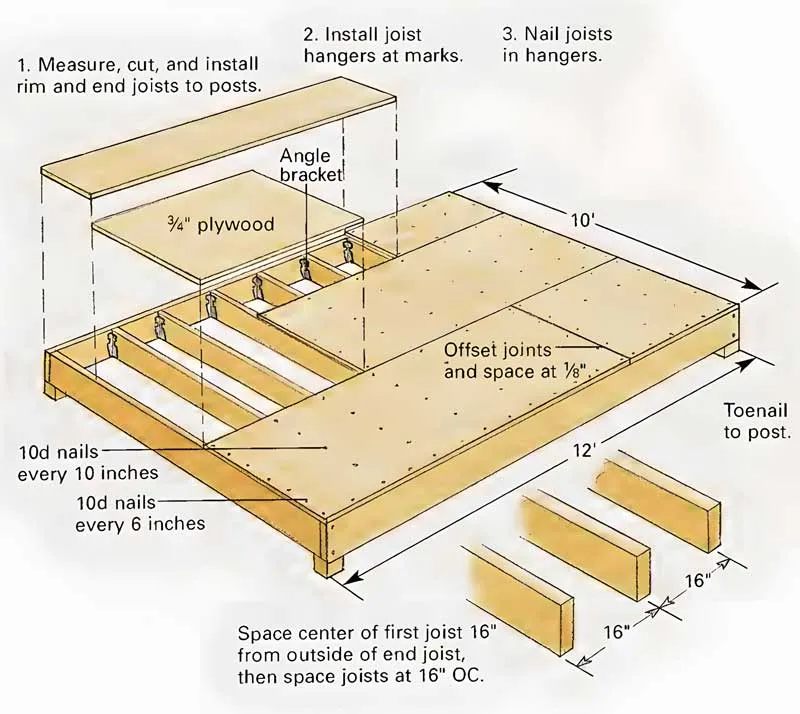
For the subfloor, we’re using 3/4-inch exterior-grade plywood. Start your first sheet flush in a corner. Stagger your joints. You don’t want your seams lining up, or you’ll end up with a “hinge” in your floor that bounces every time you walk.
Once the floor is nailed down, walk the deck slowly. If you hear a squeak or feel a “hollow” spot, your joist isn’t fully supported or a nail missed its mark. Fix it now. Once the walls are up, it’s too late.
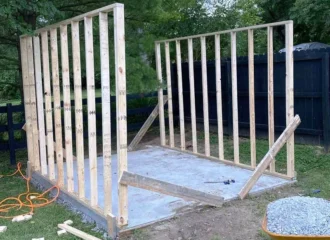
8. Square And Plumb Walls Are Non-Negotiable
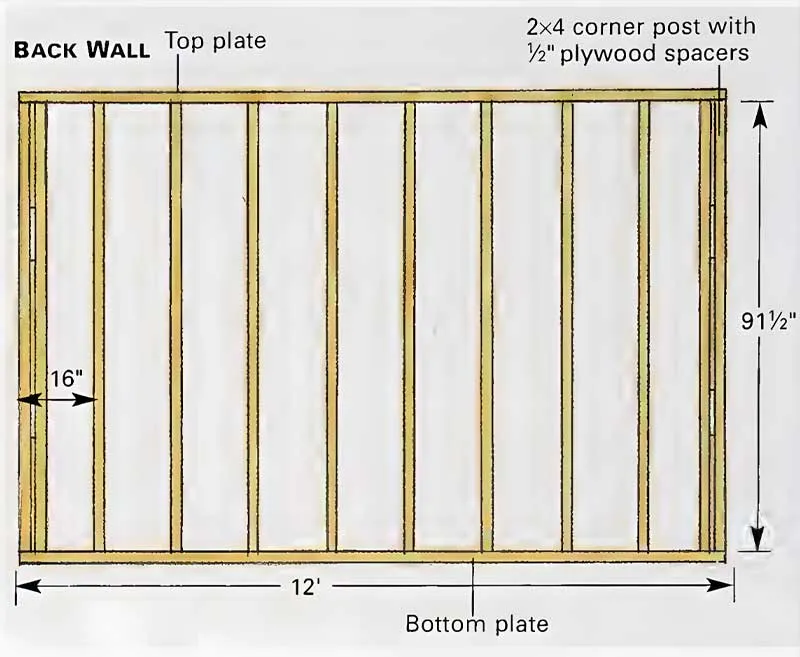
We frame the walls flat on the new floor because it’s the best level surface you’ve got. I always tackle the back wall first, it’s the most straightforward and builds your confidence.
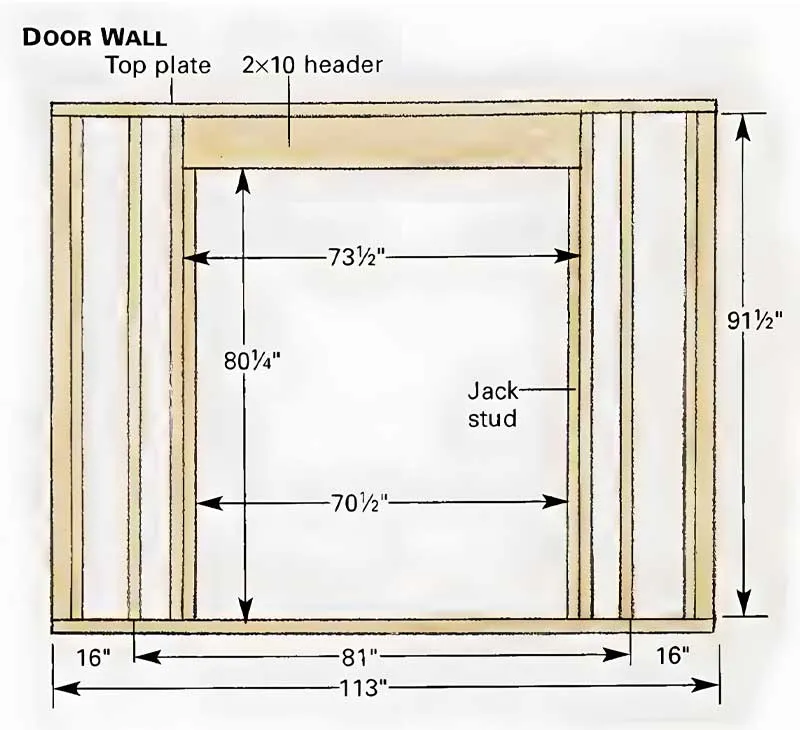
Line up your top and bottom plates side-by-side. Just like the floor, transfer your stud marks across both at once. You need to account for everything here: common studs, king studs, jack studs (the ones that hold up the headers), and cripples. I like to build my corner posts as a single solid unit and treat them as one beefy stud during assembly. Nail the studs to the plates, double-check your alignment, and get ready for the heavy lifting.
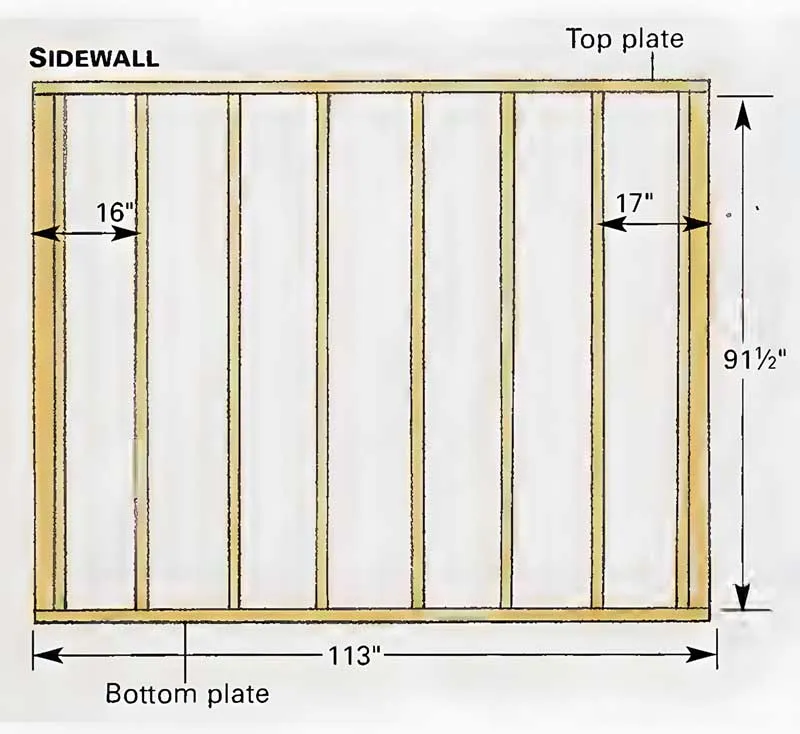
Stand the wall up on the edge of the floor frame. Immediately slap on a temporary brace using 1×3 lumber nailed to a stud and the floor. Grab your 4-foot level, your wall must be “plumb” (dead vertical). Once it’s straight, nail a diagonal “squaring” brace across the stud faces. This “locks” the wall in place while you move on to the side walls and the front wall.
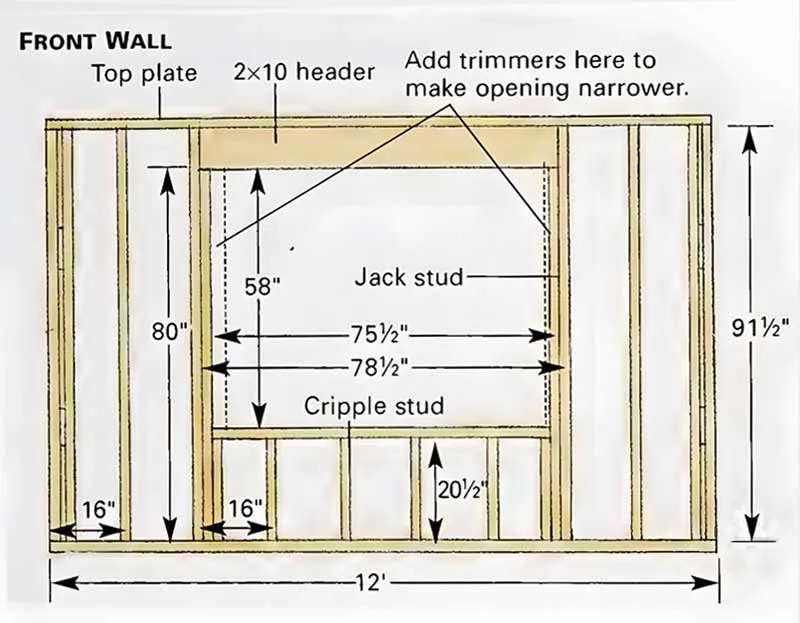
After all the walls are standing and plumb, it’s time for the Cap Plate. This is a second layer of 2×4 that sits on top of your walls. The trick is to lap the cap plates over the corners where the walls meet. This structurally “locks” the corners together so the building acts as one unit. Finally, mark your rafter centers on those cap plates and install your metal rafter ties.
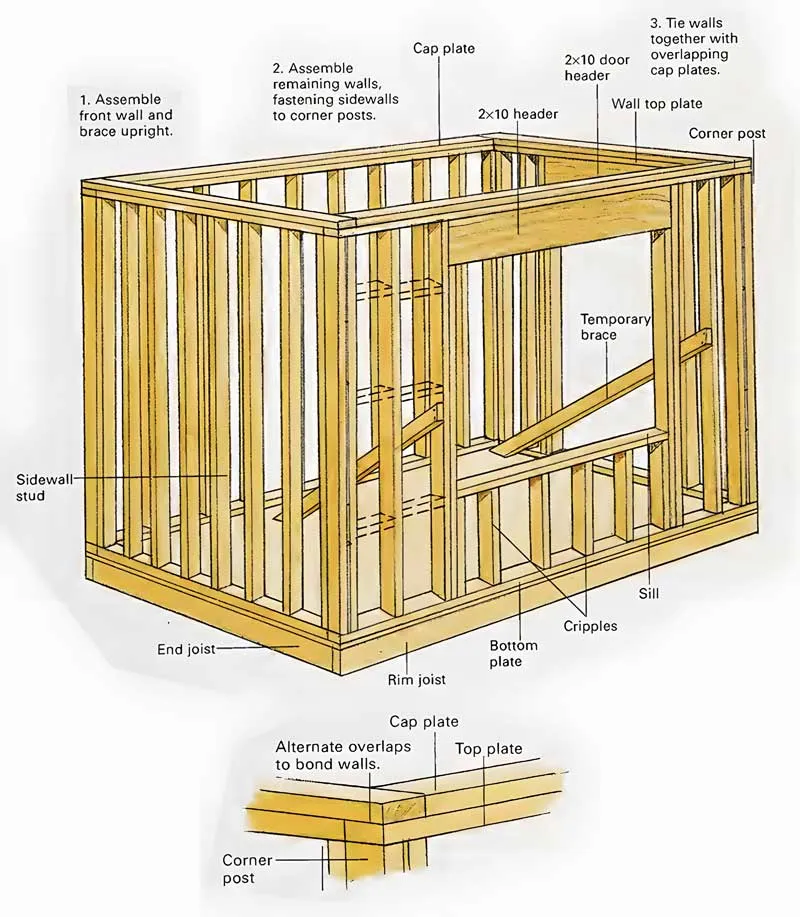

In one of my earliest builds in Texas, I pulled my temporary braces too early on a Friday, thinking the corner nails would hold. A storm rolled in that night, and by Saturday morning, the wind had “racked” the entire skeleton five degrees out of plumb. I had to use a come-along winch and a truck to pull the building back to square. Keep the braces on until the siding is nailed off.
9. Gable Rafter Framework Assembly
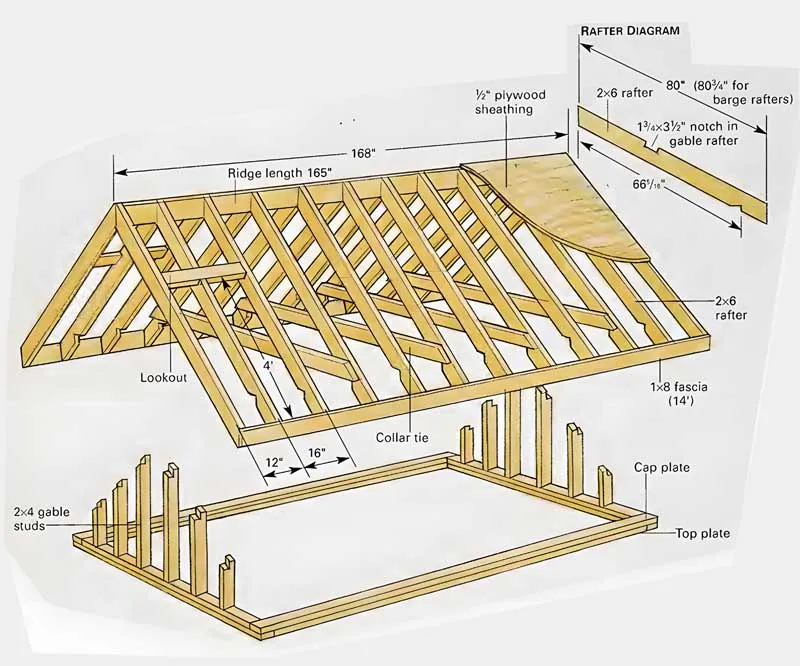
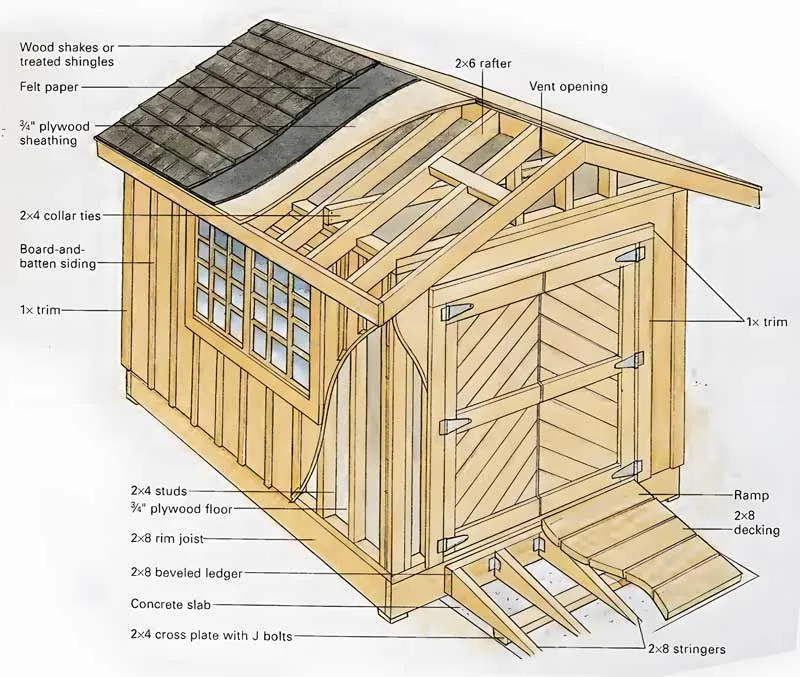
We’re using 2×6 rafters tied into a 2×6 ridge board at the peak. To give the shed that professional gable look, we’re adding barge rafters (or verge rafters) that overhang the gable ends, supported by horizontal 2×4 lookouts. To keep the whole thing from bowing, we’ll install 2×4 collar ties to stop the rafters from spreading and pushing your walls outward.
Start by cutting your ridge board to length. You’ll need to hoist it into position using temporary 2×4 vertical supports. Cut these supports so the ridge sits at the exact height your pitch requires. Tack them to the top plates and floor joists, making sure they’re dead-plumb. Position the ridge so it sticks out 10.5 inches past the wall plates on both ends, that’s your overhang.
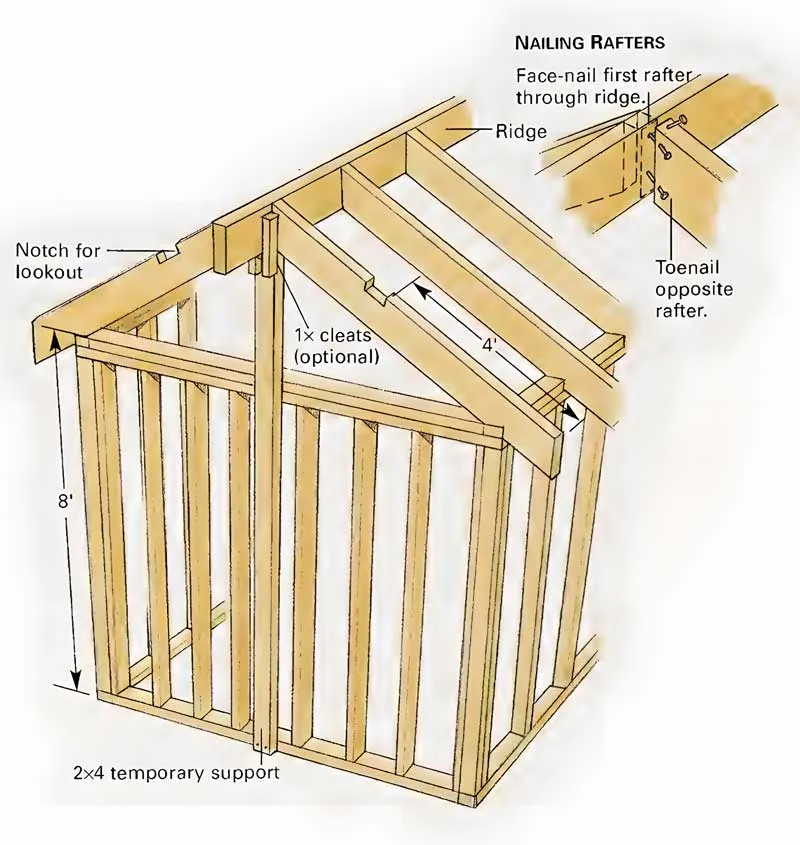
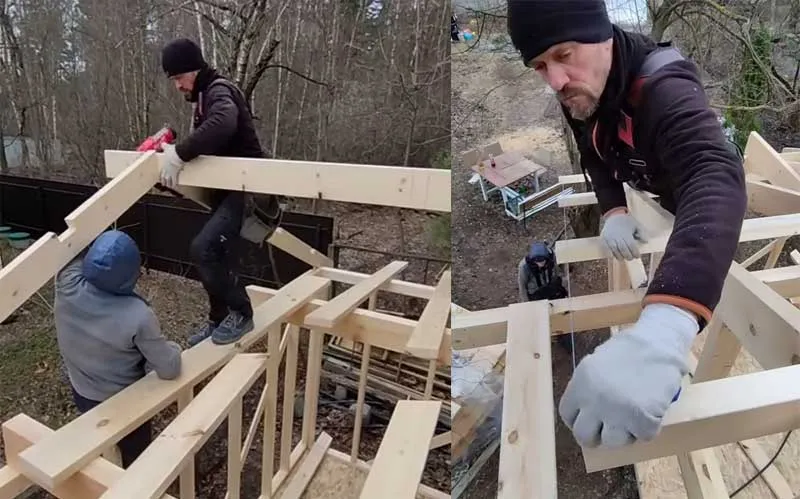
Cut your first pair of rafters following the pattern. You’re looking for a perfect fit where the bird’s-mouth notch seats on the wall plate and the top cut meets the ridge. Once you’ve nailed the fit, use these two as templates for the rest. Cut your barge rafters 1/4-inch longer so they cleanly cover the ridge ends.
Notch the four rafters at the gable ends to accept your 2×4 lookouts. Place these notches four feet from the top to give your sheathing a solid nailing surface.
Seat the bird’s-mouth in the rafter tie first. It makes aligning the ridge connection ten times easier. Nail them to the ridge with 16d nails, working in opposite pairs to keep the pressure balanced.
Install your collar ties and lookouts. Once the rafters are set, run your 1×8 fascia along the tails. Bevel the top edge of the fascia to match your roof slope so the sheathing sits flush later.
10. Sheathe The Roof and Lock It In
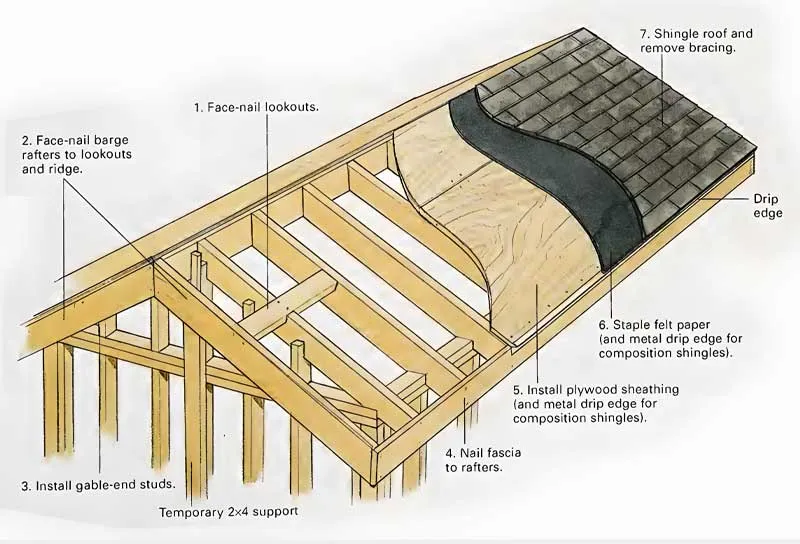
Nailing down the roof sheathing is a magic moment. It’s when the structure finally becomes rigid and you can ditch the temporary bracing. Before you start, do one last “sight-check” to ensure your rafters are straight and the ridge hasn’t sagged.
Use 1/2-inch exterior-grade plywood. Start at the bottom corner, aligning the sheet flush with the fascia and the barge rafter.
Nail every rafter, keeping the spacing tight along the edges and a bit wider in the “field” (the middle of the sheet).
Work your way up to the ridge, and just like the floor, stagger your joints. Once both sides are covered, your ridge supports can finally hit the scrap pile.
I made the mistake of skipping the H-clips (small metal clips between plywood sheets) and butted the roof sheathing tight during a dry spell, in my early days. When the humidity hit, the plywood expanded and “telegraphed” every seam right through the shingles, making the roof look like a series of waves. Leave a 1/8-inch gap for expansion.
Now, get that roofing felt (or synthetic underlayment) on immediately. Start at the bottom and overlap each row as you go up so water “sheds” off. Staple it down tight. Finally, install your metal drip edge along the eaves and the rakes. This is the barrier that prevents the edges of your plywood from soaking up water and rotting in three years.
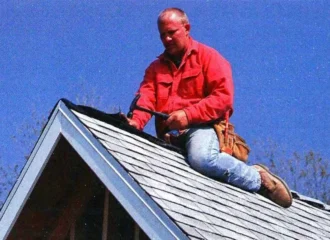
11. A Crown Of Shingles
Asphalt shingles are reliable, affordable, and easy to fix. Take your time to keep the lines straight. There are other roofing options available like metal sheets and clay tiles that are more durable but also expensive.
For shingles, we start at the very bottom edge. Your first strip should be aligned perfectly with the drip edge. This is your drip line for the rest of the roof.
Secure the shingles with dedicated roofing nails. As you move up the roof, ensure each course overlaps the one below it. Water flows downhill, and you want it to jump from shingle to shingle without ever seeing the felt underneath.
When you hit the peak, fold your shingles over the ridge to create a cap. Nail them securely, ensuring no plywood or felt is exposed to the elements.
Before you celebrate, get on the roof (carefully) and collect any stray nails, plastic packaging, or scraps. A single stray nail left in a valley can cause a puncture or a clog later. Once the exterior is sealed, you can head inside and pull down all those temporary wall braces. You’ve officially got a dried-in building.
12. Stud Blocking & Board-and-Batten Setup
We used board-and-batten wall siding. It’s a classic, vertical look that drains water beautifully and fits into any landscape. The beauty of the stud-wall framing we’ve built is that it’s a “blank canvas”, you could swap this for lap siding or shingles if you wanted, but we’re sticking to the plan.
Since board-and-batten is a vertical system, you can’t just nail it to vertical studs. You need horizontal support. I install 2×4 blocking between the studs every 24 inches on-center. Offset these blocks by 1.5 inches (stagger them) so you can drive nails straight through the stud into the end of each block. If you try to line them up perfectly, you’ll be stuck toe-nailing them, which is a pain and less secure.
Start your first board flush with the corner and use your 4-foot level. If the first board is leaning, the whole shed will look like it’s melting. Keep checking for plumb as you work your way around. Once the wide boards are up, you’ll nail the “battens” (the thin strips) over the seams to seal the building.
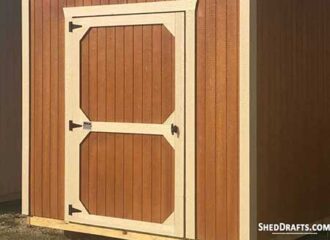
13. Set Windows and Sag-Free Double Doors
Build your door frames from 2x4s, nail your siding to the face, and hang them with heavy-duty hinges. Nail a 2×2 “stop strip” to the bottom of the header. This gives the door a solid place to rest when closed and prevents it from swinging too far and stressing the hinges.
I once built a set of beautiful barn doors but didn’t account for the weight of the 3/4″ siding. Within a month, the doors sagged so badly they were scraping the ramp. I had to go back and install internal diagonal cable turnbuckles to pull them back into square. Always brace your doors with a diagonal “Z” or “X” pattern inside.
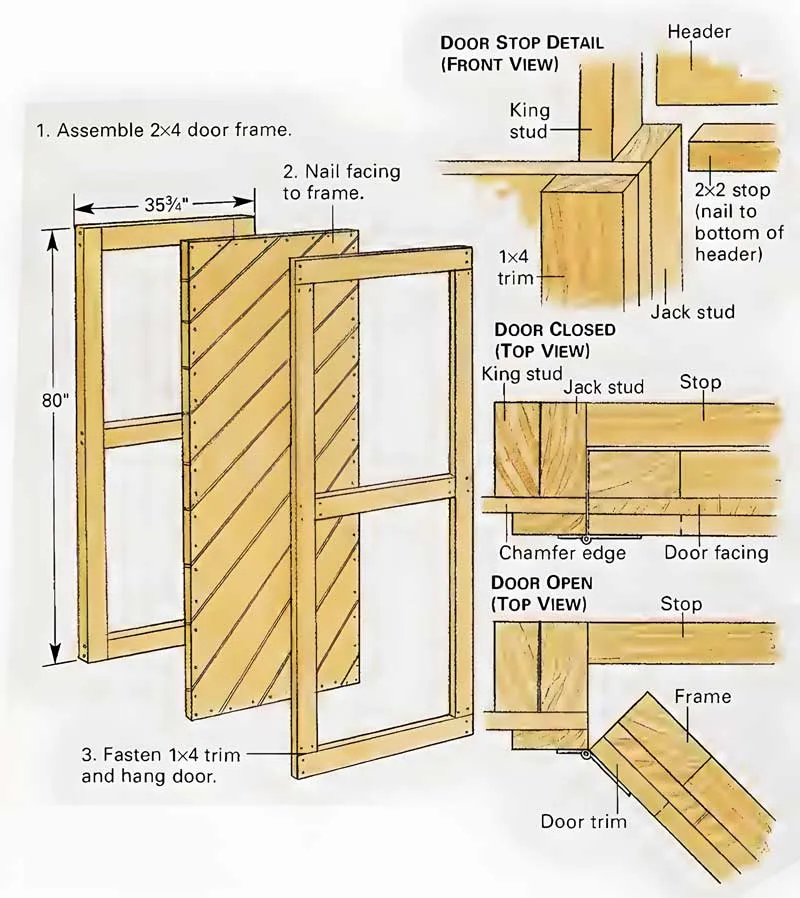
If you’re using modern windows with nailing flanges, get them on before the siding. If you’re doing traditional wood-cased windows, they go on after the siding so the trim sits flush.
Always check the manufacturer’s spec sheet. I usually cut my ROs about 1/2-inch larger than the window itself. That extra quarter-inch on all sides gives you wiggle room to shim the window until it’s perfectly level and square.
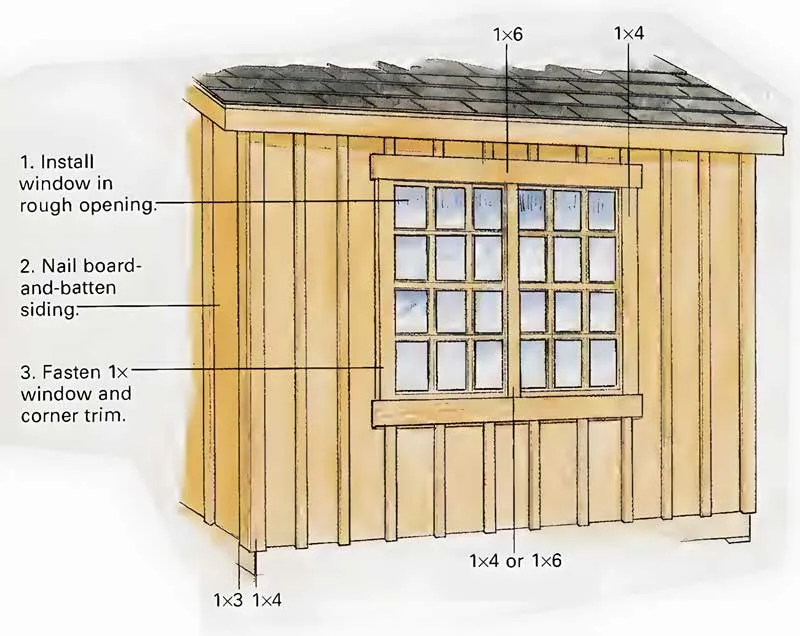
Center the window, shim it, and make sure it opens and closes like butter before you drive the final nails. Wrap it in 1×4 or 1×6 trim, letting the horizontal pieces “overhang” the verticals for a professional look.
14. Trim Isn’t For Looks Alone
Trim isn’t just for looks; it covers the raw edges of your siding. Wrap your corners, doors, and windows in 1×4 stock. Once the trim is on, it’s time for gutters.
I don’t care if it’s just a shed, you need gutters. Without them, rain sheets off the roof and splashes mud and moisture onto your bottom plates, leading to rot. Run your downspouts away from the foundation and use splash blocks to keep the water moving. Finish this stage with a high-quality exterior caulk on every seam.
15. Chimney Ventilation Effect
A sealed shed is a rotting shed. You need airflow to kick out the heat and moisture. We’re cutting vent openings near the ridge to let the hot air escape. For this to work, you need “intake” air from the soffits or a gable louver.
To see if your ventilation is actually working, set a fan in the doorway on a still day. You should feel air pushing out of the vents. This “chimney effect” keeps your tools from rusting and your shingles from baking from the inside out.
16. A Heavy-Duty Equipment Ramp Makes Life Easier
If you’re moving a riding mower, you need a ramp that doesn’t feel like a seesaw.
Cut a 2×8 to 6 feet long and rip a 10-degree bevel along the top. Lag-bolt this directly into your rim joist.
Cut five 2×8 stringers (41 inches long). Taper them from 7-1/4 inches at the shed down to a point where they meet the concrete pad.
Use 2×8 planks across the stringers. Bevel the very first plank where it meets the concrete. It makes for a smooth “thump-free” transition when you’re rolling heavy gear inside.
17. The Final Defense - Paint and Sealant
Before you open a can of paint, fill every nail hole with exterior filler and sand it flush. Caulk every single joint where wood meets wood.
Apply a high-quality primer to everything, siding, trim, and especially the end-grain of the boards. The end-grain is like a bunch of straws; it will suck up moisture if you don’t seal it tight. Let the primer dry for 24 hours, then hit it with two coats of exterior finish. Save the doors and windows for last so you don’t accidentally paint them shut.
18. Power Up And Illuminate With Wiring
If you want your shed to be more than just a dark hole for spiders, you need juice. Whether it’s for a shop vac or a bench grinder, do your wiring now before you close up the walls. Choose fixtures rated for damp or enclosed spaces, sheds breathe, and humidity is a fact of life.
Position your lights so they aren’t casting your own shadow over your workbench. Put the switches right by the door so you aren’t fumbling in the dark.
Drill your holes through the center of the studs and pull your Romex (cable) in a clean, straight line.
Staple the cables securely and mount your electrical boxes for outlets and switches.
Don’t be a “cowboy”, schedule your electrical inspection before you cover anything up. Once you get the green light, wire up the fixtures and outlets.
19. Interior Walls Need Attention Too
If you’re planning on spending time in here during the winter, or if you just want to keep your expensive cordless tool batteries from freezing, you need insulation. Fiberglass batts are the easiest DIY play.
Tuck the batts into the stud bays. Do not compress the insulation. Fiberglass works by trapping air; if you squash it to fit, you’re killing its R-value. Fill every nook to kill drafts. Once the fluff is in, skin the walls with plywood. Why plywood instead of drywall? Because in a shed, you want to be able to screw a tool rack or a shelf anywhere without hunting for a stud. Start in the corner, check for level, and screw them home.
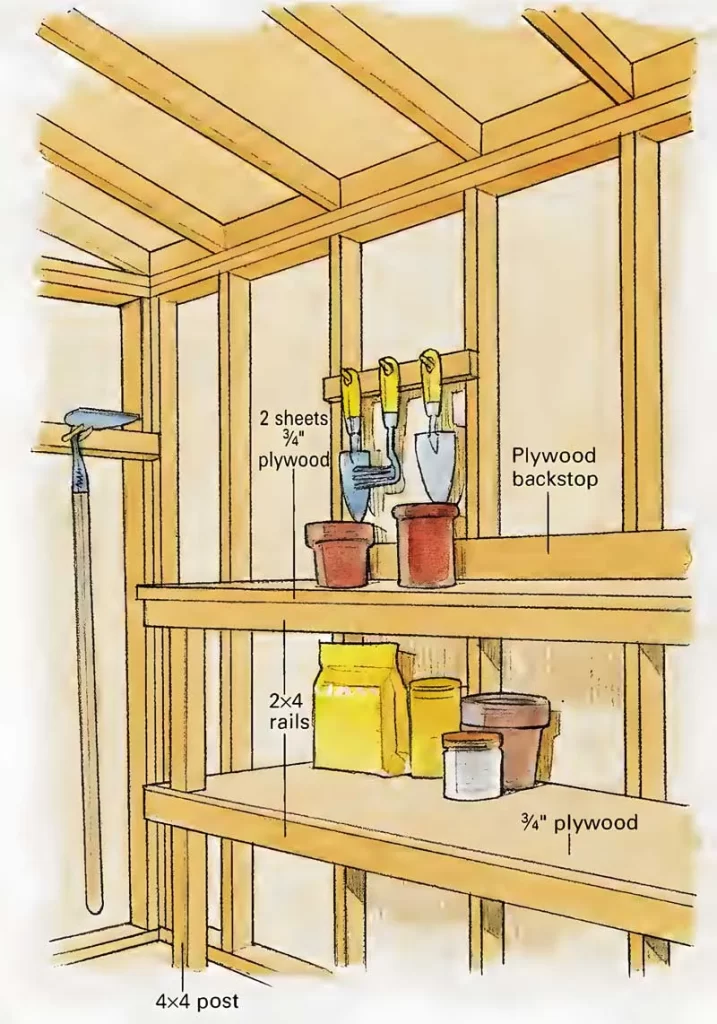
20. Shelves and Workbenches Maximize Storage
You already identified your storage needs in Step 1, so let’s execute.
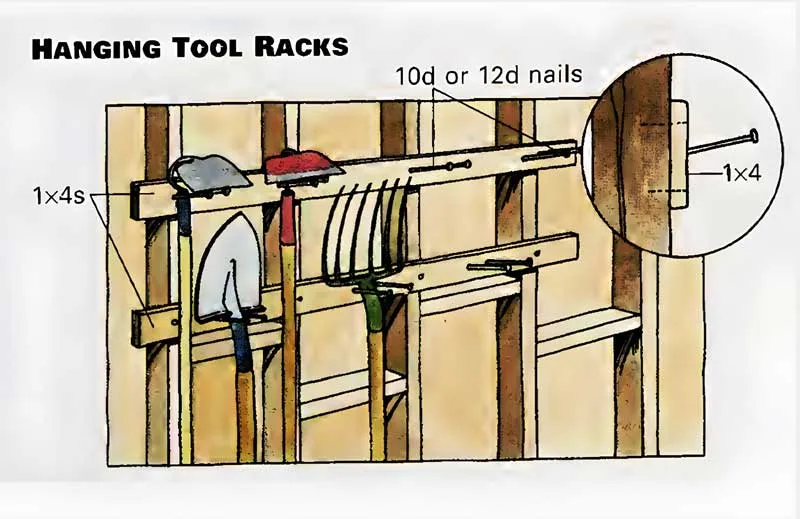
Tool Hanging: For the long stuff like rakes and shovels, nail 1×4 boards horizontally across the studs. Drive 12d nails into the boards, cheap, effective, and classic.
Heavy Duty Racks: For heavier gear, drill angled holes into a 2×4 and insert 8-inch sections of 3/4-inch dowel rods. It’s a custom peg system that won’t snap under pressure.
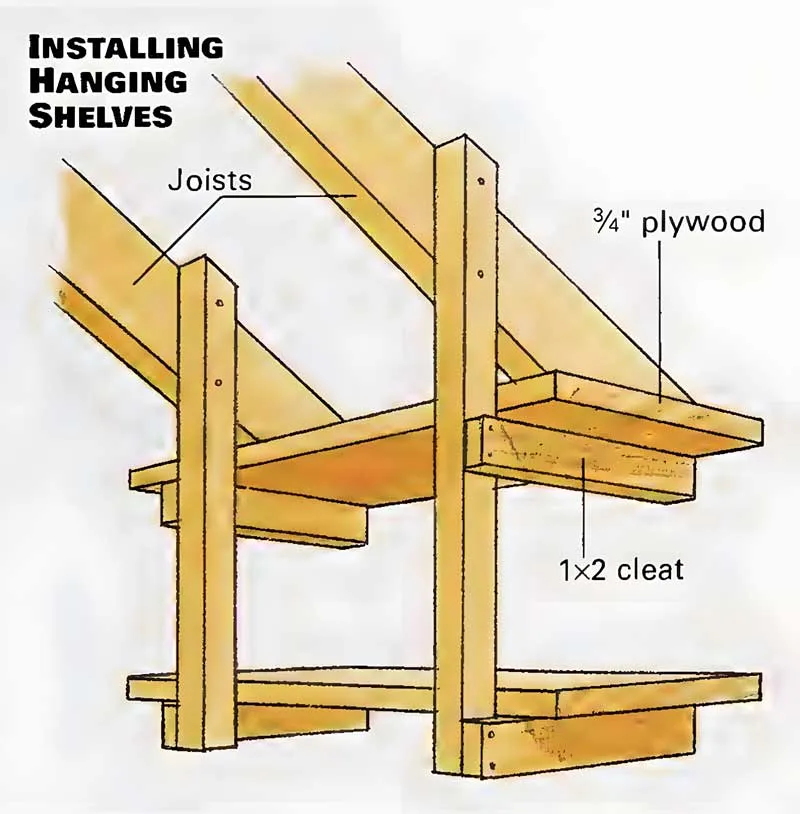
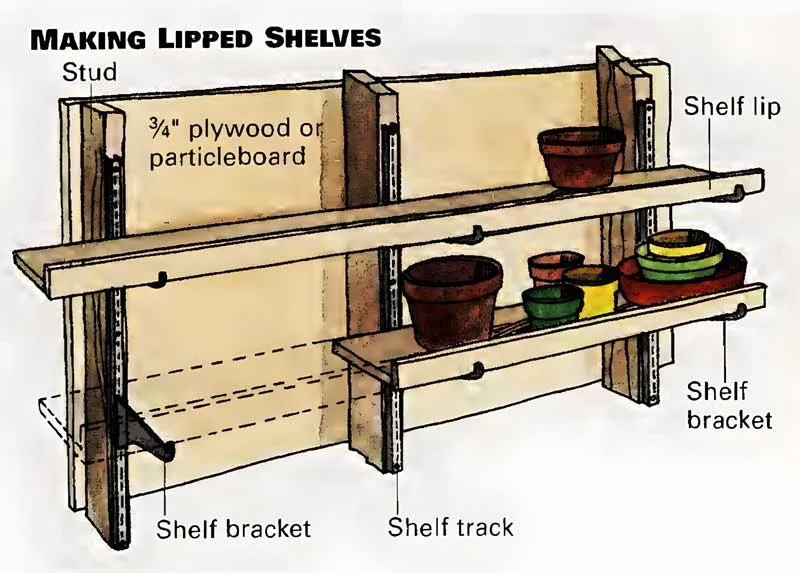
Shelving: Use adjustable tracks or simple cleats fastened to the studs. Use your plywood scraps for the shelves and always add a “front lip” (a small strip of wood) to the edge. It prevents your jars and tools from sliding off and stops the shelf from sagging over time.
Loft: Use those collar ties for overhead storage. Keep the heavy stuff on the side walls; don’t hang an engine block from your rafters.
Workbench: Build it near the window to catch that natural light. Use 2×4 legs and a plywood top, reinforced with diagonal bracing so it doesn’t wobble when you’re sawing.
21. Gear-Zones Create A Frictionless Space
Don’t just pile stuff in. Use magnetic bars for your chisels and screwdrivers. If you really want to go “Master Level,” trace the outlines of your tools on the wall so you know exactly where they go.
Put your “once-a-year” items (Christmas lights, snow blowers) in the high lofts or the back corners. Keep your “everyday” gear at eye level. Test the layout for a week before you commit to final mounting positions.
22. Aesthetic Touches & Landscaping
A shed shouldn’t look like it was dropped from a plane; it should look like it grew there.
Lay down a gravel or stone walkway to the ramp. It looks sharp and keeps you from tracking mud into your new shop.
Use mulch and proper grading to make sure rain doesn’t pool near the foundation. If you’ve got a heavy runoff area, dig a small French drain or a channel to move that water away.
A few shrubs around the base help hide the foundation and soften the edges of the building.
23. Maintenance Is The Long Game
Install shed security measures to protect your valuables stored inside.
Every spring, walk around and check the paint and caulk. Touch up any cracks before water gets in.
After a big storm, check for loose shingle tabs.
Keep them clear of leaves. A clogged gutter is just a rot-machine for your fascia boards.
Squirt some lithium grease on the hinges every now and then so the door doesn’t start groaning.


Read Next
 Shed Floor Framing: Step-By-Step Guide To A Sag-Proof Base
 Frame Shed Walls: A Step-by-Step Guide For Rock-Solid Builds
 How To Install Shingles On A Shed Roof: Step-By-Step Guide
 Build Single Shed Doors With Step-By-Step Plans
 Build Double Shed Doors From Plans Step-By-Step
 Shed Foundation Guide: 11 Durable Builds And Traps To Avoid
Framing-to-Finish Roadmap: DIY Guides For Every Step of The Build


