close button

8×12 Slant Roof Utility Tool Shed Plans

8x12 Slant Roof Utility Shed Plans Blueprints 00 Draft Design

Here are some 8×12 slant roof utility shed plans blueprints for building a long-lasting lean-to shed on your yard.

A shed could deliver valuable storage area for your machinery or perform as a room to work or merely as an additional room close to your residence.

Refer to the storage shed plans and contemplate the area where you will be developing the structure along with its measurements once you obtain the materials for the building.

This 8×12 shed has large double doors to make it easy to move large equipment in and out of the building. The window to the right of the door can be used to illuminate a workbench that may be set up directly underneath it. The single sloped roof is built by overlapping siding panels connected by shiplap joints.

8×12 Slant Roof Utility Shed Architecture Blueprints With Framing Designs And Elevations

8x12 Slant Roof Utility Shed Plans Blueprints 11 Front Elevations
8x12 Slant Roof Utility Shed Plans Blueprints 12 Side Elevations
8x12 Slant Roof Utility Shed Plans Blueprints 13 Rear Elevations
8x12 Slant Roof Utility Shed Plans Blueprints 01 Siding Finished

Floor Frame And Foundation Details For DIY Utility Shed

8x12 Slant Roof Utility Shed Plans Blueprints 17 Floor Framing
  1. Create the shed base by digging an 8×12 ditch in the ground and fill it with a four-inch layer of gravel.
  2. Build and set up the floor frame over the foundation using 2x4s. Check that the frame is perfectly level.
  3. Verify the size of the diagonals right after building the floor frames to ensure it is accurately square.
  4. Use deck screws to attach the sheathing to the floor frame and ensure that the edges of the sheathing come over the frame boards.

Wall Framing Diagrams For 8×12 Lean-To Shed

8x12 Slant Roof Utility Shed Plans Blueprints 03 Front Wall Framing
8x12 Slant Roof Utility Shed Plans Blueprints 04 Back Wall Framing
8x12 Slant Roof Utility Shed Plans Blueprints 05 Side Wall Framing
8x12 Slant Roof Utility Shed Plans Blueprints 02 Full Framing
8x12 Slant Roof Utility Shed Plans Blueprints 07 Front Wall Sheathing
8x12 Slant Roof Utility Shed Plans Blueprints 08 Rear Wall Sheathing
8x12 Slant Roof Utility Shed Plans Blueprints 09 Side Wall Sheathing
  1. Craft and hoist the rear wall into position such that the edges of the bottom plate are aligned with the sheathing on the floor.
  2. Check that the frame is perfectly plumb and level. Then use 2×4 bracing to support it while you work on the remaining walls.
  3. Next, frame the side walls by marking the locations for the studs on the bottom plate.
  4. Secure the rear wall with the side walls using 16d galvanized nails. Verify that the outer wall edges are aligned with each other correctly.
  5. Lastly, construct the front wall as shown in the diagram and fasten it to the side walls with nails.
  6. Fasten 4×4 beams to the upper wall plates using framing nails. These will brace the overhang of the roof along the wall.
  7. Craft the siding panels to the required dimensions by cutting with a circular saw. Align and fasten each panel such that the lengthier seams are placed horizontal, and each upper piece covers the lower piece.
  8. Use 6d nails to fasten the siding panels at intervals of 6 inches along the outer perimeter. Nail at twelve-inch intervals over the studs.
  9. There may be gaps between the vertical seams of the panels, which can later be sealed with caulk.
  10. Use chalk to trace the lengths of siding pieces that will need to be installed around the doors and windows. Cut them to size using a jigsaw.

Rafter Pattern And Roof Framing Schematics

8x12 Slant Roof Utility Shed Plans Blueprints 06 Roof Framing
8x12 Slant Roof Utility Shed Plans Blueprints 10 Roof Sheathing
8x12 Slant Roof Utility Shed Plans Blueprints 18 Rafter Blocking
8x12 Slant Roof Utility Shed Plans Blueprints 19 Rafter Notches
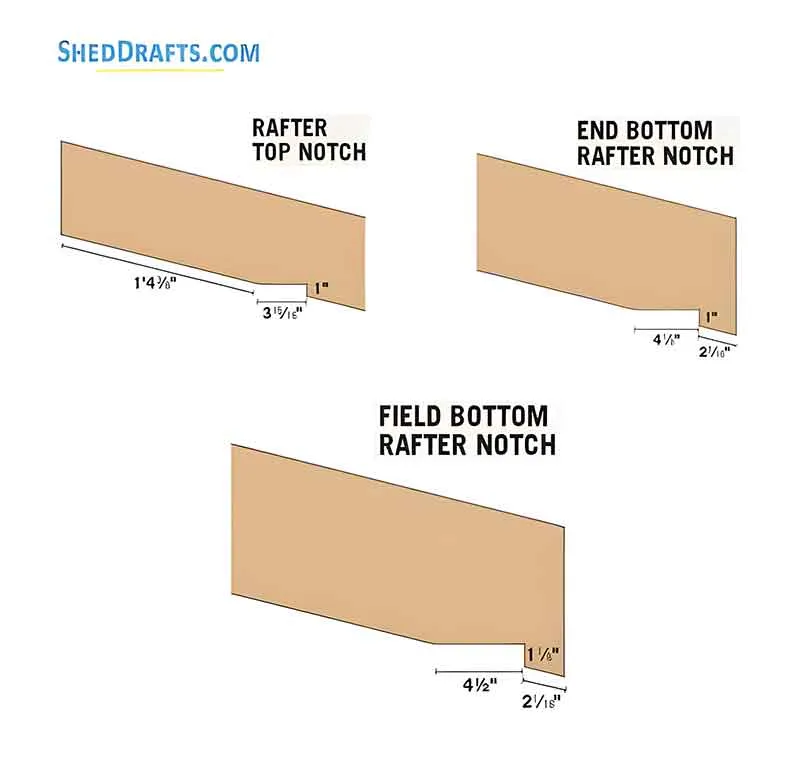
  1. Create a speed square to create the rafter template as shown in the roof framing plan.
  2. There will be one template for the field rafters and another template for the end rafters.
  3. Cut the notches in the rafters with a jigsaw.
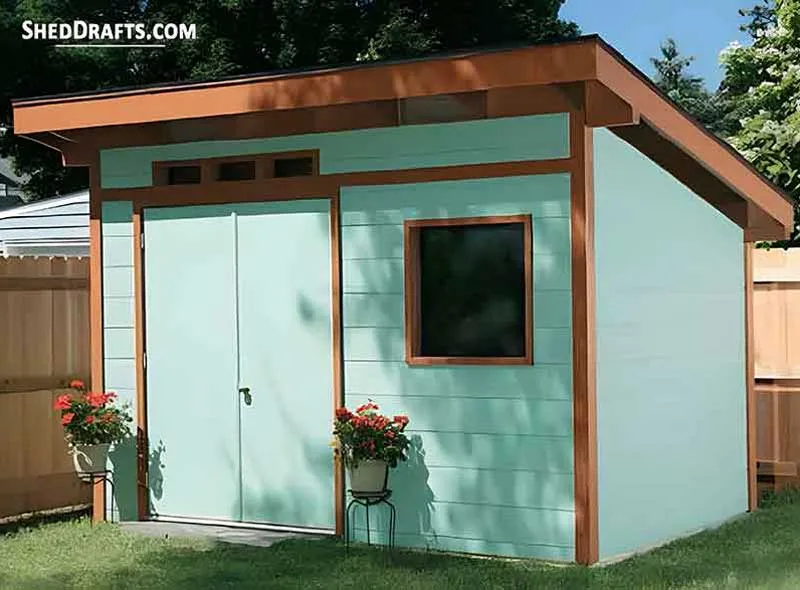
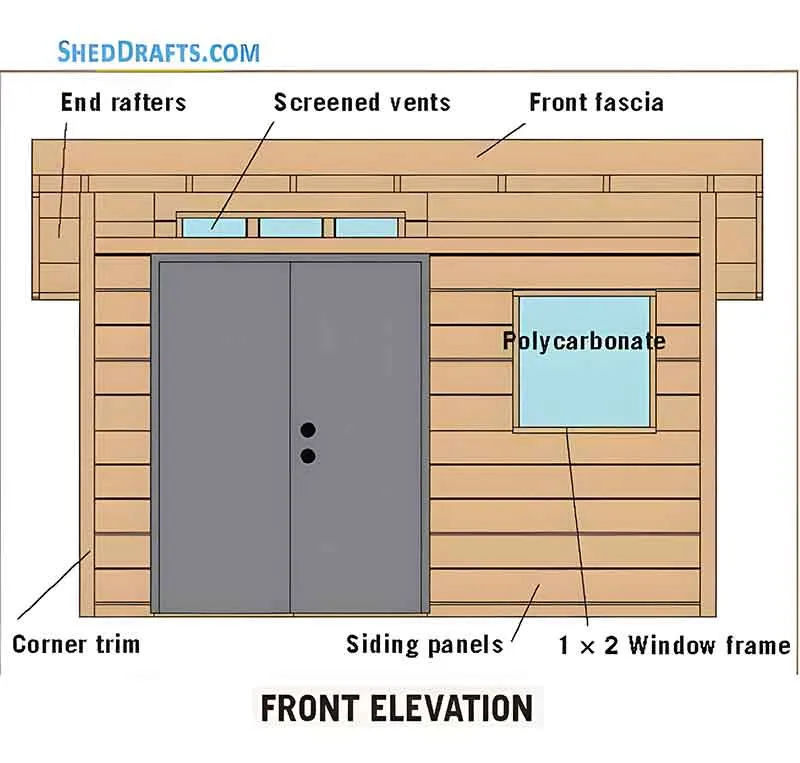
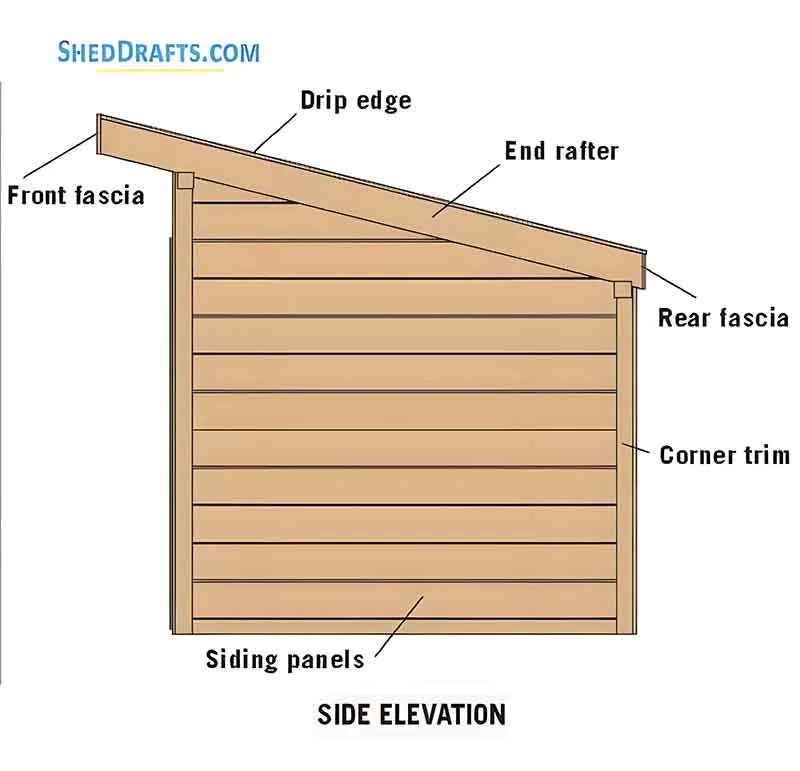
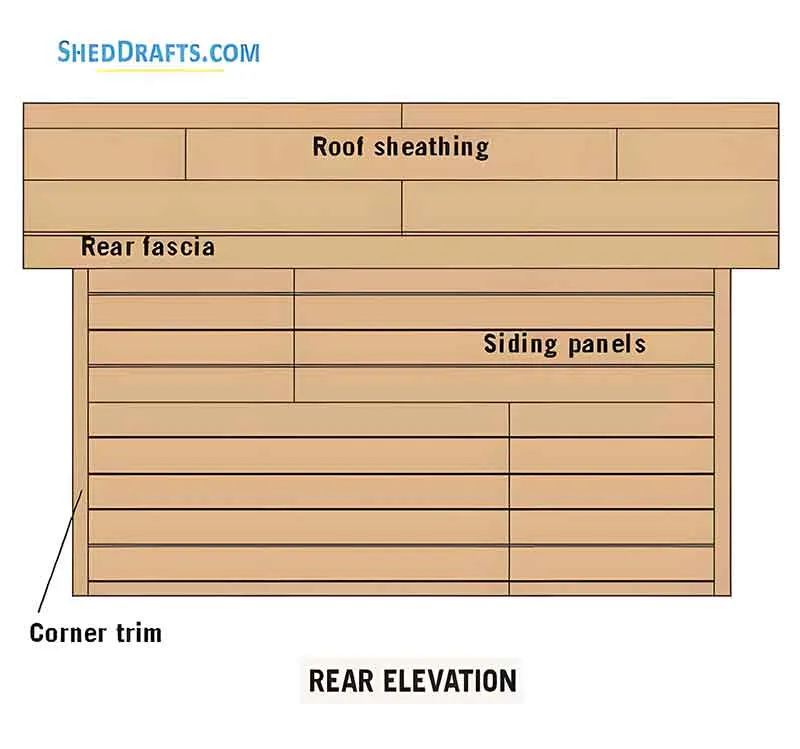
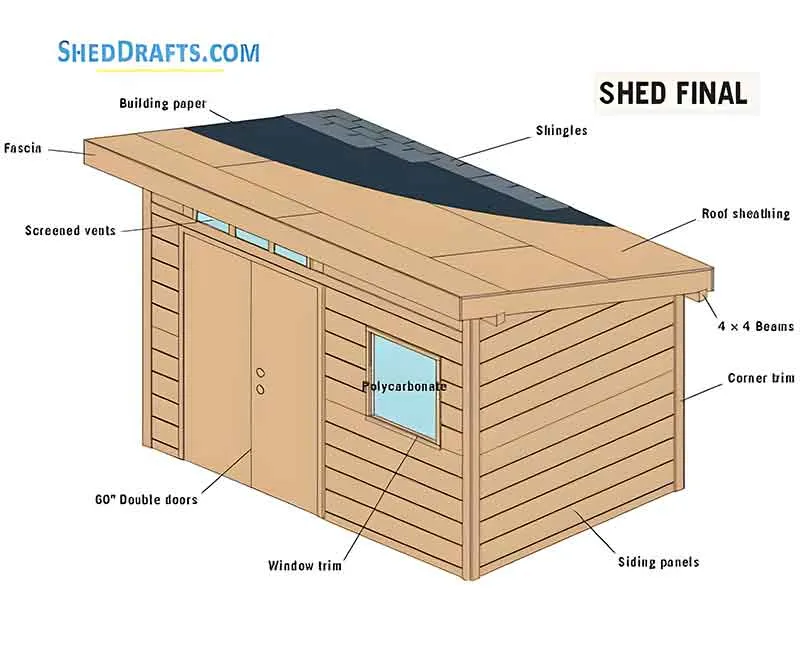
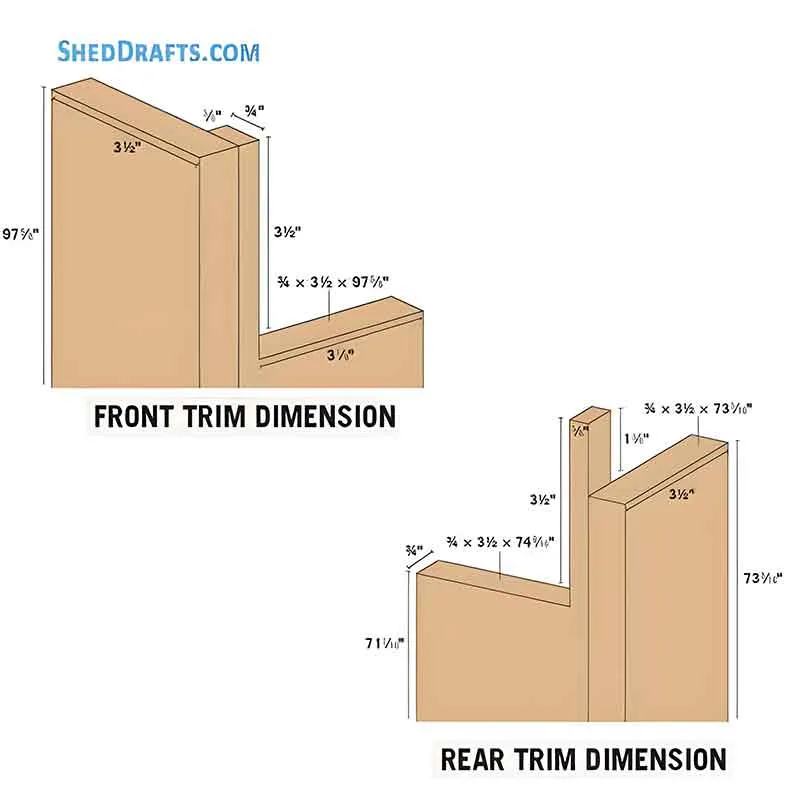
  4. Craft the front and rear fascia from a 1×10 board. The rear fascia will hold up the roof sheathing while the front fascia braces it.
  5. Apply stain to all the blocking, fascia, trim, and rafters on all sides.
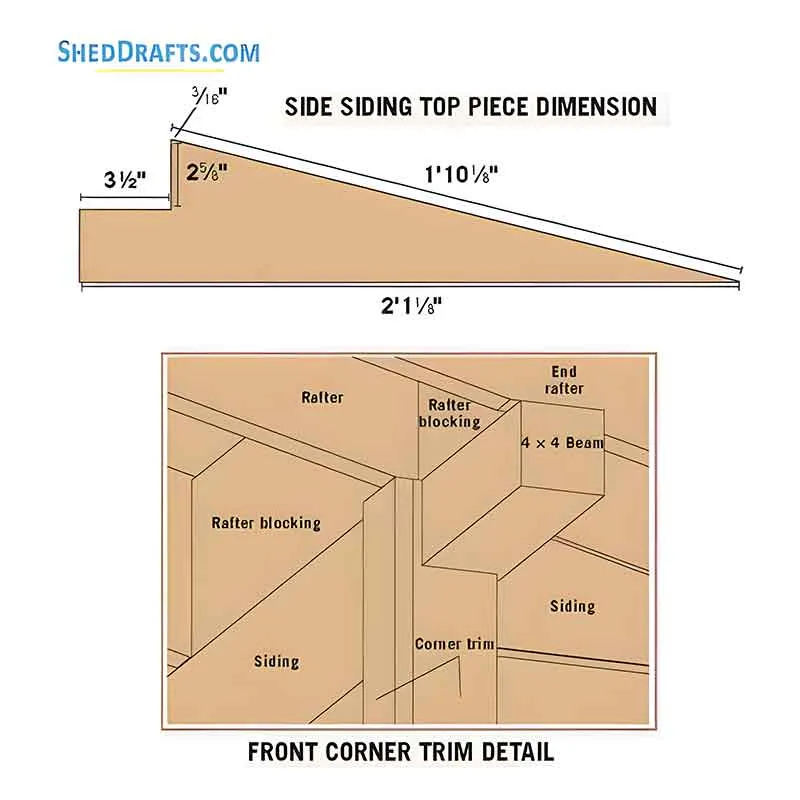
  6. Toenail each rafter into place with 16d galvanized nails, as shown in the rafter framing diagram.
  7. Then fasten galvanized hurricane straps to each rafter with joist hanger nails to provide further support.
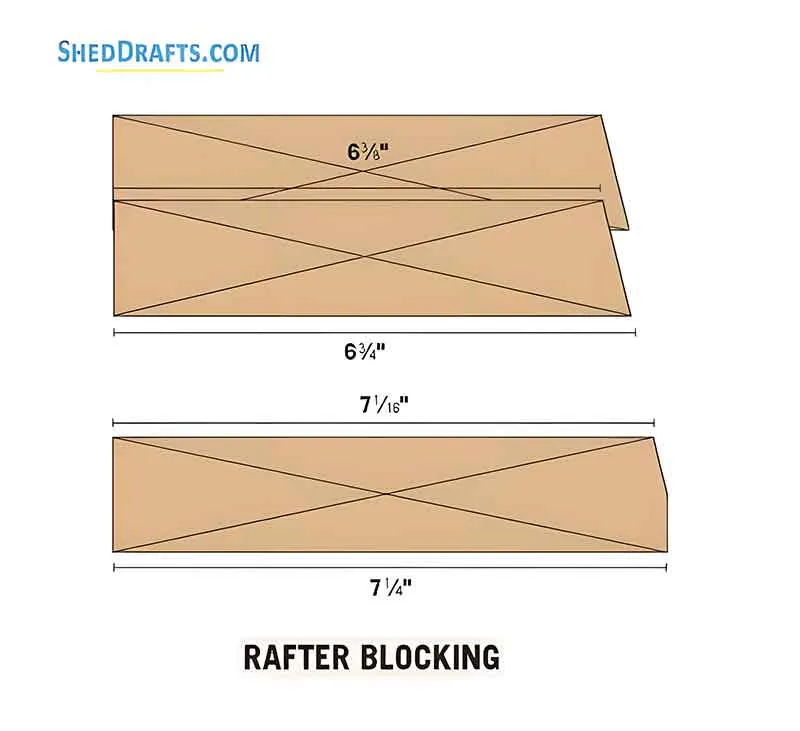
  8. Secure the rafter blocking by driving 10d nails into the neighboring rafter. After this, toenail the remaining end of the rafter blocking to the adjacent rafter.
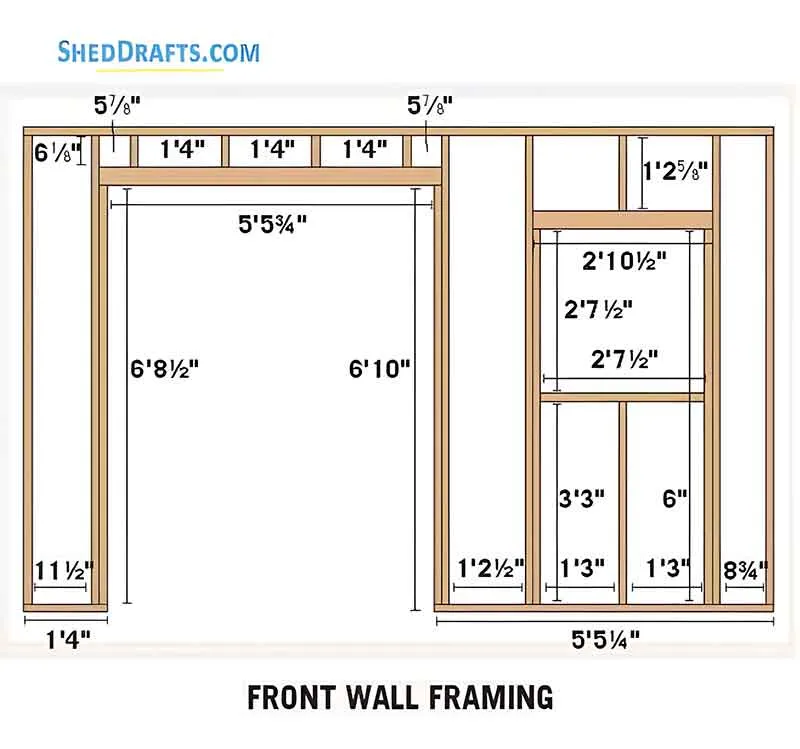
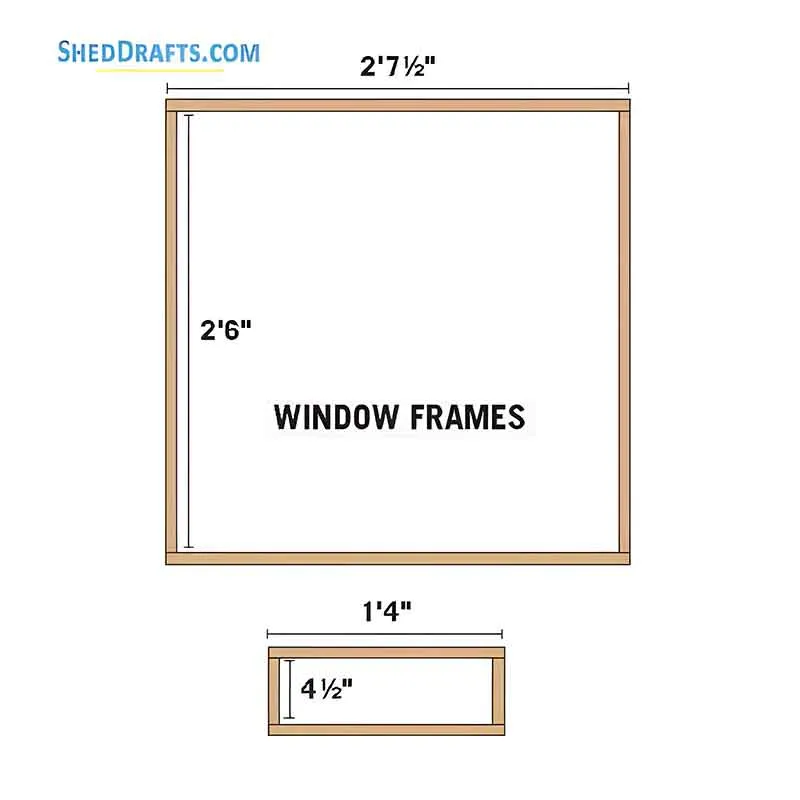
  9. Create 3 frames using 1×2 timber to fill the opening we left in the front wall.
  10. Secure window screens on the inner side of the frames and then attach them with the rafters using two-inch deck screws.
  11. Use a drill to create pilot holes and avoid cracking the timber.
  12. Install a drip edge over the rear perimeter of the roof and then staple multiple layers of building paper over it.
  13. Afterward, install more drip edges across the front and side perimeter of the roof.
  14. Lastly, install asphalt shingles with roofing nails.

    Drafts To Construct Windows And Doors

    8x12 Slant Roof Utility Shed Plans Blueprints 16 Window Frames
    8x12 Slant Roof Utility Shed Plans Blueprints 14 Front Rear Trim Dimensions
    8x12 Slant Roof Utility Shed Plans Blueprints 15 Corner Siding Trim Details
    8x12 Slant Roof Utility Shed Plans Blueprints 20 Material List
    1. Use acrylic plastic for crafting the windows. Cut the pieces to size using a table saw by supporting it with plywood. This will prevent the plastic from running off or trembling as you make the cut.
    2. Make sure to use masking tape to get a clean edge and clamp a timber board over the plastic to use as a cutting guide.
    3. Craft two frames for each window from 1×2 lumber as shown in the shed window blueprints. The plastic will be held between these frames.
    4. Create pilot holes with a drill and Install the outer frame over the siding using deck screws.
    5. Cover the inner edge of the outer window frame with transparent exterior caulk and fasten the window in place between the two frames. Install the screened ventilation over the door similarly.
    6. We installed a pre-fabricated, steel double-door, but you can craft the doors out of timber if you would prefer that.
    7. Determine the length of timber that would be needed to create the window trim and cut the trim to size.
    8. Install each trim section flush with the window frame’s inner edge using 8d casing nails.
    9. Cut a notch into the trim sections that will be used on the side corners with a jigsaw. This will make sure they tightly fasten to the beam.
    10. Secure the corner trim with galvanized 8d nails.