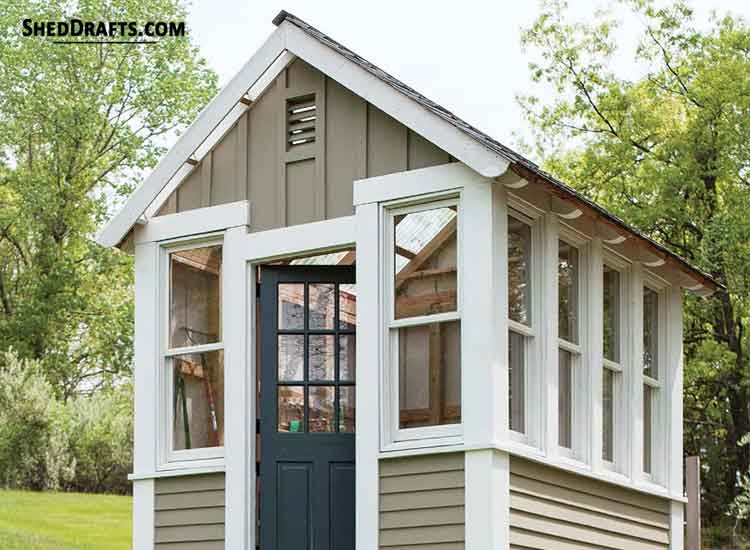
Follow our 8×10 timber frame garden shed plans blueprints to design a spacious utility shed within a short time.
This unique 8×10 garden storage shed can be used as a special place for storing your tools, plants and other garden supplies.
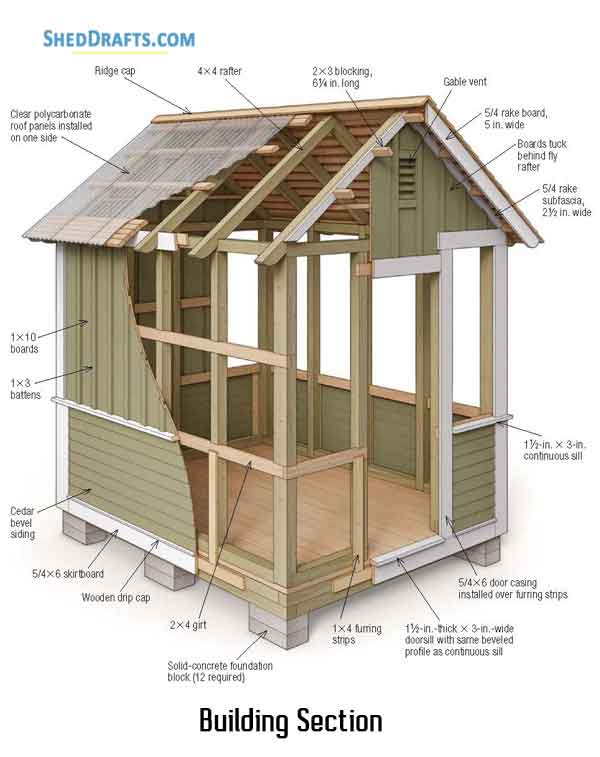
It can also serve as a small greenhouse because one side of the roof is covered with clear thermoplastic panels.
There are seven big windows to provide ample air and sunlight.
Architecture Plans For 3D Building Layout
Construction Blueprints With Floor Framework
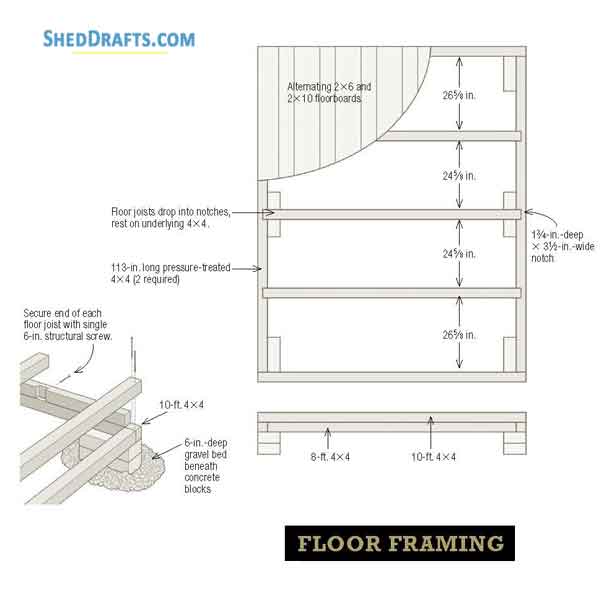
Foundation
Since pressure-treated 4x4s vary in size depending how wet they are, use a 4×4 block to mark the width of the rim-joist notches.
After positioning the 4×4 block with a layout square, draw a line along each side of the block to represent the shoulder cuts.
Guide the circular saw along a layout square to produce accurate, perfectly square shoulder cuts on each side of the half-lap joints.
Then saw away a majority of the waste wood in between by making several closely spaced kerf cuts.
Once you’ve made all the kerf cuts, use a hammer to break off the thin waste-wood slices that remain in the rim-joist notches.
Take a wide chisel and scrape the notches smooth and flat.
Hold the chisel bevel-side down to prevent it from gouging the surface.
Floor Frame
Starting at the highest corner, clamp a level to the 4×4 rim joist, then adjust the other blocks in the row until they’re perfectly level.
Check the frame for square by measuring diagonally across the opposite corners.
The frame is square when the dimensions match.
Use a cordless impact driver to quickly drive in the 6 inch long structural screws.
Secure each overlapping corner joint with two screws.
Snap a chalk line, then use a circular saw to trim the overhanging ends of the 2×6 and 2×10 floorboards flush with the shed’s floor frame.
Diagrams For Erecting Wall Framework
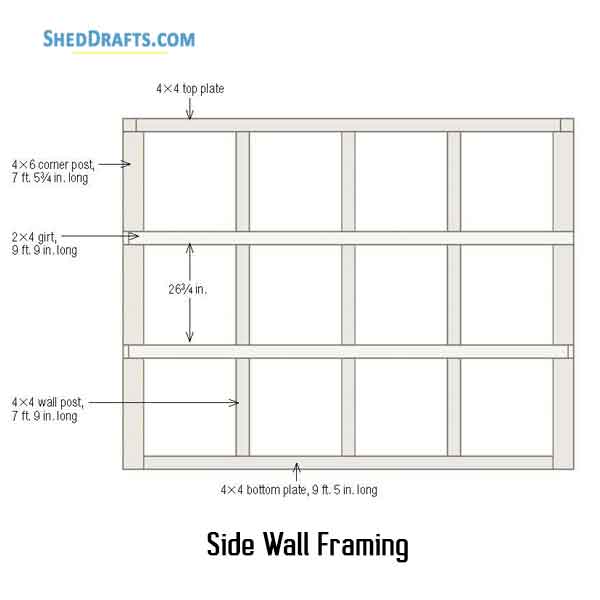
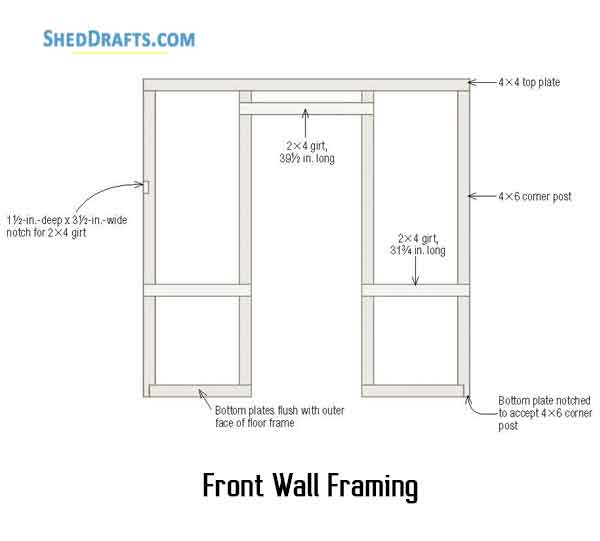
Clamp together several pressure-treated 4×4 wall posts, then kerf-cut the 1.5 inch deep notches to receive the horizontal 2×4 girts.
After sawing a series of closely spaced cuts through the half-lap joints, use a hammer to chop out as much waste wood as possible.
With the 4×4 wall posts still clamped together, scrape smooth the bottom of the half-lap joints with a wide wood chisel.
Install a pressure-treated 4×6 corner post at each corner of the shed floor.
Fasten the bottom of each post with two 6 inch screws.
Cut the 2×4 horizontal girts to length, then nail them to the notches in the corner posts.
Be sure the posts are plumb before nailing.
Put the 4×4 wall plates on top of the corner posts.
Attach the gable-end wall plates first, then set the longer sidewall plates in between.
Slip the 4×4 wall posts into place, making sure their notches fit snugly over the top and bottom wall plates and horizontal 2×4 girt.
Once the 4×4 wall posts have been screwed to the top and bottom wall plates, nail through the horizontal 2×4 girt and into the posts.
Install the upper row of 2×4 girts into the half-lap notches cut into the 4×4 wall posts.
Secure the girts to the posts with 3 inch nails.
Nail a short girt over the doorway to create a header.
The lower girt spanning the opening will be cut out later to accommodate the door.
Roof Framework Assembly And Rafter Template

Frame Roof
Hold the rafter-layout jig flush with the end of the 4×4 rafter.
Then scribe a line along the template’s curved shape to mark the rafter tail.
Cut the curved shape into each rafter tail with a jigsaw and extra-long 6 inch blade.
Cut slowly and leave just a little of the pencil line.
Clamp together all the rafters, making sure the rafter tails are flush.
Then use a belt sander and 60-grit belt to smooth the rounded ends.
Align the rafter-layout jig with its plywood template flush with the rafter end.
Draw a line along the template to mark the angled cut line.
Reposition the jig so that the 1×4 is now even with the rafter end.
Draw another angled line to mark the notch for the half-lap joint.
Use a power miter saw to cut the rafter ends to 16.3°.
That way, when the roof trusses are assembled, they’ll form a 9-in-12 roof pitch.
Clamp the 4×4 rafters together and adjust the circular saw to cut 13⁄4 inches deep.
Then, saw along the shoulder line of the half-lap joints.
Snap a chalkline across the ends of the 4×4 rafters.
Cut as deeply as possible along the line to establish the face of the half-lap joints.
Knock out the wood block from each half-lap joint with a hammer and chisel.
Clean up the cuts by scraping the joints flat and smooth.
Saw the bird’s-mouth cut in two passes: Put the saw blade to 37° and make the seat cut.
Then, tilt the blade to 53° for the plumb cut.
Frame each gable-end truss for a vent.
Nail the header between the vertical nailers and attach the sill.
Then nail the assembled frame to the rafters.
Install The Trusses
Fasten the gable-end truss to the top plate by driving a 6 inch structural screw into the top of the rafter and through the bird’s-mouth cut.
Clamp a level to the gable-end truss, then nail a 2×3 across the roof rafters to hold the trusses perfectly plumb and properly spaced.
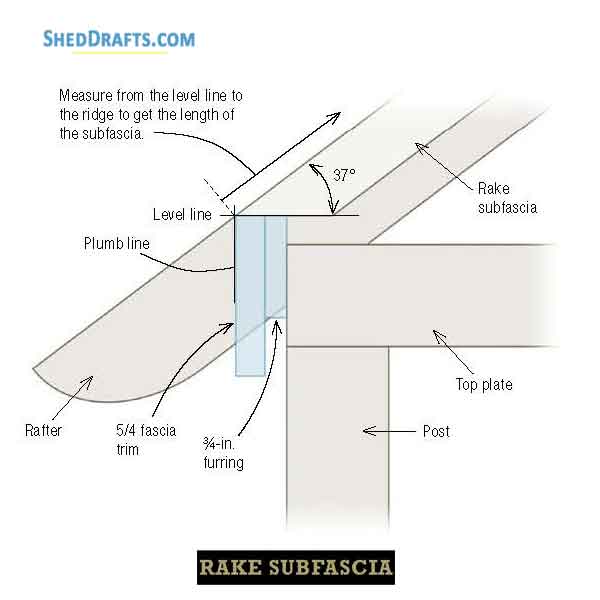
Clamp together the rake subfascias, forming a tight miter joint.
Bore screw-pilot holes, then fasten the parts with 3 inch screws.
Attach furring strips to the gable-end rafters, then nail up the rake subfascia.
Align the subfascia flush with the top of the rafters.
Use pocket screws to join together the two 5 inch wide rake boards.
Bore the pocket holes into the back surface so they won’t be visible.
Nail the rake board to the 2×3 blocks protruding from the subfascia.
Drive two 3 inch long nails into each of the six blocks.
Mark curved cut lines onto the ends of the rake boards using the same template used earlier for scribing the ends of the rafter tails.
Use a jigsaw to cut the rounded shape into the rake board ends.
To minimize splintering, cut slowly and use a fine-tooth wood blade.
Roofing
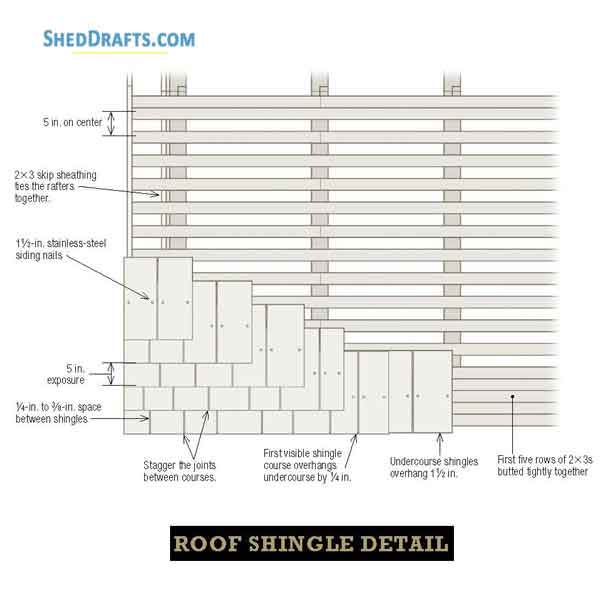
To support the red-cedar shingles, nail 2×3 skip sheathing to the rafters.
Space the rows 2.5 inches apart and fasten them with 31⁄2 inch nails.
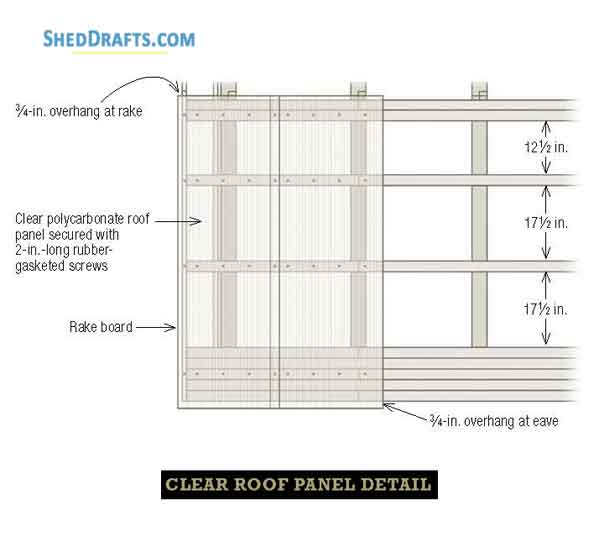
On the opposite side of the roof, nail down three rows of 2×3 skip sheathing to support the lightweight clear polycarbonate panels.
Attach a 2×4 spacer and 1×4 ledger to the eave, then nail on the very first row of shingles, which is known as the undercourse.
Nail the first visible course of shingles directly over the undercourse shingles.
Position the nails 61⁄2 inches from the butt edge.
Make a jig to hold the shingles in place for nailing.
Leave a gap between each shingle and stagger the joints from one course to the next.
Install The Polycarbonate Panels
To save time, gang-cut all the polycarbonate roof panels at once.
For the cleanest cut, mount the blade backward on the circular saw.
Mark the locations of the skip sheathing onto the roof panels.
Then, bore 1⁄4 inch dia. pilot holes through the panels at each mark.
Fasten the polycarbonate roof panels with rubber-gasketed screws.
Don’t overtighten the screws or you’ll crush the corrugations.
To help seal out rain, overlap the panels by at least one full trough.
Rip the last panel to fit, making sure it extends 3⁄4 inches past the rake.
Make a continuous ridge cap by screwing a 41⁄4 inch wide cedar board to a 1×4 cedar board.
Join the boards with 15⁄8 inch decking screws.
Put the ridge cap over the roof peak.
Bore pilot holes every 18 inches or so along both sides of the cap, then fasten it with 2.5 inch screws.
Install The Windows
Nail 1 inch thick vertical wood strips to each window rough opening.
The strips provide support for the windows’ mounting flanges.
Use a level to plumb up each window.
Make the spaces between windows even and parallel.
Otherwise, you’ll have to cut tapered pieces of trim to fit.
Plumb the door, then secure it to the rough opening by screwing through the jambs and into the 4×4 wall posts on either side.
Siding And Trim
Fasten 1×4 furring strips to each wall post and corner post.
Note that two furring strips are nailed to the 6 inch face of the 4×6 corner posts.
Nail a continuous sill to the tops of the furring strips.
The 3 inch wide sill separates the top half of the walls from the bottom half.
Join the sill pieces at each corner with a miter joint.
Bore a pilot hole first, then screw each joint together with a single 3 inch screw.
Use the tablesaw to bevel-rip 45° miters into the corner boards.
Then, fasten the boards together with 15⁄8 inch long trim-head screws.
Hold the assembled corner board on the corner post and tight to the bottom of the sill.
Secure the corner board with ring-shank nails.
Cut a 6 inch wide skirt board to fit snugly between the corner boards.
Fasten the skirt to the furring with 2.5 inch long ring-shank nails.
Nail a wood drip-cap to the top edge of the skirt boards.
The drip-cap has a beveled surface, which will help drain away rainwater.
Cut the cedar bevel siding slightly longer than the distance between the corner boards.
Snap it into place and fasten with 2 inch nails.
When installing the cedar siding, measure frequently to maintain a 4 inch exposure to the weather.
Center all butt joints over a post.
Install The Board-and-Batten Siding
Start the board-and-batten siding centered on the rear gable wall.
Plumb and nail the first 1×10 board, then work out in both directions.
As you nail up the 1×10 boards, maintain the 1.5 inch expansion space by holding a 1.5 inch wide spacer strip between the boards.
Cover the spaces between the 1×10 boards with vertical 1×3 battens.
Center and plumb the battens and nail them to the wall framing
Use a jigsaw to notch the fascia board to fit around the rafter tails at the top of the left sidewall; that’s the wall without windows.
Fasten a louvered vent to the framed opening at the top of each gable-end wall.
The vents are needed to let hot air escape the shed.