16×16 Gable Storage Shed Plans With Build Guide
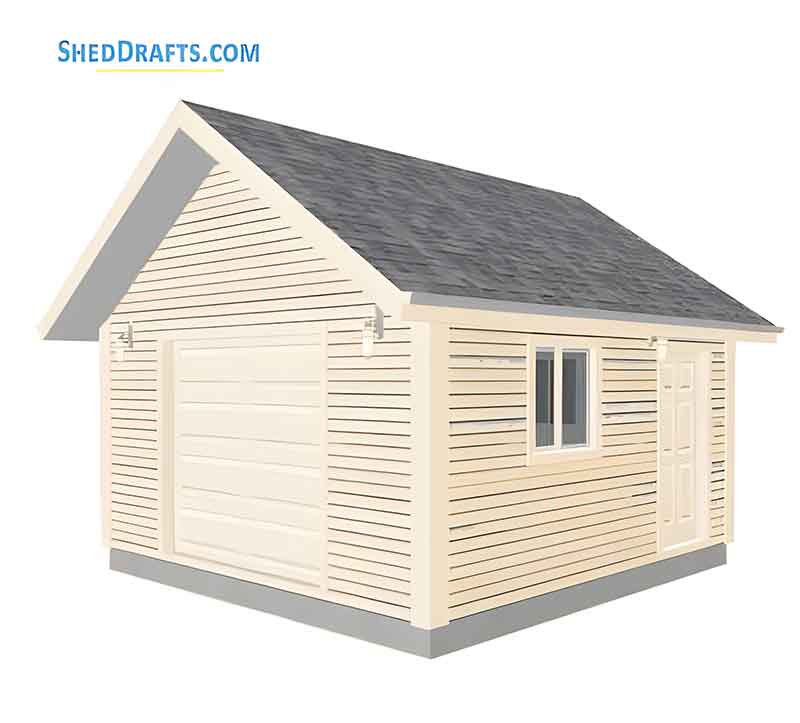
These 16×16 gable storage shed plans can be used to build a storage space for equipment, a garage, or even serve as a useful extra room close to your home.
After creating the roof framework, check the diagonal measurements immediately to make sure the structure is perfectly square.
You can customize your outbuilding with extras such as a skylight, plumbing, or a workbench, depending on how you plan to use the space.
KEY TAKEAWAYS
You must use a dropped-header configuration over the 8′ garage opening paired with double 2×6 framing ties directly into the top plate assembly to eliminate sag across the large clear span.
Style & Footprint – 16′ x 16′ gable roof with a square 256 sq. ft. foundation print.
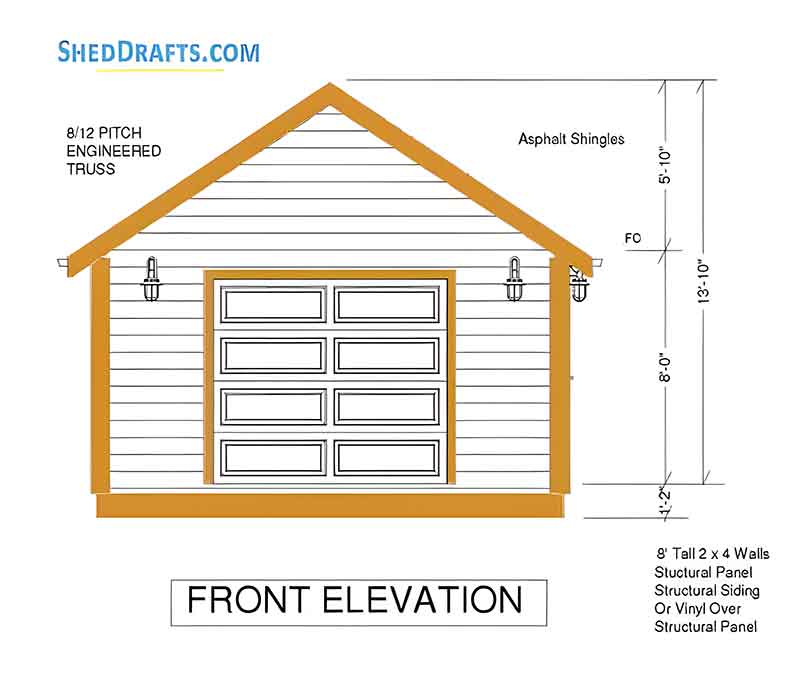
Highlight Specs – 8:12 roof pitch angle, 8′-0″ W x 7′-0″ H garage/roll-up door rough opening, 13′-1″ total peak height from grade, wall framing set at 16″ O.C., and roof framing set at 24″ O.C.
Permit Status – Exceeds the standard 120 sq. ft. and 200 sq. ft. municipal permit exemption limits in most US jurisdictions, requiring a standard residential accessory structure building permit and site plan approval.
What Fits Inside – Double zero-turn riding mowers side-by-side, compact utility tractors with front loaders, full-size ATVs, heavy-duty woodworking equipment, or a complete wall-hung workshop system alongside seasonal gear.
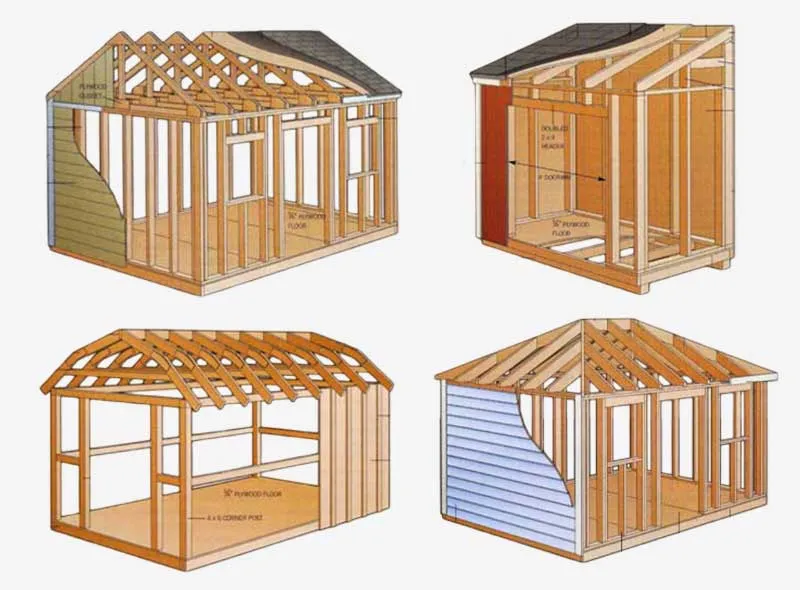
16x16 Gable Shed Plan Overview & 3D Building Layout
Raw structural materials, including pressure-treated foundation timbers, floor joists, subfloor panels, wall studs, roof rafters, sheathing, weather wrap, architectural shingles, and basic trim, average approximately $18 to $24 per square foot.
At 256 square feet, that puts the raw material cost around $4,600 to $6,100, depending on local lumber prices and exterior finish choices.
A prefabricated 16×16 kit or retail-delivered outbuilding typically runs about $38 to $50 per square foot installed. That works out to approximately $9,700 to $12,800.
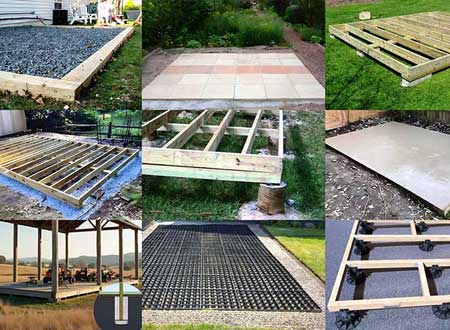
Foundation & Floor Frame Blueprints (Gravel Pad vs. Concrete Slab)
For most site conditions across US Climate Zones 3 through 7, I’d lean toward a floating skid foundation over an engineered, properly compacted crushed stone pad.
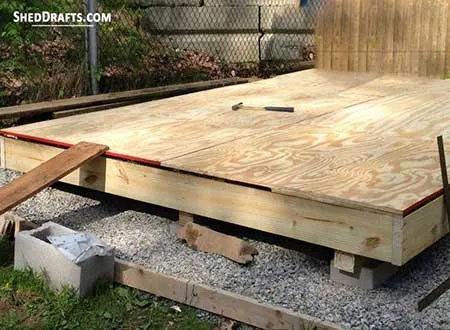
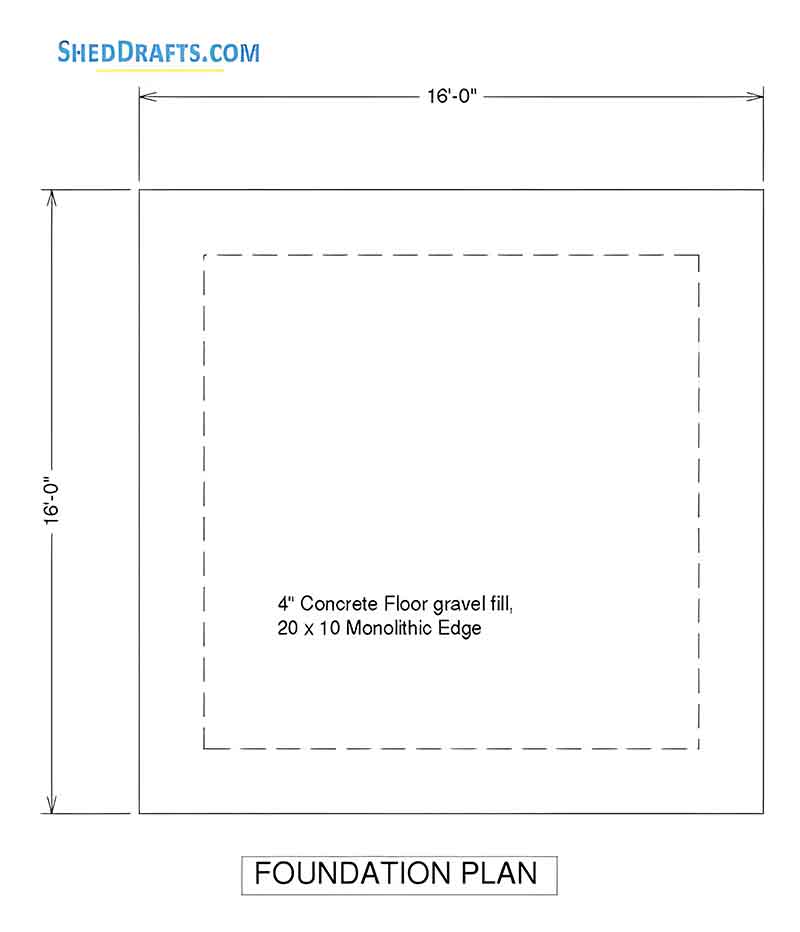
The design uses five pressure-treated 4×4 timber skids running the full 16-foot length of the building. They sit on a 4-inch to 6-inch layer of compacted 3/4-inch minus crushed gravel.
I like this approach because drainage is built into the foundation rather than treated as an afterthought. Water can move away from the floor framing, while the floor system can move somewhat with seasonal freeze-thaw cycles without the cracking or binding you’d worry about with an inadequately founded slab.
If you’re putting stationary heavy iron tools, car restoration equipment, or cast concrete ramps inside, you should only use an engineered 4-inch thick concrete slab with thickened monolithic edge footings instead.
That’s a different animal. In northern latitudes, perimeter footings generally need to extend below the regional frost line, which frequently means 36 inches to 48 inches deep.
Subfloor Sheathing Standards and Fastening Rules
A small error at floor level can compound as you stack wall plates and set trusses. By the time you get to the 8:12 roof ridge, what looked like a harmless little discrepancy can become a twisted peak.
Before driving a single subfloor nail, check the frame diagonally from corner to corner across the outside edges of the rim joists. A true 16-foot by 16-foot square has diagonals of exactly 22 feet 7 and 1/2 inches, or 271.5 inches.
If the measurements differ by even a quarter-inch, rack the frame by pushing against the long diagonal until both measurements match.
Then lock it down.
I use temporary 2×4 diagonal braces tack-nailed across the tops of the joists while the subfloor is being installed. Keep them there while you glue and nail the panels. Once the subfloor diaphragm is secured, the frame has a much better chance of staying exactly where you put it.
Achieving Absolute Frame Squareness
A small error at floor level can compound as you stack wall plates and set trusses. By the time you get to the 8:12 roof ridge, what looked like a harmless little discrepancy can become a twisted peak.
Before driving a single subfloor nail, check the frame diagonally from corner to corner across the outside edges of the rim joists. A true 16-foot by 16-foot square has diagonals of exactly 22 feet 7 and 1/2 inches, or 271.5 inches.
If the measurements differ by even a quarter-inch, rack the frame by pushing against the long diagonal until both measurements match.
Then lock it down.
I use temporary 2×4 diagonal braces tack-nailed across the tops of the joists while the subfloor is being installed. Keep them there while you glue and nail the panels. Once the subfloor diaphragm is secured, the frame has a much better chance of staying exactly where you put it.
16x16 Wall Framing Diagrams & Overhead Door Header Specs
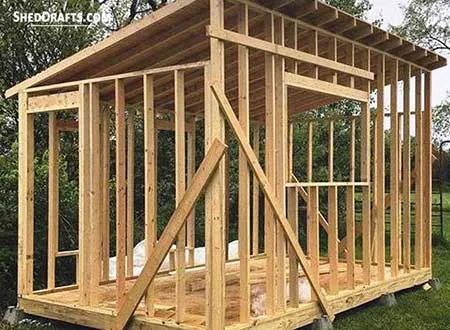
This design uses an interior wall stud height of 8 feet 1 inch, measured from the top of the subfloor sheathing to the underside of the rafter seats.
With the bottom sole plate and double top plate assembly included, the exterior eave line sits approximately 8 feet 7 inches above the foundation line.
That extra height is useful.
An 8-foot clear working height gives you room for standard 8-foot sheet goods, vertical lumber racks, and tall shop cabinetry without having everything fighting the wall-to-ceiling transition.
Stud Layout, Load Alignment, and Double Top Plates
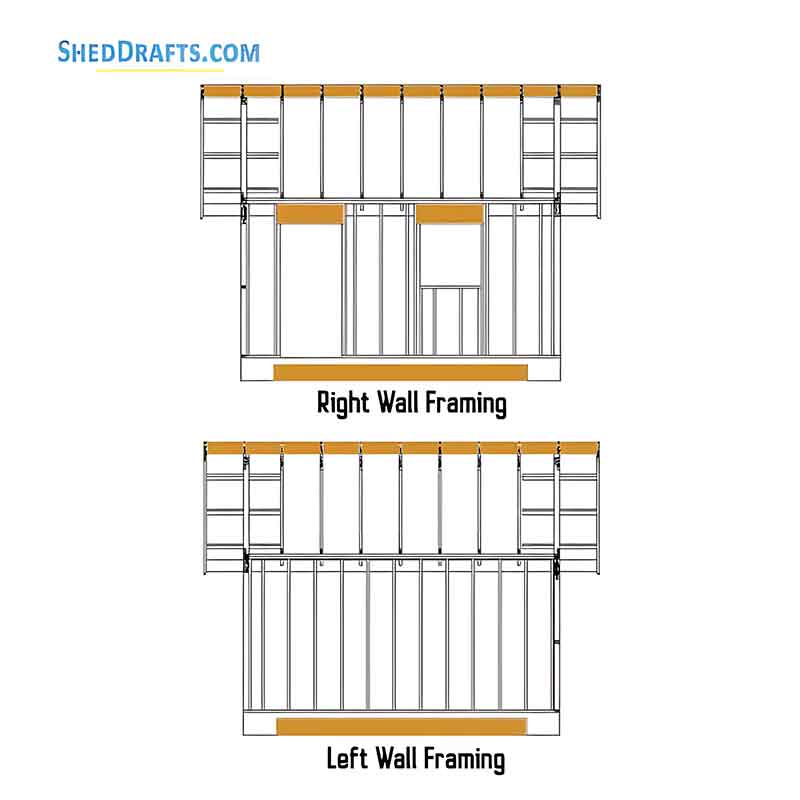
All exterior walls use 2×4 wall studs spaced at 16 inches on-center. I’ve always preferred this spacing for straightforward framing because it lines up cleanly with standard insulation batts, exterior siding panels, and interior finishes while providing solid axial load capacity.
The perimeter framing gets a continuous double top plate. At the corners, the upper plate overlaps the lower plate joints by at least 4 feet, tying the adjoining walls into one continuous structural ring.
Large Opening Engineering: The Front Gable Dropped Header
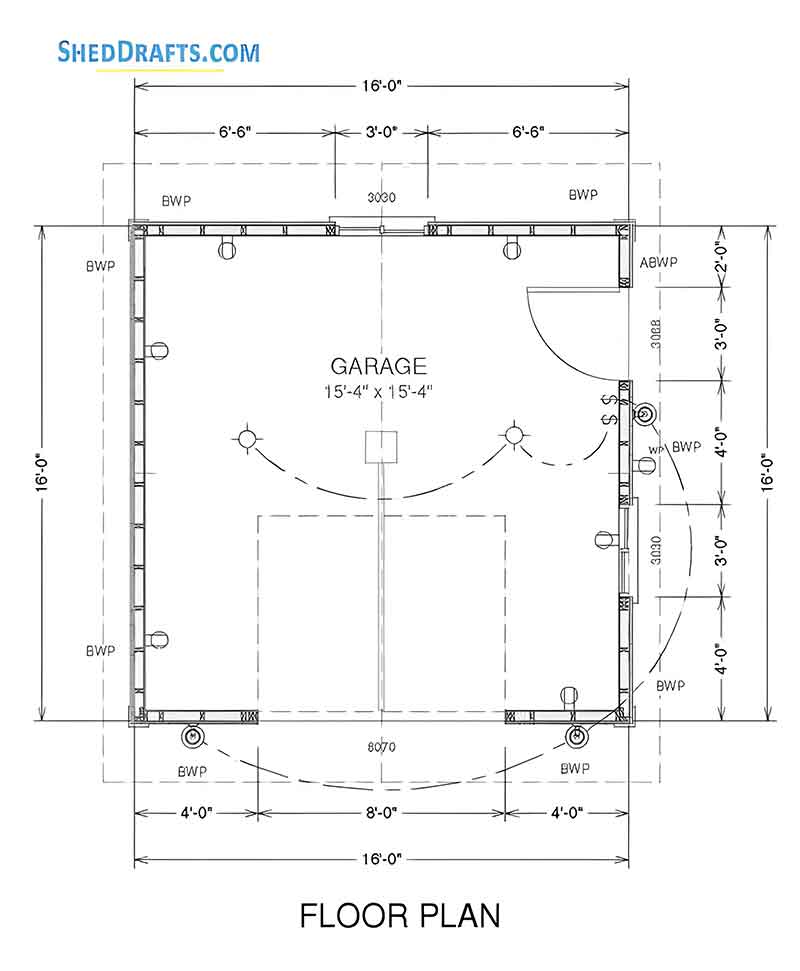
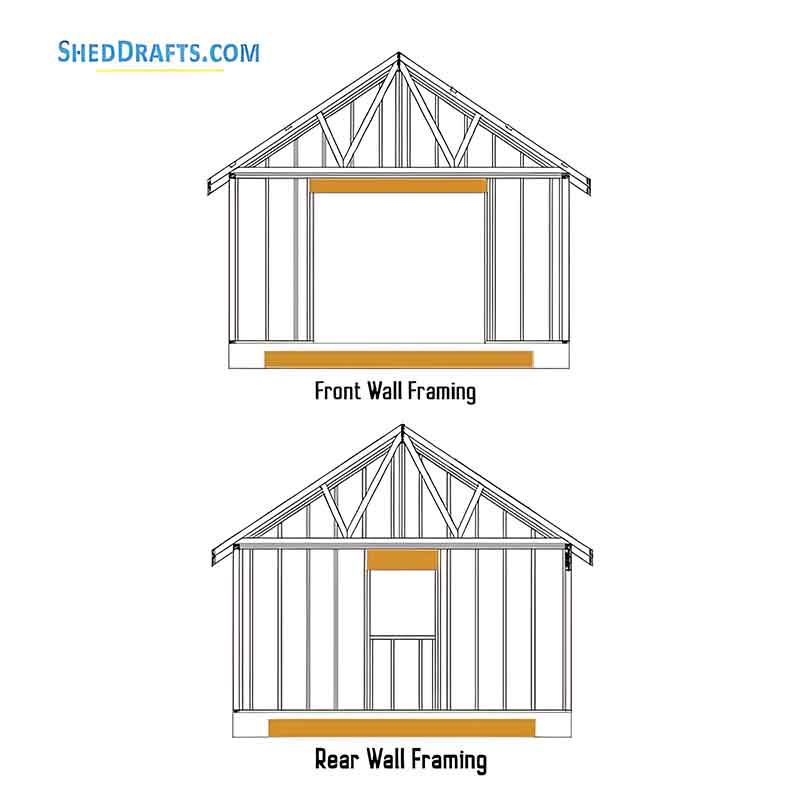
The front wall has an 8-foot wide by 7-foot high rough opening for a commercial roll-up or carriage-style garage door.
A 96-inch opening directly beneath the upper roof rake isn’t something I’d treat casually. The gable wall above it carries triangular wall loads along with the gable framing, so the header needs to be properly supported.
The blueprint specifies a dropped-header configuration using double 2×10 framing lumber. A 1/2-inch exterior plywood spacer core sits between the members and is thoroughly bonded with high-strength polyurethane structural adhesive.
The double 2×10 header bears on robust double Jack studs, or trimmer studs, at both ends. Those are structurally fastened to adjacent full-length King studs using heavy-duty timber screws.
When a wide opening is framed without enough attention to the load path it will get stuck eventually. The door may work perfectly on day one. Months or years later, a little movement can turn into a binding track or a door that no longer wants to behave.
Secondary Entry Framing and Corner Layouts
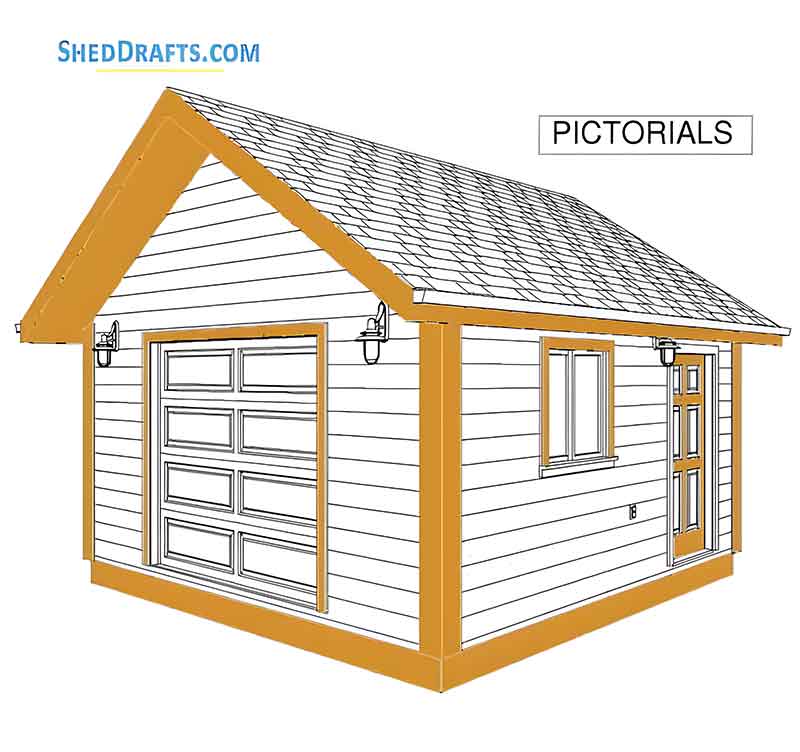
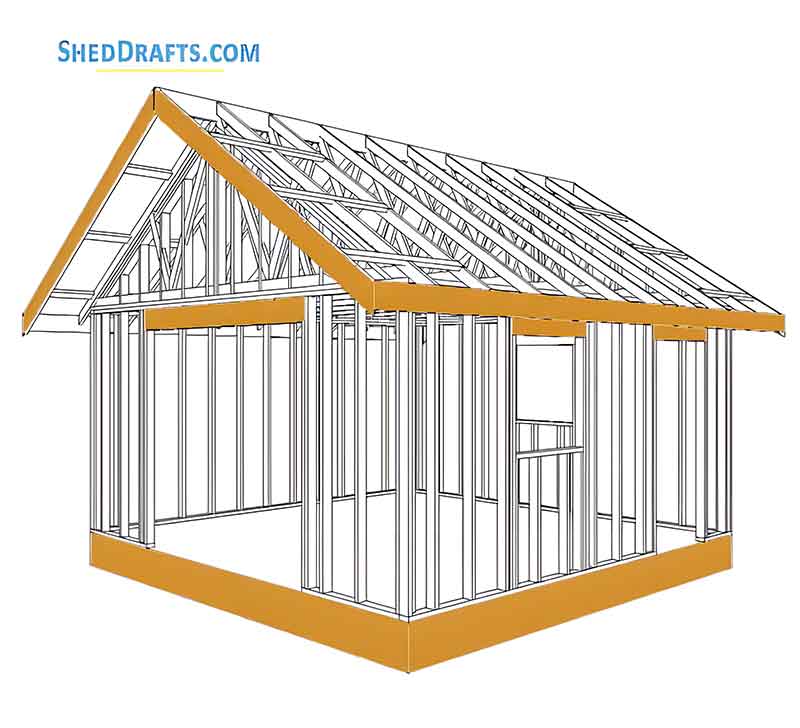
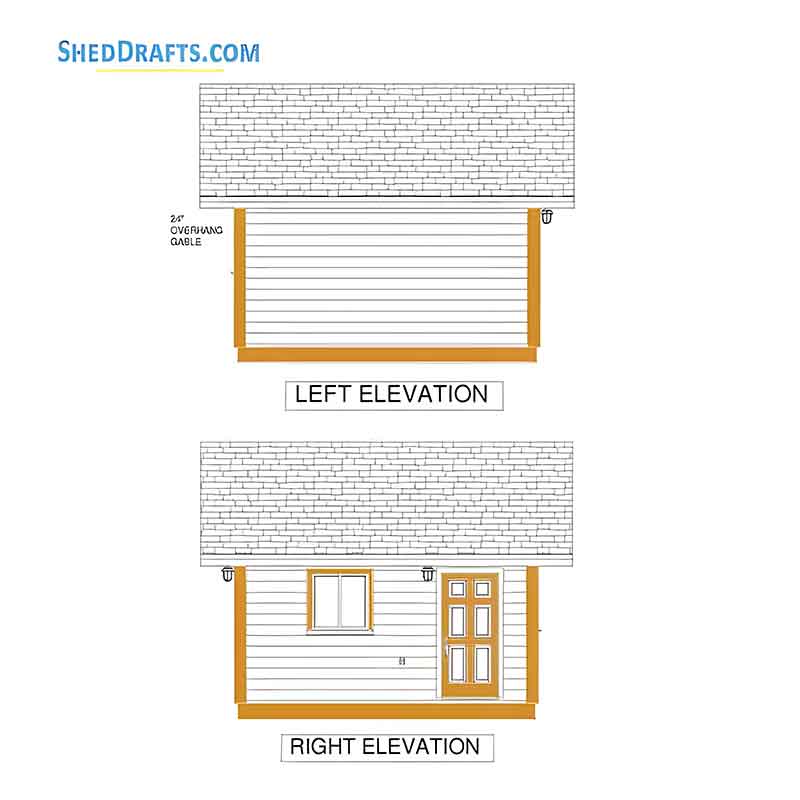
The side wall includes a 3-foot wide by 6-foot 8-inch high rough opening for a standard exterior pedestrian door. This opening uses a double 2×6 header supported by single Jack studs and King studs.
At all four corners, I recommend standard three-stud “California corners.” They’re practical because they give the exterior sheathing a full structural nailing surface while leaving a 1.5-inch interior stud edge exposed.
That exposed edge gives you a solid nailing backer for drywall, plywood, or pegboard without creating an unnecessary uninsulated air pocket in the corner.
Interior Storage Capacity
The 8-foot 1-inch perimeter wall height combined with the open 8:12 gable roof creates approximately 2,688 cubic feet of interior volume. You also get more than 52 linear feet of uninterrupted interior wall stud surface across the side and rear walls.
That 52-plus linear feet can accommodate up to 400 square feet of vertical shelving, wall track systems, and pegboards.
The primary 8-foot wide by 7-foot high garage opening provides a maximum clear diagonal entrance clearance of 10 feet 7 inches. That’s useful if you’re driving wide commercial zero-turn mowers with side-discharge deflectors or utility tractors with attached front-loader buckets into the shed.
8:12 Gable Roof Framing & Rafter Layout Schematics
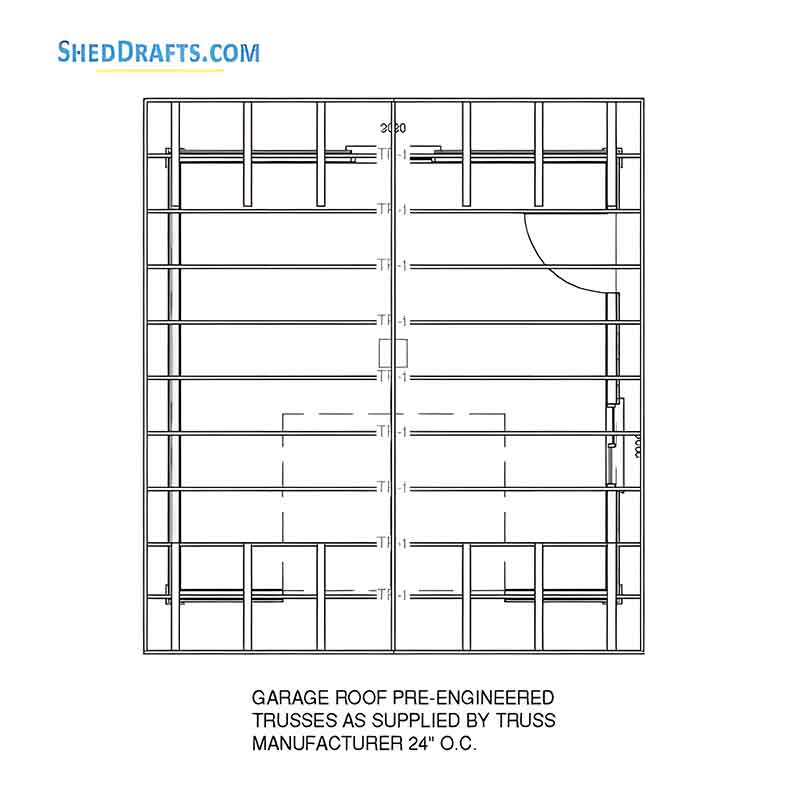
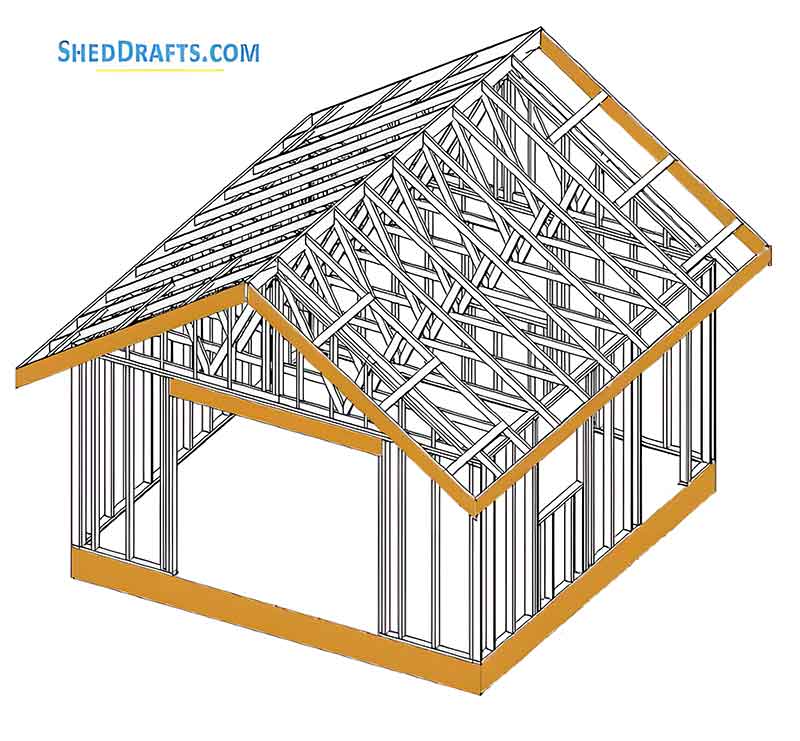
The roof uses traditional 2×6 framing rafters or trusses spaced at 24 inches on-center. The rafters terminate against a solid 2×8 dimensional lumber ridge board running the full 16-foot length of the peak.
This 2×6 rafter arrangement is designed for a maximum ground snow load rating of 40 pounds per square foot (PSF), making it suitable for harsh northern winters.
To achieve a basic wind speed tolerance of up to 110 MPH, each rafter tail is anchored to the double top wall plate with heavy-duty structural metal connector ties, such as Simpson H2.5A hurricane ties, using structural connector nails.
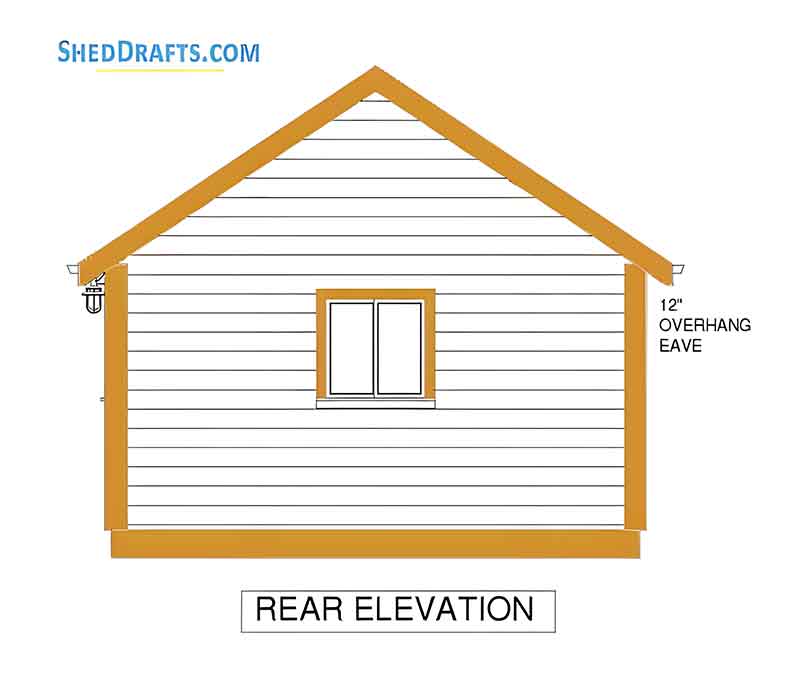
The design uses generous 12-inch eave overhangs along both side elevations and 12-inch gable rake overhangs at the front and rear.
High-Altitude Safety and Temporary Framing Anchors
Long 2×6 rafters on an 8:12 roof mean you’re handling framing members more than 10 feet above the floor deck. Never try to toe-nail rafters to an elevated ridge board by yourself while balancing on ladders.
Before lifting the 16-foot ridge board, screw temporary 2×4 vertical support posts with top ledger blocks to the front and rear gable wall plates. These supports hold the ridge board at the correct peak elevation while you install the end rafter pairs.
I also would not walk along the top plates of a 16×16 open frame without temporary 2×4 collar ties or ceiling joists locked across the plate lines. Those temporary supports help keep the side walls from spreading or bowing while the roof framing goes together.
Weatherproofing House Wrap & Passive Ventilation
Before installing exterior trim or siding panels, wrap all four exterior wall frames with a high-performance commercial vapor-permeable weather barrier, such as Tyvek HomeWrap. For this footprint, you’ll need approximately 750 square feet of weather barrier fabric.
Start at the base plate and work upward. Horizontal seams should overlap by at least 6 inches, while vertical seams should overlap by 12 inches. The idea is to create a shingle-lap drainage plane so water gets directed outward rather than behind the wall assembly.
Secure the wrap with cap staples. Seal vertical and horizontal joints, window penetrations, and door rough openings with approved 3-inch exterior flash tape.
Drip Edge Flashing With Ventilation
The roof deck uses 1/2-inch or 5/8-inch CDX roof plywood or OSB installed perpendicular to the rafters with staggered end joints. On an 8:12 pitch, use H-clips between adjacent sheathing panels midway between the 24-inch rafter bays to prevent panel-edge deflection under snow loads.
Around the roof perimeter, install 72 linear feet of corrosion-resistant metal drip edge flashing. At the eaves, place the drip edge directly over the roof deck sheathing. Along the rake edges, install it over the 15 lb or 30 lb synthetic roof underlayment.
Passive ventilation is also important for controlling summer heat and winter moisture condensation inside the upper roof plenum.
Standard specifications include one 30-inch by 30-inch operable window, providing approximately 6.25 square feet of light and air intake, paired with two 12-inch by 12-inch louvered gable end vents near the peak of the front and rear gables.
Together, these openings provide more than 288 square inches of Net Free Vent Area (NFVA), creating cross-ventilation that helps move warm, moist air out before it condenses beneath the roof decking.
Wall Insulation (R-13/R-21) For Radiant Heat Barriers
Standard 2×4 wall cavities accept R-13 or R-15 fiberglass batt or stone wool insulation. Upgrade the walls to 2×6 framing and you can install R-21 high-density insulation.
For the roof deck, radiant barrier OSB with the foil face toward the rafter cavities can reflect up to 97% of radiant solar heat. Under the stated conditions, this can reduce peak interior summer temperatures by up to 15 degrees Fahrenheit.
Cost-Saving Alternatives: LP SmartSide Siding & Prefab Trusses
Siding Panels
Replacing traditional 5/8-inch T1-11 exterior plywood with LP SmartSide engineered wood panel siding can reduce total siding material costs by approximately 15%.
LP SmartSide also offers better resistance to fungal decay, termite damage, and moisture swelling. Because it comes pre-primed, it can shorten the exterior painting process as well.
Roof Framing Alternatives
If cutting site-built 2×6 stick rafters feels like more work than you want, ordering pre-manufactured 2×4 stick-built roof rafters engineered for your site dimensions can save roughly 6 to 8 hours of complex roof-framing labor.
There’s a tradeoff. Factory truss deliveries can add approximately 12% to the overall framing material budget, and you need clear delivery access to the building site.
4-Weekend Build Timeline & Safety Guidelines
A 16-foot structure is large enough that lumber gets heavy, walls get awkward, and a simple two-person job can suddenly become a four-person job when something needs to be lifted.
Estimated Labor Hours & Weekend-by-Weekend Construction Phasing
Plan on roughly 80 to 100 labor hours for the complete project. A motivated, skilled two-person build team can work through the structural phases using this baseline schedule:
Weekend 1 (Days 1–2) – Complete site excavation, gravel bed compaction, skid leveling, floor joist framing, and subfloor sheathing installation.
Weekend 2 (Days 3–4) – Complete wall stud layout, header construction, wall frame assembly, wall raising, and ridge and rafter roof framing installation.
Weekend 3 (Days 5–6) – Complete roof sheathing installation, weather wrap application, drip edge flashing, and shingle installation.
Weekend 4 (Days 7–8) – Complete siding panel installation, exterior trim fitting, door mounting, and final paint application.
Weather, material delivery, site conditions, and how quickly you’re comfortable working at height can move the schedule around.
How to Safely Raise 16-Foot Framed Walls (Crew vs. Wall Jacks)
A fully assembled 16-foot side wall framed from 2×4 dimensional lumber at 16 inches on-center, with double top plates, corner framing, and rough opening headers, weighs well over 300 pounds. That’s not something I’d casually lift with one other person.
I’ve seen people get into trouble because the wall felt manageable while it was flat. The moment it starts coming upright, the leverage changes completely. A gust of wind makes the situation worse.
Bring three additional crew members for wall-raising day, or use two mechanical wall jacks rated for timber framing and properly secured to the floor joists.
As soon as the 16-foot wall reaches a true 90-degree vertical position, have someone immediately secure a 2×4 diagonal brace from the top wall plate to the outer rim joist of the floor deck. Get the wall plumb and rigid before anyone lets go.
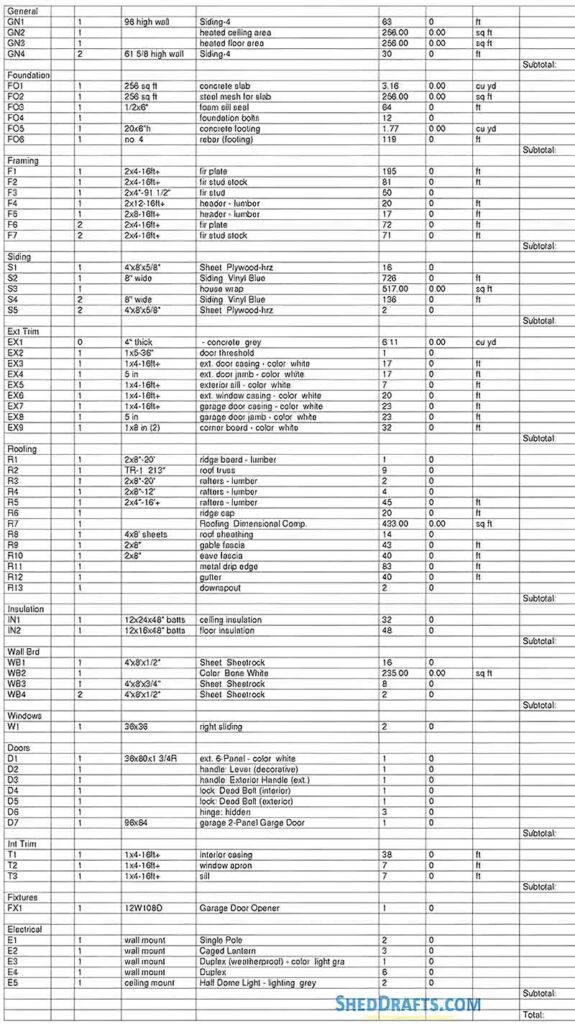
Bill of Materials


Framing-to-Finish Roadmap: DIY Guides For Every Step of The Build