10×12 Hip Roof Storage Shed Dormer Plans With Materials List
Check out these 10×12 hip roof storage shed dormer plans for building a elegant garden shed in your patio. You could include extras like skylight, electricity, and even an air conditioner in your hip roof shed plans based on your unique needs.
Writing down a collection of all materials that would be required for constructing can certainly help you estimate your expenditures in advance. Determine length of diagonals just after creating the roof framework to make sure it is correctly square.
Shed architecture schematics are very helpful if you are a homeowner who likes to assemble structures with his own hands. This building uses a LVL (Laminated Veneer Lumber) header system, vinyl windows, and fiber cement siding to make it more durable.
You can change the structural elements based on your choice and budget. Our design includes an 8-foot overhead door, a service door, and several casement windows, which provide ample sunlight and ventilation into the shed.
Step 1. Build The 10×12 Foundation For Your Hip Shed
Select a level, well-drained site approximately 10×12 feet, plus perimeter clearance. Remove turf using a sod cutter and excavate to a depth that allows for a 4-inch concrete slab thickening to 7 inches at the edges.
Grade the sub-base with a 3-inch sand cushion for drainage and stabilization. Use 2×8 lumber for the concrete forms, securing them with stakes every 4 feet and at all corners. Level and square the forms by checking diagonal measurements—equal diagonals confirm squareness.
Trim stake tops flush with the form edges. If your soil remains damp, lay a vapor barrier beneath the slab to prevent moisture migration.
Step 2. Frame The Walls
Snap chalk lines 3½ inches from the slab’s outer edge to indicate the inner wall lines. Cut pressure-treated 2×4 sole plates and standard SPF 2×4 top plates to length for each wall.
Mark the stud, window, and door openings on the plates simultaneously to maintain alignment. Standard wall studs are cut to 88½ inches, producing a wall height of approximately 93 inches after assembly.
Assemble the back wall first. Nail studs to plates using 16d sinker nails. Frame window and door openings with double 2×6 headers and trimmer studs beneath each header.
Use cripple studs below window sills to complete the framing pattern. Once framed, lift the wall into place, plumb it with a 4-foot level, and brace it diagonally. Repeat the process for side and front walls, ensuring corner joints are fastened with 16d nails through both plates.
After all walls are up and braced, install 2×4 tie plates across the top to connect adjoining walls. Overlap each corner joint by at least 3½ inches. These tie plates ensure structural continuity and serve as rafter bearing points later. Fasten walls to the foundation using washers and nuts on the embedded anchor bolts.
The large overhead door requires a double LVL (Laminated Veneer Lumber) header, each ripped down to 9 inches to maintain the correct rough opening height (84 inches). Notch each header end 1½ x 3½ inches to fit around sidewall tie plates.
Support the LVLs temporarily with 2×4 header-support walls, then glue and nail the LVL pair together using construction adhesive and 16d sinkers every 16 inches. Install Simpson LSTA18 steel straps and nail them across key wall joints and header supports for lateral rigidity.
Step 3. Craft The Four-Sided Roof
Mark rafter layout lines on the tie plates starting from each wall’s center and spacing them 16 inches on center. The roof uses 2×6 rafters and a 2×8 ridge board, designed for a 10/12 pitch.
Cut three common rafters using a single full-size pattern to maintain accuracy. The bird’s-mouth cut should seat snugly over the tie plates. Attach the two front side rafters to the ridge board and raise the ridge with a helper. Once plumb, toenail the rafters into position and secure them to the wall plates using Simpson A23 angle brackets and 10d nails.
Four hip rafters, two with left-hand bevels and two with right-hand bevels, extend from the corners to the ridge intersection. Use the hip/val scale on a speed square at the 10 mark (around 31°) for cheek cuts and set the saw to a 45° bevel. Nail hips to the ridge and tie plates with 10d nails and reinforce them with A23 brackets.
Jack rafters are shortened versions of the common rafters, spaced 16 inches on center along each hip. They carry a 45° bevel cut on the top end and the same bird’s-mouth and tail cuts as the common rafters. Toenail each jack into the hip carefully to avoid deflection
Install double jack rafters on each side of the dormer to form the dormer walls. Frame the gable ridge header (2×6, 63⅞ inches) between hip rafters, and install gable face rafters sloping at the same 10/12 pitch. Fasten a 42-inch rafter tail header across the front below the dormer opening. Attach rafter tails (23⅞ inches) to this header using 3-inch deck screws from the backside.
Step 4. Sheath And Cover The Roof
Sheathe the main roof with ½-inch CDX plywood, nailing with 8d sinkers every 6 inches along the rafters. Leave a 1/8-inch gap between sheets for expansion.
Trim the sheathing flush with a chalk line set slightly short of the hip centerline, cutting at approximately 15° for alignment. Continue sheathing the dormer and side walls, extending each sheet ⅜ inch below the sole plate to overlap the concrete slab seam.
Install metal drip edge along all eaves and rake edges, then cover the roof deck with 15-lb. asphalt-saturated roofing felt, overlapping rows by 2 inches. Lay the first course of shingles upside down, flush with the drip edge to act as a starter strip. Apply successive courses with 5-inch exposure, nailing with 1-inch roofing nails.
The first seven courses should be nailed into rafters only to avoid exposed fasteners on the underside of overhangs.
Once the front roof sheathing is in place, add ½-inch CDX plywood to the dormer walls and roof. Extend the front dormer roof sheathing 12 inches to create an overhang, supported later by decorative brackets.
Step 5. Install Windows and Doors
Before installing windows, wrap all rough openings with building paper (felt) or flashing tape to prevent water seepage. Shim windows level and plumb within openings and fasten through the manufacturer’s nailing flanges.
Install the 32-inch prehung service door, ordered 2 inches shorter than standard height to clear the overhead door track. Secure it with Tapcon fasteners into the slab and frame with 2×4 jamb extensions. The front overhead door is supported by the LVL header and mounted using professional-grade hardware.
Step 6. Install Wall Sheathing, Siding, and Trim
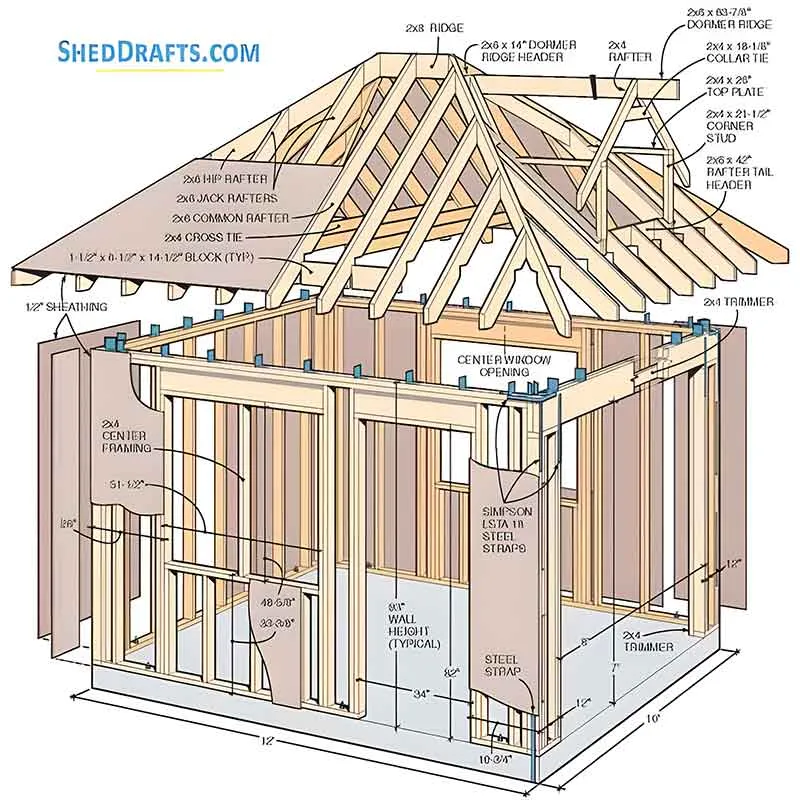
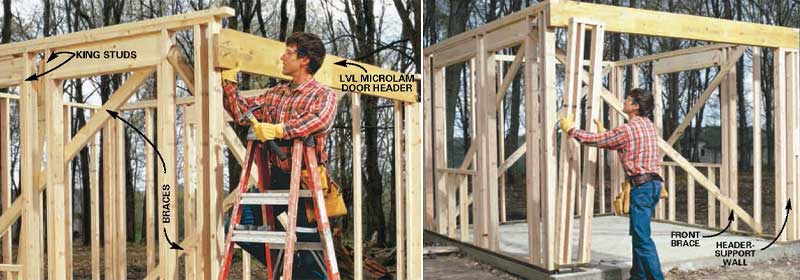
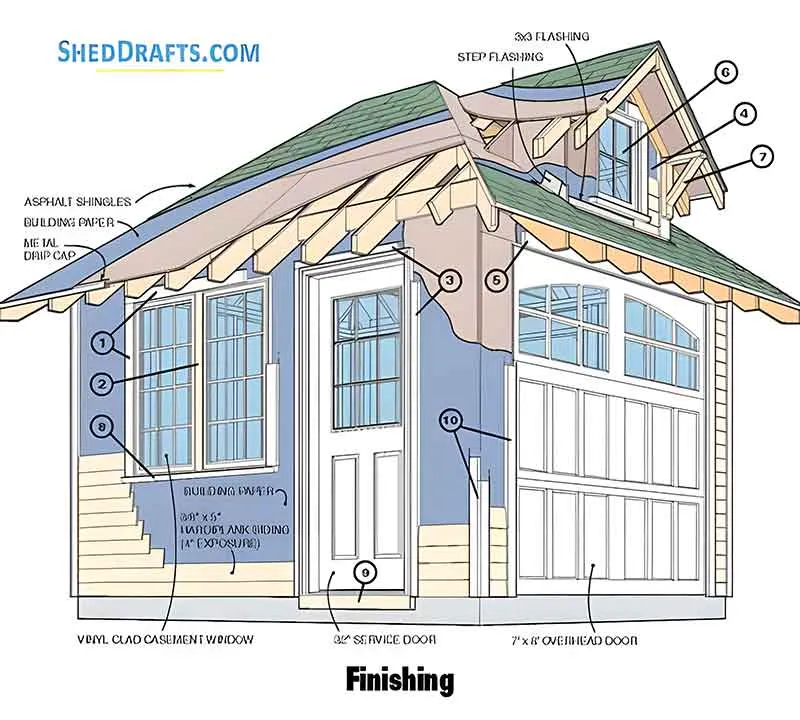
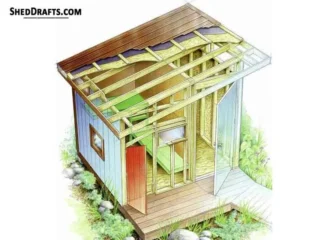
Attach ½-inch CDX plywood wall sheathing flush to top plates and extending ⅜ inch below sole plates. Nail every 6 inches along framing members. Install the remaining Simpson 18-inch steel straps over the front header support walls for added racking resistance.
Staple 15-lb. building felt or modern house wrap over the sheathing, overlapping seams 4 inches. Cut and wrap around windows and doors for a watertight barrier.
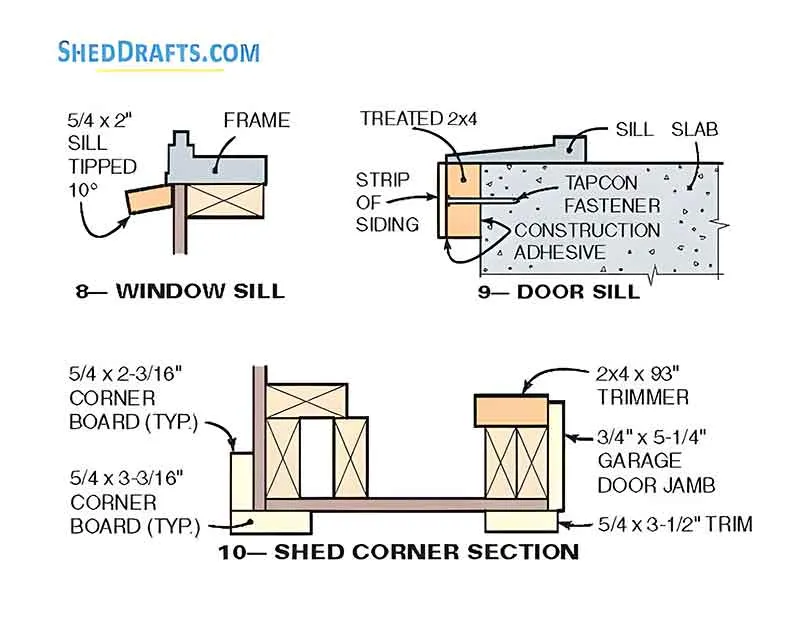
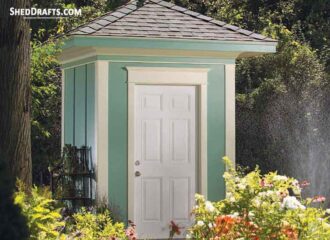
Use Miratec 5/4 composite trim boards, which are preprimed and weather-resistant. Rip lower corner boards to 3-3/16 inches and 2-3/16 inches, overlapping for a beveled corner.
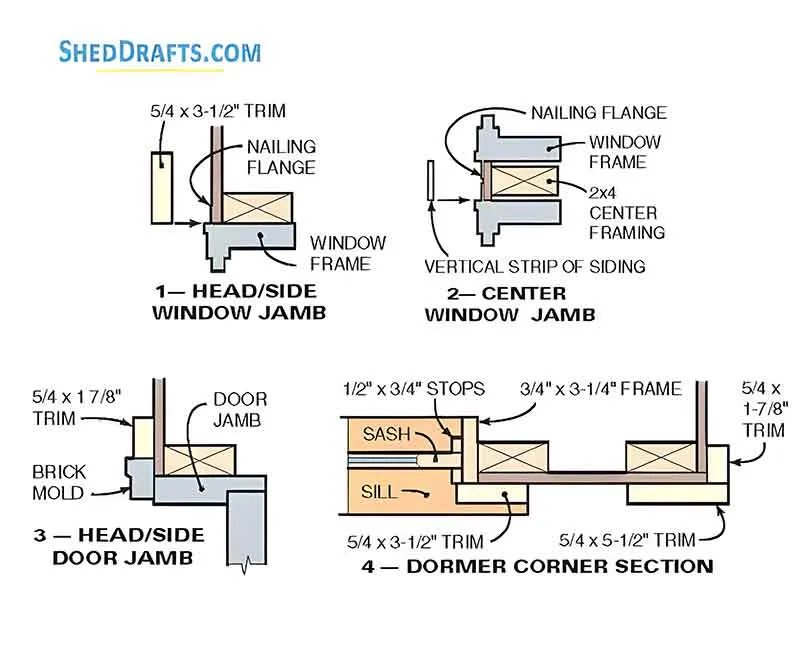
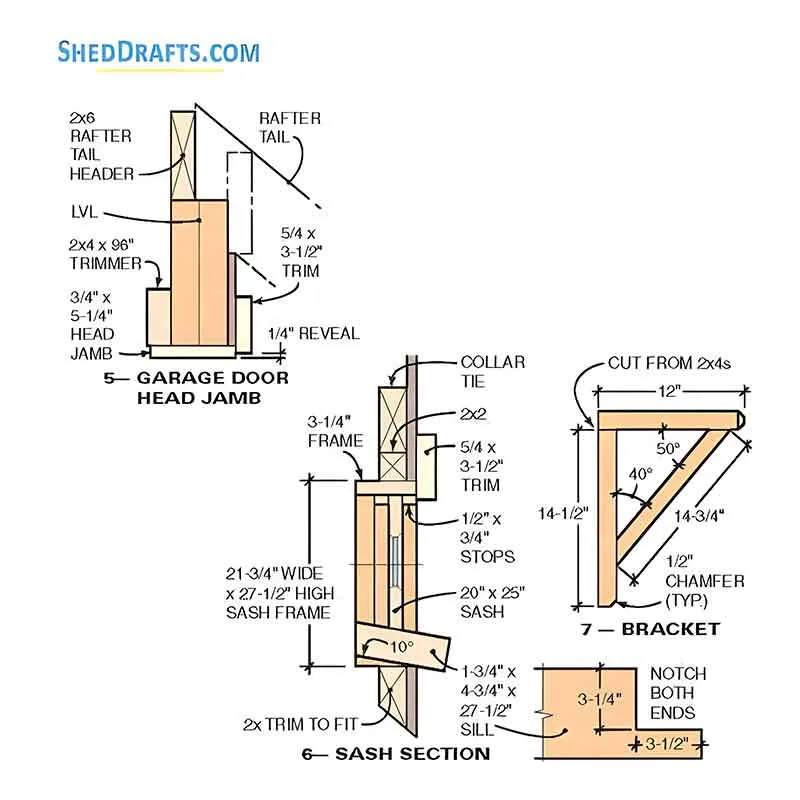
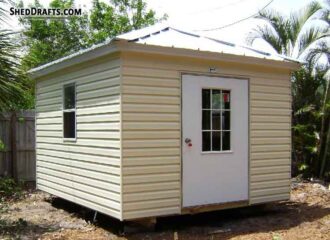
Install 3½-inch trim around windows and doors, maintaining a ¼-inch reveal on jambs. For the overhead door, fabricate jambs from 1×6 pine, ripped to 5¼ inches, and secure to framing with 10d galvanized casing nails.
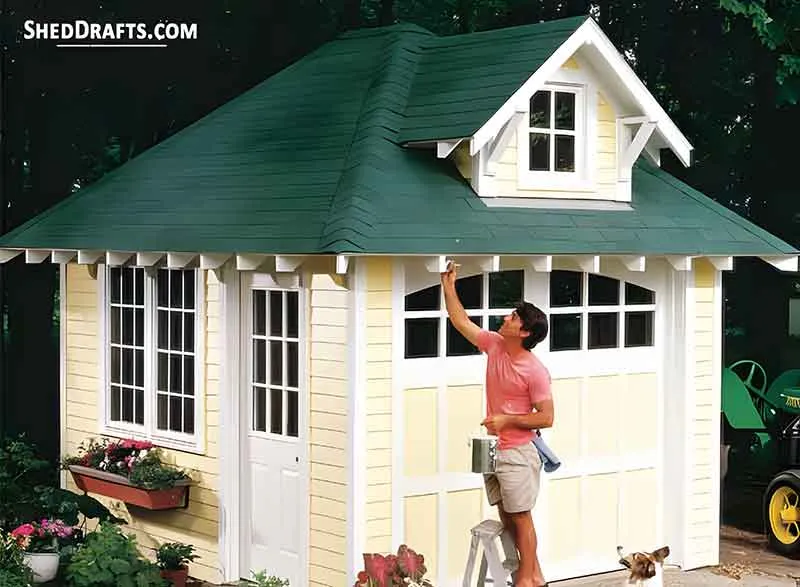
Install fiber cement siding (Hardiplank) with 4-inch exposure. Use a story pole marked in 4-inch increments to maintain consistent course spacing around the structure. Start at the base with a 5/16-inch beveled starter strip. Nail each course into studs using 7d galvanized nails driven flush within the top 1 inch of each board, so subsequent rows conceal nail heads.
Maintain a ⅛-inch gap at trim joints for expansion.
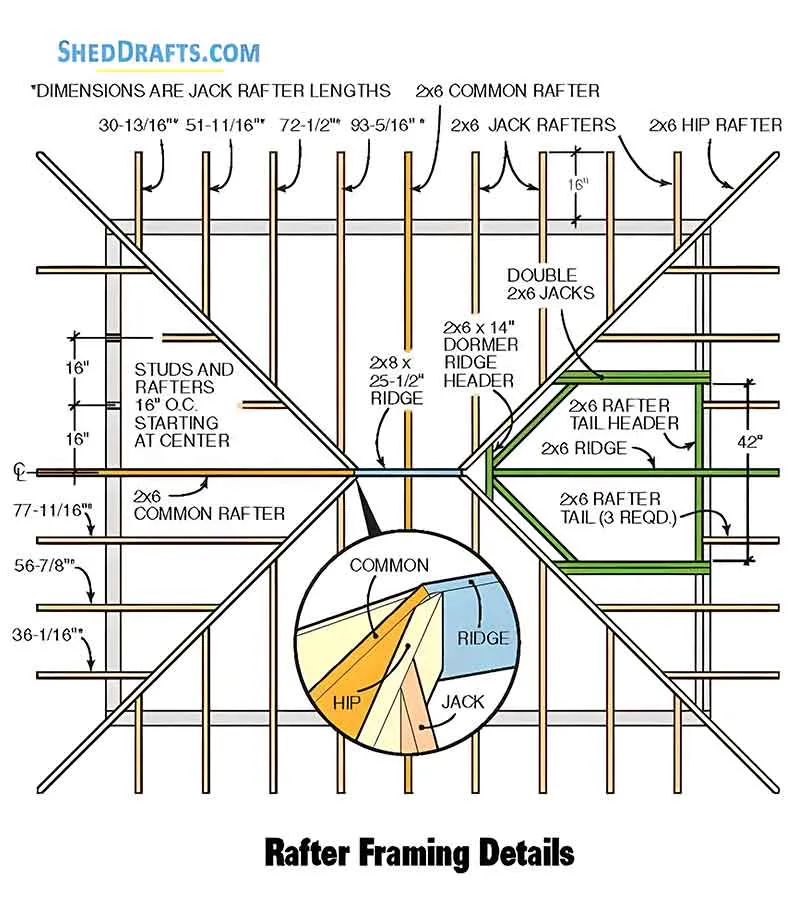
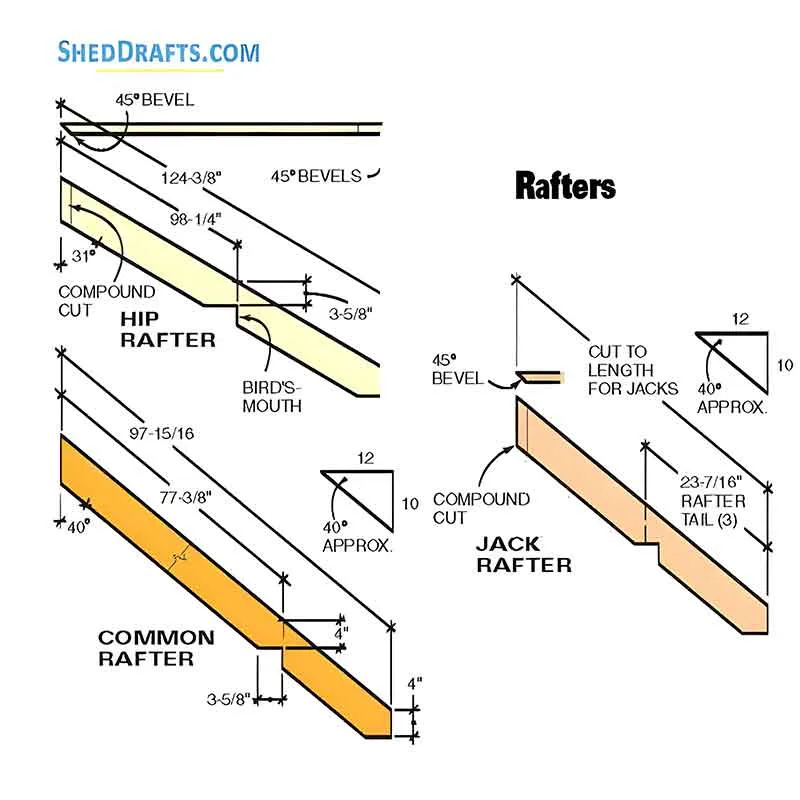
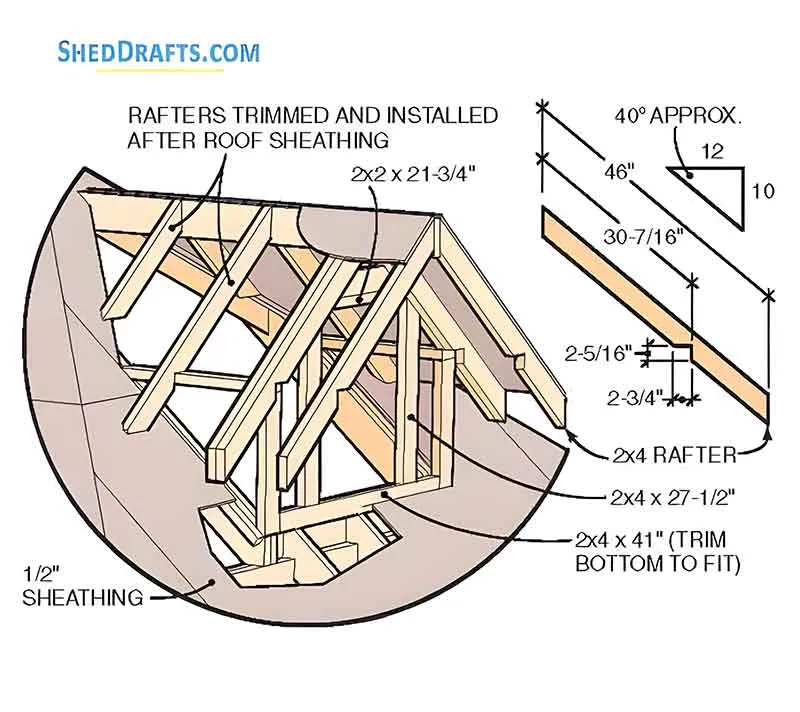
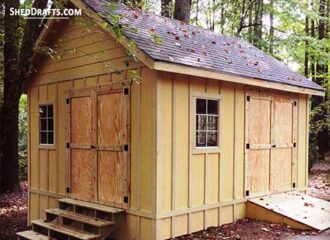
Rip 2×8 blocks to 6½ inches wide and install them between rafter tails to close off the eaves, nailing with 10d galvanized casing nails. Cut and install decorative gable overhang brackets, notching them to fit under the dormer fly rafters.
Secure them with 3-inch deck screws through both the trim and the fly rafters.
Step 7. Finish and Paint
Prime all cut edges of fiber cement and Miratec trim with exterior-grade primer. Caulk all joints and gaps using urethane-based exterior caulk.
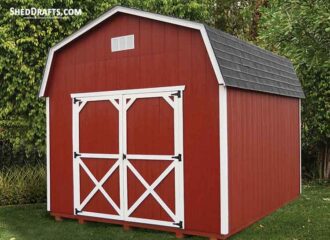
Apply two coats of satin latex exterior paint to the siding and trim for weather protection and aesthetic appeal. Use color contrast to highlight architectural details such as window trim and brackets.
Materials List
- 2¼ cubic yards of concrete mix
- 8 pieces of #4 (½”) rebar, 12 ft length
- 1 roll (10×25 ft minimum) of 6-mil polyethylene plastic sheeting (vapor barrier)
- 2 pieces of 2×8 lumber for concrete forms (14 ft)
- 2 pieces of 2×8 lumber for concrete forms (10 ft)
- 12–15 wooden stakes (2x4s, cut to 16–24″ lengths)
- 12 Concrete anchor bolts, ½” x 6″
- 1 lb. box of Form nails or screws for assembly
- 55 pieces of 2x4x8′ lumber or precut studs
- 2 pieces of 2x4x10′ lumber (for top plates and tie plates)
- 9 pieces of 2x4x12′ lumber (for top plates and diagonal bracing)
- 3 pieces of 2x4x12′ Pressure-Treated (for bottom/sole plates)
- 2 pieces of 2x6x14′ lumber (for window and door headers)
- 2 pieces of LVL beams, 1¾” x 9½” x 10′ (for double overhead door header)
- 1 tube construction adhesive (for laminating LVLs)
- 20 sheets (4×8′) of ½” CDX plywood (for wall and roof sheathing)
- 10 pieces of Simpson LSTA18 steel straps (18″ long)
- 38 pieces of Simpson A23 steel angle brackets
- 4 boxes of Simpson Strong-Drive screws (for brackets)
- 4 pieces of 2x6x12′ lumber (for rafters)
- 20 pieces of 2x6x10′ lumber (for common, hip, and jack rafters)
- 1 piece of 2x8x3′ (ridge board)
- 6 pieces of 2x4x8′ lumber (for dormer framing, corner studs, brackets, fly rafters)
- 2 pieces of 2x2x8′ lumber (for dormer cleats and supports)
- 1 piece of 2x6x14″ (for dormer ridge header)
- 1 piece of 2x6x42″ (for rafter tail header)
- A23 angle brackets
- 1 lb. box of 3″ exterior deck screws
- 2 rolls of asphalt roofing felt
- 450 sq ft of Asphalt shingles (standard 3-tab)
- 6 pieces (10 ft each) of Metal drip edge
- 10 lbs. of 1″ length galvanized roofing nails
- 1 box of ½” staples for roofing felt
- 60 boards of 5¼” wide cement fiber lap siding
- 5 lbs. of 7d galvanized siding nails (1½”–1¾”)
- 4 tubes of Urethane exterior caulk
- 1 quart of primer for cut edges
- 3 pieces of 2x8x8′ lumber (ripped to 6½” for bird blocking between rafters)
- 8 pieces of 5/4x6x12′ boards (for corner boards, window trim, door trim, gables)
- 6 pieces of 5/4×3½x12′ boards (for door and window trim)
- 4 pieces of 5/4×5½x12′ boards (for gable and fascia trim)
- 3 pieces of 1x6x8′ pine boards (for overhead door jambs)
- 3 pieces of ¾”x5¼” head jamb trim (window/door tops)
- 4 pieces of ¾”x3¼” sash frame trim (for dormer window)
- 2 pieces of 5/4×2″ sill stock (for window sills)
- 4 pieces of decorative gable overhang brackets
- 16 exterior deck screws (for brackets)
- 4 pieces of 2’x4′ vinyl-clad casement or double-hung windows
- 20″x25″ plastic barn sash window (for dormer)
- 1x4x10′ stock for dormer sash framing
- 32″ prehung exterior wood door (order 2″ shorter than standard height)
- 7’x8′ wood or steel overhead roll-up door
- Door lockset and deadbolt
Tools Needed
- Circular saw (with carbide and diamond blades)
- Power drill/driver and impact driver
- Portable table saw
- Hammer, speed square, framing square, chalk line, and level
- Masonry tools (bull float, edger, trowel)
- Ladders (8 ft and 10 ft stepladders)
- Roof jacks and scaffolding planks
- Safety gear (gloves, goggles, dust mask, hearing protection)
Building a 10×12 hip roof shed can be a complex DIY project. It is only suitable for an experienced builder familiar with framing and roofing techniques. The key to the success of this shed project lies in accurate layout, square framing, and consistent roof geometry.
DIY Guides For Each Stage Of Shed Construction
These detailed guides help you find out all you need to know about shed construction before you start work.